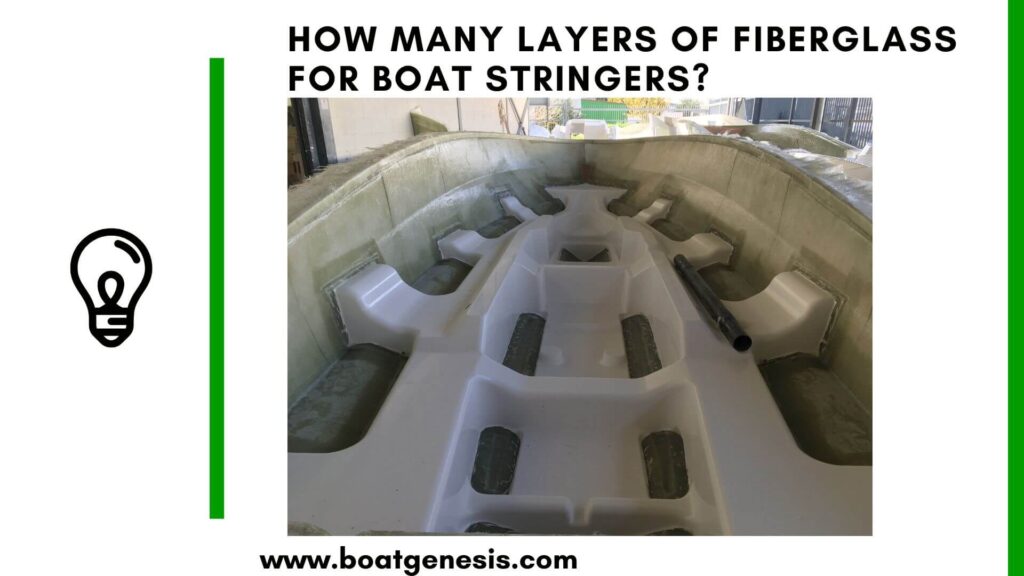
Boat stringers need the right amount of fiberglass to stay strong and support your hull properly. When you’re repairing or building stringers, you need to know how much material to use to avoid weak spots or wasted effort.
Most boat builders recommend using three layers of biaxial fiberglass cloth on wooden stringers for proper strength and durability. The exact number can vary based on your boat’s size and how much stress the stringers will handle. Some repairs might need four to five layers if you’re fixing damaged areas or need extra thickness.
The type of fiberglass you choose matters just as much as how many layers you apply. Biaxial 1708 cloth is commonly used for stringers because it provides excellent strength and works well with epoxy or polyester resin. Understanding the right layering process will help you build stringers that last for years without rot or crushing.
Key Takeaways
- Three layers of biaxial fiberglass cloth typically provides adequate strength for most boat stringers
- The type of fiberglass material and resin you select affects the final strength of your stringers
- Proper preparation and layering techniques prevent future problems like rot and structural failure
- Key Takeaways
- Purpose of Stringers in Boat Construction
- Types of Stringers: Wood, Composite, and Alternatives
- Role of Stringers in Structural Integrity
- Stringer Core Material and Size
- Boat Size and Intended Use
- Selection of Fiberglass Materials
- General Guidelines for Layer Thickness
- Differences Between 2, 3, and More Layers
- Choosing Between Polyester and Epoxy Resins
- Fiberglass Cloth, Mat, and Woven Roving Comparison
- Step-by-Step Lamination Process
- Glass Tabbing for Stringer Attachment
- Avoiding Common Lamination Mistakes
- Surface Preparation and Cleaning
- Fitting Stringers and Creating Fillets
- Checking for Voids and Adhesion
- Preventing Moisture Intrusion
Understanding Boat Stringers and Their Importance
Stringers run lengthwise through your boat’s hull to distribute weight and maintain structural shape. The materials and design of these components directly affect your vessel’s strength and lifespan.
Purpose of Stringers in Boat Construction
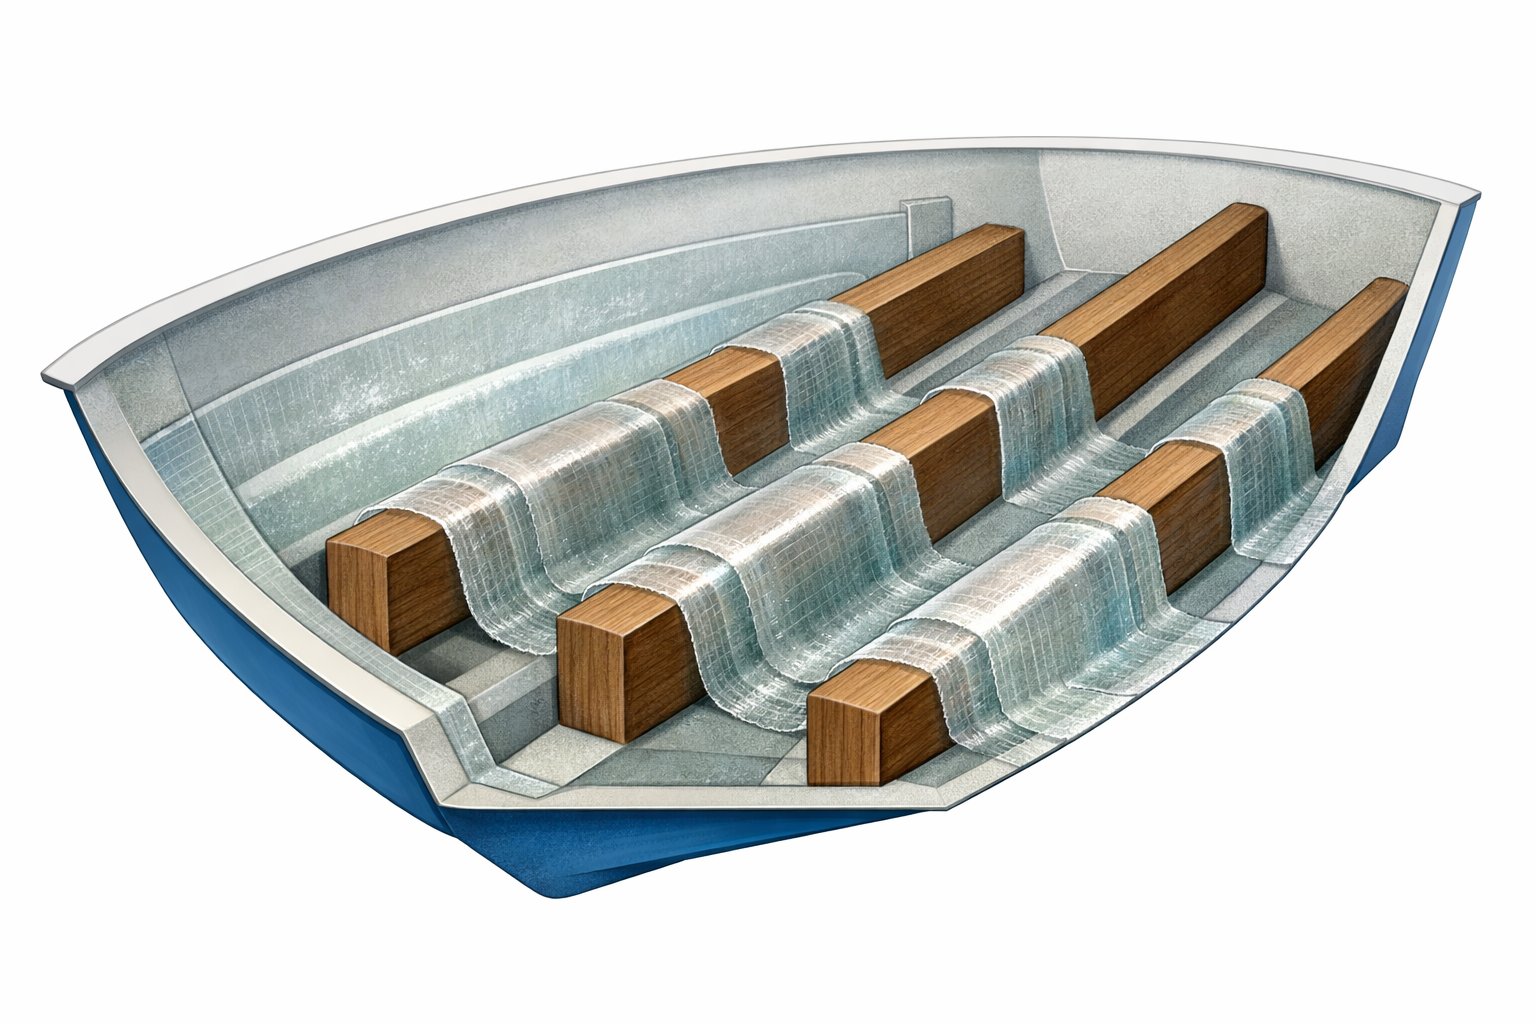
Stringers are key parts inside a boat’s hull that work like beams to support the entire structure. They run from bow to stern along the bottom of your boat.
These components distribute weight evenly across your hull. When you add passengers, gear, or an engine, stringers prevent stress from concentrating in one spot. They transfer forces throughout the hull instead of letting specific areas bear all the load.
Your boat’s shape stays consistent because stringers resist bending and flexing. Without them, the hull would twist under normal use. They also provide mounting points for your deck, bulkheads, and floor.
The location and number of stringers depends on your boat’s size and design. Smaller vessels might have two or three stringers, while larger boats need more for adequate support.
Types of Stringers: Wood, Composite, and Alternatives
Wood stringers have been used for decades in boat construction. Douglas fir and marine-grade plywood are common choices. You’ll find these materials are affordable and easy to work with during repairs.
Composite stringers combine wood cores with fiberglass encapsulation. In the 1970s and 1980s, the common practice shifted to encapsulating wood cores in layers of fiberglass and resin. This method protects the wood from moisture while maintaining structural benefits.
Fully structural fiberglass stringers contain no wood at all. These modern designs eliminate rot concerns entirely. They cost more initially but require less maintenance over time.
Each type has specific advantages. Wood stringers are lighter and easier to customize. Composite versions balance protection with traditional construction methods. Full fiberglass stringers offer maximum durability in harsh marine environments.
Role of Stringers in Structural Integrity
Your boat’s hull and deck rely on stringers to maintain their connection. These components act as the spine between upper and lower structures. They prevent the hull from deforming when you encounter waves or carry heavy loads.
Stringers handle multiple stress types simultaneously. They resist compression from weight pressing down and tension from the hull flexing upward. Side-to-side forces from turning also pass through these supports.
When stringers fail, serious problems develop quickly. Soft spots appear in your deck where support has weakened. The hull may develop cracks or separation from the deck. Your boat becomes unsafe to operate until you complete repairs.
Understanding what stringers do and why they matter helps you maintain your vessel properly. Regular inspections catch moisture damage before it compromises strength. Addressing small issues prevents costly full replacements later.
Want to avoid costly fiberglass boat repair mistakes?
Learn how to inspect damage properly, decide when to DIY, and prevent expensive fiberglass problems before they start.
Key Factors Affecting Number of Fiberglass Layers
The number of layers of fiberglass you need for boat stringers depends on the core material you’re working with, the size and purpose of your boat, and the type of fiberglass materials you choose. Each of these factors directly impacts the strength and durability of your stringers.
Stringer Core Material and Size
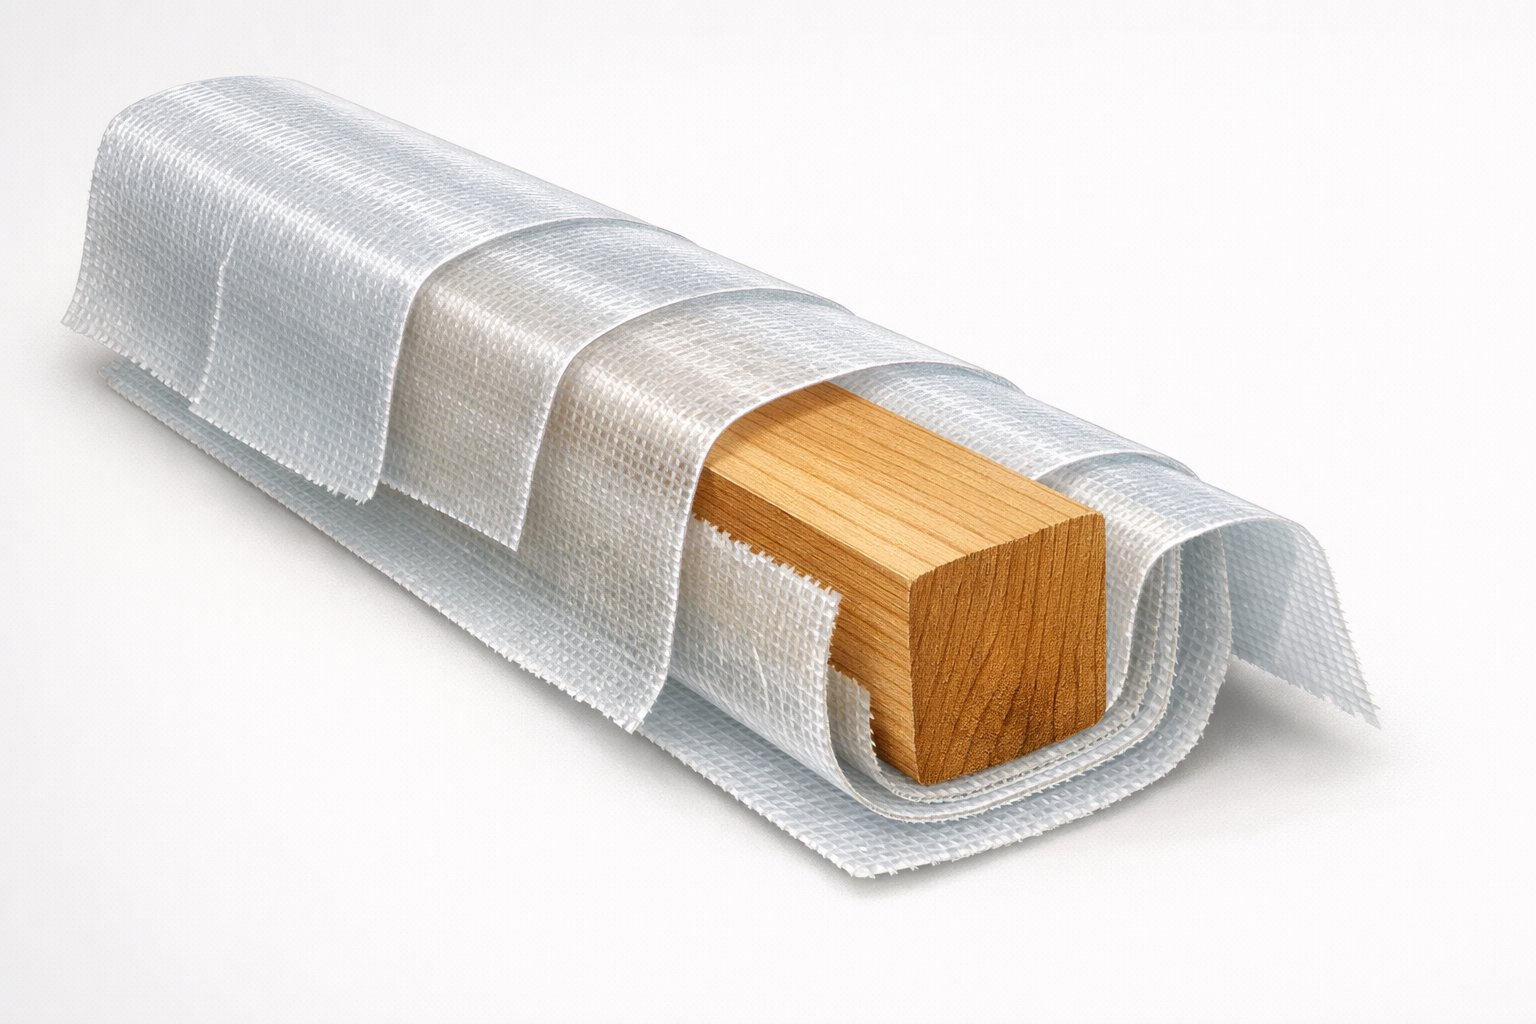
The core material of your stringers determines how many layers of fiberglass you’ll need to apply. Wood stringers typically require a minimum of two to three layers of fiberglass cloth on all exposed surfaces for basic protection and waterproofing.
If you’re using solid wood cores, you’ll need fewer layers than if you’re building stringers from scratch with foam or other lightweight materials. The dimensions of your stringers also matter. Larger stringers that measure 4 inches or more in width can handle more layers without becoming too rigid.
Boat stringers built with composite cores need additional layers because the fiberglass provides structural strength rather than just protection. You should plan for at least three to four layers when the fiberglass serves as a structural component.
The thickness of each layer adds up quickly. You need to account for the wet-out ratio and how the resin saturates each layer of cloth.
Boat Size and Intended Use
Your boat’s size and how you plan to use it directly affect stringer reinforcement needs. Small boats under 16 feet that stay in calm waters can use fewer layers than larger vessels.
Boats designed for rough water or high-speed use need stronger stringers with more layers of fiberglass. A boat that regularly encounters waves and impacts requires at least one additional layer beyond the minimum.
The weight your boat will carry matters too. Heavier loads create more stress on stringers, which means you need more reinforcement. Building a boat for shallow rivers with minimal stress requires fewer layers than one designed for ocean use.
Selection of Fiberglass Materials
The type and weight of fiberglass cloth you choose changes how many layers you need. Heavier cloth weights like 10-ounce or 12-ounce fabrics provide more strength per layer than lighter 4-ounce or 6-ounce materials.
Biaxial fiberglass cloth builds thickness faster than plain weave fabrics because of its construction. You can calculate layers needed by dividing your target thickness by the thickness of a single cured layer.
Different manufacturers produce cloth with varying thicknesses and properties. You should test your specific materials before starting your project to ensure accurate layer counts.
Recommended Fiberglass Layer Counts for Stringers
Most boat stringer repairs require between 2 and 5 layers of fiberglass, with the exact number depending on your boat’s size and the type of fiberglass material you choose.
General Guidelines for Layer Thickness
You need a minimum of two layers of fiberglass for basic stringer coverage. Three layers provide better strength than the absolute minimum.
For most repairs, 4 to 5 layers of fiberglass work well depending on how thick you want your stringers. The type of material affects how many layers you need. Heavier materials like 1708 biaxial fabric require fewer layers than lighter fiberglass mat.
When using woven roving, you typically need fewer layers than when working with chopped strand mat. Each layer should cure or at least gel before you add the next one. Your first layer should extend several inches beyond the repair area to create proper tabbing connections.
Differences Between 2, 3, and More Layers
Two layers give you the bare minimum protection for your stringers. This works only for small boats with light loads.
Three layers offer significantly more strength and durability. This setup handles moderate boat sizes and regular use conditions better than two layers.
Four to five layers create the strongest stringer repairs. You need this many layers for larger boats, high-stress areas, or when you want maximum durability. Each additional layer adds thickness and impact resistance.
Layer recommendations by boat size:
- Small boats (under 14 feet): 2-3 layers
- Medium boats (14-20 feet): 3-4 layers
- Larger boats (over 20 feet): 4-5 layers
The material weight matters too. Heavier woven roving builds thickness faster than lighter fiberglass mat, so you can use fewer layers with heavier fabrics.
Best Materials for Laminating Stringers
The resin you choose affects waterproofing and strength, while the type of fiberglass fabric determines how easily you can work with it and how much structural support it provides. Each material has specific advantages that make it better suited for different parts of the stringer repair process.
Choosing Between Polyester and Epoxy Resins
You can use polyester, vinyl ester, or epoxy resin for laminating boat stringers. Polyester resin costs less than other options and works well for basic repairs. It cures with a tacky surface that needs surfacing wax added to the final layer for a hard finish.

This guide helps boat owners understand fiberglass damage clearly — what matters, what doesn’t, and when repairs are truly necessary, so small issues don’t turn into expensive mistakes.
See What Every Boat Owner Should Know →Epoxy resin and vinyl ester resin offer better waterproofing than polyester resin and create stronger bonds. Epoxy provides the strongest adhesion and moisture resistance of all three types. It cures hard without tackiness, so you don’t need to add wax to the final coat.
Vinyl ester sits between polyester and epoxy in terms of cost and performance. It resists water better than polyester but costs less than epoxy. All three resin types work with common fiberglass fabrics, so your choice depends on your budget and how much waterproofing you need.
Fiberglass Cloth, Mat, and Woven Roving Comparison
Fiberglass comes in several forms that serve different purposes. The 1708 biaxial fabric is popular for stringer work because it combines 17 ounces of woven material with 8 ounces of chopped strand mat stitched together. This heavier weight fabric builds thickness quickly and provides good strength.
Chopped strand mat (CSM) works well with polyester and vinyl ester resins but should not be used with epoxy. It adds bulk and fills gaps easily. Woven roving provides more strength than mat but takes longer to wet out with resin.
Common Fiberglass Options:
- 1708 Biaxial: Best all-around choice for stringers, fast application
- Chopped Strand Mat: Good for filling and bulk, works only with polyester/vinyl ester
- Woven Roving: High strength but harder to work with on vertical surfaces
- Plain Weave Cloth: Easiest to conform to shapes, lighter weight
You typically need 2-5 layers depending on stringer thickness requirements. The 1708 fabric lets you build up thickness faster than lighter materials.
Techniques for Laminating and Tabbing Stringers
Proper lamination requires careful attention to layer sequence and material placement. The way you apply fiberglass tape to bond stringers to the hull directly affects the strength and longevity of your repair.
Step-by-Step Lamination Process
Start by coating your stringers with two coats of resin before installation. This seals the wood and prevents moisture from entering through exposed edges.
Mix your resin according to package instructions and work in small batches to prevent premature curing. Apply each layer of 1708 biaxial cloth while the previous layer is still tacky for better bonding between laminates.
You may need 4-5 layers of fiberglass depending on your desired thickness. Use a plastic spreader or roller to remove air bubbles and ensure proper resin saturation. Work from the center outward to push trapped air toward the edges.
Allow each complete set of layers to cure according to the resin manufacturer’s specifications before adding more material or grinding the surface.
Glass Tabbing for Stringer Attachment
Set your stringers in silica putty before applying tabbing. Create a fillet along the edges where the stringer meets the hull to eliminate sharp corners that cause stress concentrations.
Apply your first layer of tabbing running 4 inches up the stringer and onto the hull. The second layer should extend 6 inches onto the hull. This staggered approach prevents shear failures at a single location.
Common tabbing configurations include:
- 8-6-4 inches with 2-inch minimum overlaps
- 8-6-6 inches for heavier loads
- 6-6-4 inches for smaller vessels
Two layers of 1708 biaxial provide adequate strength for most recreational boats. Three layers offer additional security for larger vessels or high-stress applications.
Avoiding Common Lamination Mistakes
Lay your largest pieces first and work toward the smallest. This prevents fiber bridging and reduces resin-rich areas where smaller pieces would force larger ones to span gaps.
When you place small layers first, the fibers bend sharply over edges and create voids that fill with excess resin. These resin-rich zones are weaker than properly proportioned laminates.
Don’t let excess resin pool in corners or along edges. Use only enough resin to fully saturate the glass cloth without creating puddles. Work air bubbles out immediately with a roller or squeegee before the resin begins to gel.
If you grind between layers, clean the surface thoroughly to remove dust and loose fibers. This ensures proper bonding between successive applications of glass tabbing.
Preparing Stringers for Fiberglass Encapsulation
Proper preparation ensures the fiberglass bonds well to the wood and creates a waterproof seal. You need to seal the wood and clean all surfaces before applying any glass layers.
Surface Preparation and Cleaning
You must seal wood stringers before applying fiberglass to prevent moisture absorption. Apply a penetrating epoxy sealer to all wooden surfaces first. This step stops the wood from soaking up your laminating resin later.
Cabinet grade plywood is not the best choice for boat stringer construction. The glue used in cabinet plywood is not fully waterproof. Marine grade plywood works better because it uses waterproof adhesive between layers.
Clean the hull surface where stringers will sit. Remove all dust, oil, and dirt. Sand the gelcoat lightly to help the resin stick better. Wipe everything down with acetone or denatured alcohol.
Cut limber holes in the stringers before installation. These holes let water drain through the stringer system instead of pooling.
Fitting Stringers and Creating Fillets
Set the stringers to the hull using bonding putty or thickened epoxy. Apply the mixture to the bottom of each stringer. This fills small gaps between the wood and hull.
Weight or brace the stringers to keep them vertical and parallel during the cure. Check that each stringer stands at 90 degrees to the hull. Use a level to verify alignment.
Create fillets along both sides where the stringer meets the hull. Mix resin with a thickening agent like cabosil or milled fibers. Apply the mixture with a tongue depressor or putty knife. Shape smooth fillets at least one inch tall on each side. This creates a gradual transition for your tabbing layers to lay over without air pockets.
Maintenance and Inspection After Laminating
After you complete your stringer lamination, proper inspection ensures the strength and longevity of your repair. Regular checks help you catch problems early before they compromise your boat’s structure.
Checking for Voids and Adhesion
You need to inspect your laminated stringers within 24 hours after the resin fully cures. Tap the surface lightly with a coin or small hammer to listen for hollow sounds that indicate voids or delamination. A solid, uniform sound means good adhesion, while a dull thud signals air pockets or poor bonding.
Look closely at the edges where your fiberglass layers meet the hull. You should see no gaps or separation between the stringer and hull surface. Press firmly on different areas of the laminate to check for flex or movement.
Visual inspection reveals surface defects like dry spots where resin didn’t fully saturate the fabric. These appear as white or chalky areas in the laminate. You can also check for starved areas where insufficient resin left the fibers exposed.
If you find voids smaller than a quarter inch, you can drill small holes and inject epoxy resin. Larger voids require removing the affected section and re-laminating with proper technique.
Preventing Moisture Intrusion
You must seal all exposed edges and cut ends of your stringer laminate to block water entry. Apply at least two coats of epoxy resin to any raw fiberglass edges, especially where stringers meet bulkheads or floors.
Water absorption damages the core materials and weakens the bond between layers. Check your bilge regularly for standing water near the stringers. Install proper drainage so water doesn’t pool against the laminate.
Inspect the areas where hardware bolts through your stringers every six months. These penetrations are common entry points for moisture. Remove and reseal any fasteners that show signs of leaking or corrosion.
You should also examine the gelcoat or paint covering your stringers for cracks or chips. Even small breaks in the finish allow water to reach the laminate underneath. Touch up damaged areas promptly with marine-grade sealant or epoxy.

Warren is the founder of BoatGenesis and brings practical experience in fiberglass boat repair, marine equipment testing, and powerboat building. He has worked on a range of repair and restoration projects and now focuses on creating clear, research-based guides to help boat owners avoid costly mistakes and make smarter maintenance decisions. Learn more about Warren.