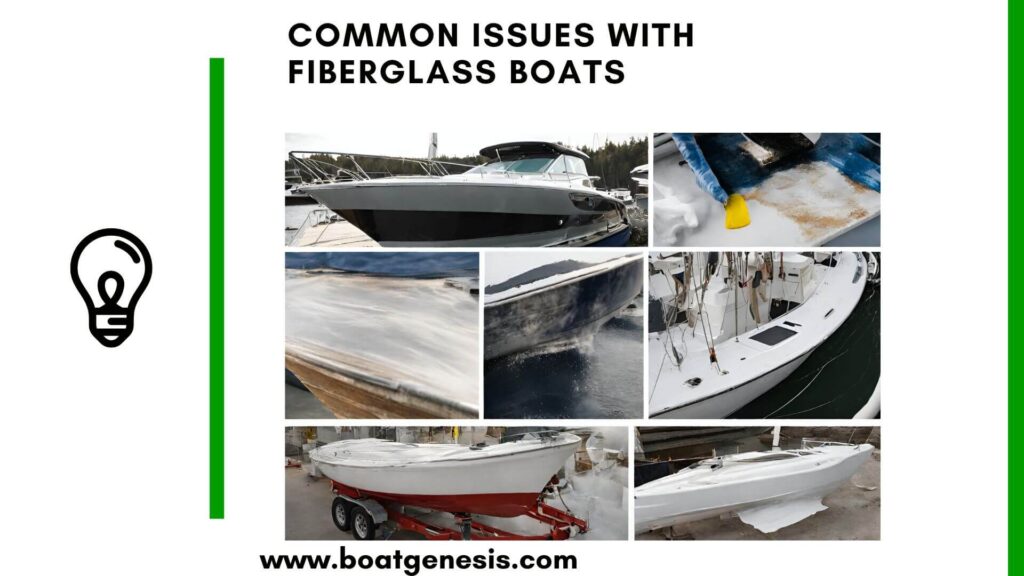
If you’ve ever stepped on your boat deck and felt that dreaded soft, spongy give underfoot, you already know something is wrong. Nine times out of ten, the culprit is rotting stringers — and fiberglass boat stringer replacement is the fix that will save your hull from the inside out.
Stringers are your boat’s structure. They run from bow to stern, transferring load from the deck down to the hull. When moisture creeps in — and it always finds a way — those wooden cores start to decay. Left alone, what starts as a soft spot turns into a full structural failure.
The good news? This is a project you can fix yourself. It’s not quick, and it’s not glamorous. You’ll be grinding fiberglass dust in a cramped bilge and mixing epoxy in the heat. But when it’s done, your boat will be solid again — and you’ll have saved thousands over a yard repair bill.
This guide walks you through the entire process, from spotting the early warning signs to laying up fresh fiberglass around brand-new stringers. Let’s get into it.
Key Takeaways
- Fiberglass boat stringer replacement is necessary when more than 25% of a stringer has rotted or snapped.
- Early signs include soft deck spots, creaking underfoot, and musty bilge smells.
- New stringers must be sealed, epoxy-bonded, and fully encapsulated in fiberglass — skipping any step leads to repeat failure.
- The job requires safety gear, power tools, marine-grade plywood, epoxy resin, and fiberglass cloth.
- Proper bilge ventilation after the repair is critical to prevent moisture from returning.
- Done right, DIY stringer replacement costs a fraction of professional yard repairs.
- Key Takeaways
- What Are Stringers and Why Do They Fail?
- Warning Signs Your Stringers Need Replacing
- Stringer Repair vs. Full Replacement: Which Do You Need?
- Tools and Supplies You'll Need
- Step-by-Step Fiberglass Boat Stringer Replacement
- Step 1: Clear the Workspace and Remove Decking
- Step 2: Support the Hull and Extract the Old Stringer
- Step 3: Grind and Clean the Bonding Surface
- Step 4: Test-Fit and Seal the New Stringer
- Step 5: Bond the Stringer Using Thickened Epoxy
- Step 6: Encapsulate the Stringer in Fiberglass
- Step 7: Reinstall Decking and Hardware
- Step 8: Maximize Bilge Ventilation
- DIY vs. Professional Repair: What Does It Actually Cost?
- Common Mistakes to Avoid
- Conclusion
- Frequently Asked Questions
- 1. How do I know if my stringers are rotten without tearing the boat apart?
- 2. Can I replace just one stringer, or do I need to do them all?
- 3. How long does fiberglass boat stringer replacement take?
- 4. Do I need fiberglass experience to do this job?
- 5. What type of wood should I use for replacement stringers?
- 6. Can I use polyester resin instead of epoxy?
- 7. How do I prevent the stringers from rotting again?
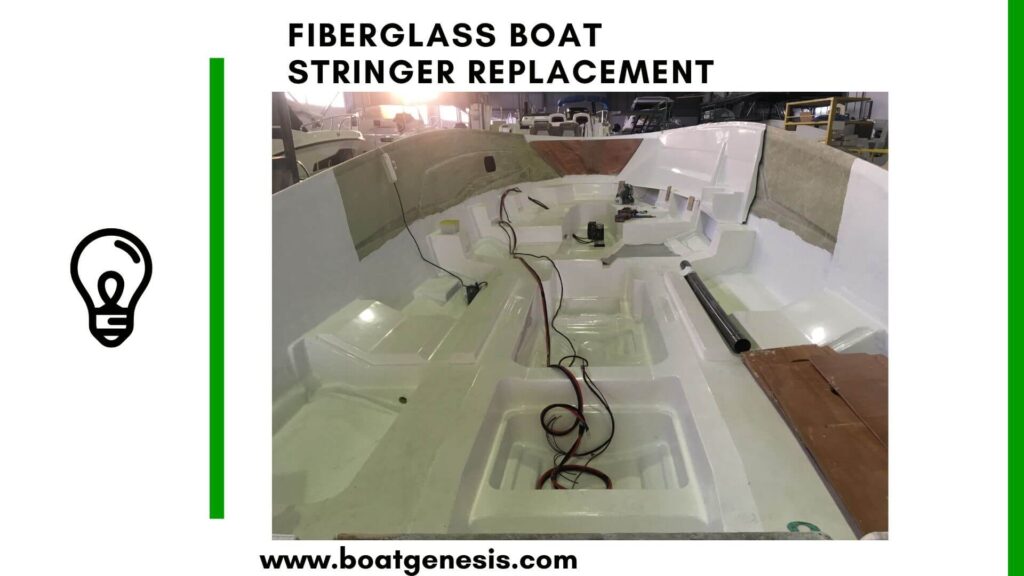
What Are Stringers and Why Do They Fail?
Stringers are long structural framing members that run fore to aft along the inside of the hull. Think of them as the ribs of your boat — they give the hull rigidity and provide the anchoring points for deck hardware, fuel tanks, and floor panels.
Most production fiberglass boats use wooden stringer cores (typically marine-grade plywood) that get encapsulated in fiberglass during the original build. When that fiberglass shell cracks — from impact, flexing, or worn-out hardware fittings — water gets in. Wood and standing water are a slow disaster. Over time, the core rots, loses structural strength, and eventually crumbles.
Saltwater accelerates the damage. Freshwater is kinder, but given enough time and poor ventilation, it will do the same job.
Some newer and higher-end boats use foam-filled composite stringers or aluminum frames, which are far more resistant to moisture. But if your boat is more than 15–20 years old, there’s a solid chance it has wood-cored stringers that deserve a closer look.
Warning Signs Your Stringers Need Replacing
Catching stringer problems early gives you options — minor encapsulation or partial repair may suffice. Wait too long and you’re looking at a full replacement. Here’s what to watch for:
- Soft or spongy spots when walking on the deck, especially near the center or along the gunwale line.
- Creaking or groaning noises when the boat flexes underway — this signals the hull is working harder than it should.
- Visible cracks in the gelcoat or deck, particularly in straight lines that mirror the stringer run below.
- Discoloration, staining, or bubbling around deck hardware fasteners.
- A damp, musty smell rising from the bilge — a sure sign moisture has been sitting in there for a while.
- Visible dry rot or dark, crumbling wood when you poke around the bilge.
A simple test: press a sharp screwdriver or awl firmly into any exposed stringer wood. If it sinks in easily, you have rot. If more than 25% of the stringer cross-section crumbles from prodding, or if the stringer has visibly snapped, full replacement is your best long-term option.
For a deeper dive into evaluating damage before committing to a full replacement, the experts at BoatUS Foundation offer solid guidance on hull inspection and damage assessment.
Want to avoid costly fiberglass boat repair mistakes?
Learn how to inspect damage properly, decide when to DIY, and prevent expensive fiberglass problems before they start.
Stringer Repair vs. Full Replacement: Which Do You Need?
Not every stringer problem requires tearing everything out. Use this table to help decide:
| Condition | Recommended Action | Difficulty |
|---|---|---|
| Soft spot, stringer still structurally intact | Encapsulation / injection repair | Moderate |
| Less than 25% of cross-section is rotted | Partial sister stringer reinforcement | Moderate |
| More than 25% rotted, crumbles when probed | Full stringer replacement | High |
| Stringer has snapped or delaminated from hull | Full stringer replacement | High |
| Deck hardware pulling through deck | Stringer replacement + hardware rebedding | High |
Tools and Supplies You’ll Need
Gather everything before you start. Running to the store mid-job with a hull torn apart is not a fun afternoon.
Safety Gear — Non-Negotiable
- NIOSH-rated respirator (fiberglass dust is nasty)
- Safety goggles or a full face shield
- Chemical-resistant gloves (nitrile or neoprene)
- Long sleeves and old clothes you don’t mind ruining
Power Tools
- Circular saw — for cutting decking panels
- Oscillating multi-tool — great for precision cuts in tight spaces
- Reciprocating saw (sawzall) — for cutting out stuck stringers
- Angle grinder with 80-grit flap disc — for surface prep
- Power sander — for final surface cleaning
Fiberglass and Bonding Materials
- Two-part slow-cure epoxy resin (slow cure gives you working time)
- Thickening agent / colloidal silica (for making adhesive filler)
- Woven fiberglass cloth, 4–6 oz weight
- Fiberglass mat for the first bonding layer
- Rollers, brushes, mixing cups, and mixing sticks
Replacement Stringers
- Marine-grade plywood (BS1088 specification) — cut to precise dimensions
- Stainless fasteners for temporary clamping
- Bilge-grade sealant and marine epoxy primer
Step-by-Step Fiberglass Boat Stringer Replacement
Work methodically. This is not a weekend rush job — budget two to three weekends for a thorough result.
Step 1: Clear the Workspace and Remove Decking
Start by stripping everything out of the work area — cushions, storage, insulation, any panels covering the bilge. Take photos as you go so you remember where things go back.
Disconnect any wiring or plumbing runs near the stringer zone. Cap wire ends and pipe fittings carefully. Remove deck panels and sole boards slowly to avoid damaging anything you’ll want to reuse. Label hardware and keep it in a labeled bag.
Step 2: Support the Hull and Extract the Old Stringer
Before you start pulling structural material, support the hull from below with jack stands. This is critical: removing a stringer without support can permanently flex or distort the hull.
If the stringer is loose enough, use long wood chisels to pry it free. If it’s well-bonded, cut it into manageable sections with a sawzall or angle grinder. Work carefully to avoid gouging the hull laminate.
Step 3: Grind and Clean the Bonding Surface
This step determines how well your new stringer bonds. Use an 80-grit flap disc to grind the hull interior until you reach clean, bright fiberglass. Remove all traces of old wood, epoxy residue, gel coat chips, and any oily or greasy residue.
A clean mechanical and chemical bond is what holds everything together. Don’t rush this.
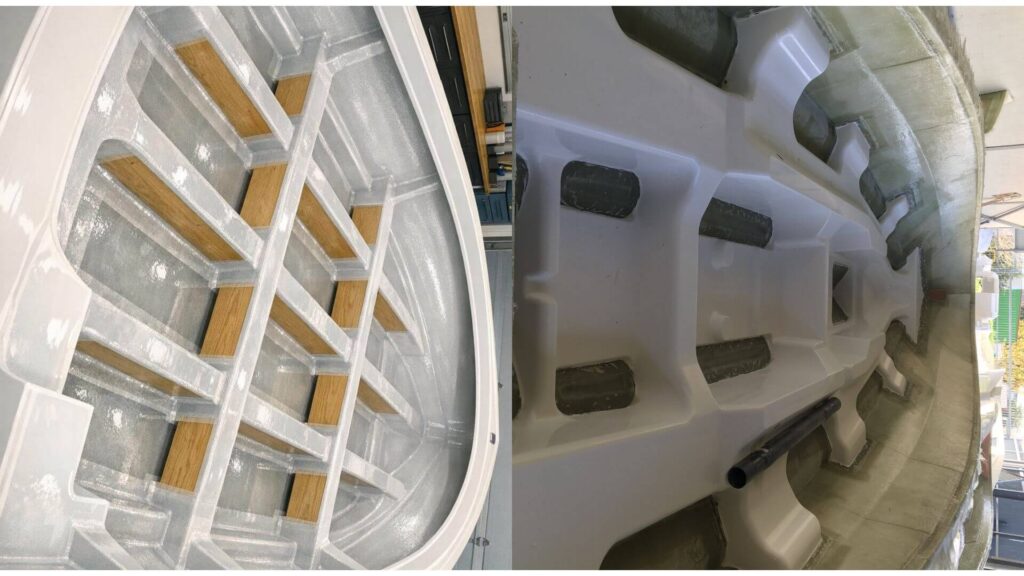
Step 4: Test-Fit and Seal the New Stringer
Before mixing any epoxy, dry-fit your new plywood stringer repeatedly until it sits flush with no gaps along the hull contact surface. Use a belt sander or rasp to refine the fit.
Once satisfied, seal all surfaces of the new stringer — especially the end grain, which absorbs moisture fastest. Apply two coats of neat (unthickened) epoxy as a penetrating sealer and let it cure fully before proceeding.

This guide helps boat owners understand fiberglass damage clearly — what matters, what doesn’t, and when repairs are truly necessary, so small issues don’t turn into expensive mistakes.
See What Every Boat Owner Should Know →Step 5: Bond the Stringer Using Thickened Epoxy
Mix a generous batch of slow-cure epoxy and thicken it with colloidal silica to a peanut-butter consistency. Apply it thickly to both the hull surface and the stringer mating face.
Lower the stringer into place with a helper — don’t try this solo on a large stringer. Clamp it firmly against the hull. Excess epoxy should squeeze out around the edges, which is exactly what you want.
Smooth those fillets out with a gloved finger or a rounded stick while the epoxy is still wet. Allow a full cure before removing clamps.
Step 6: Encapsulate the Stringer in Fiberglass
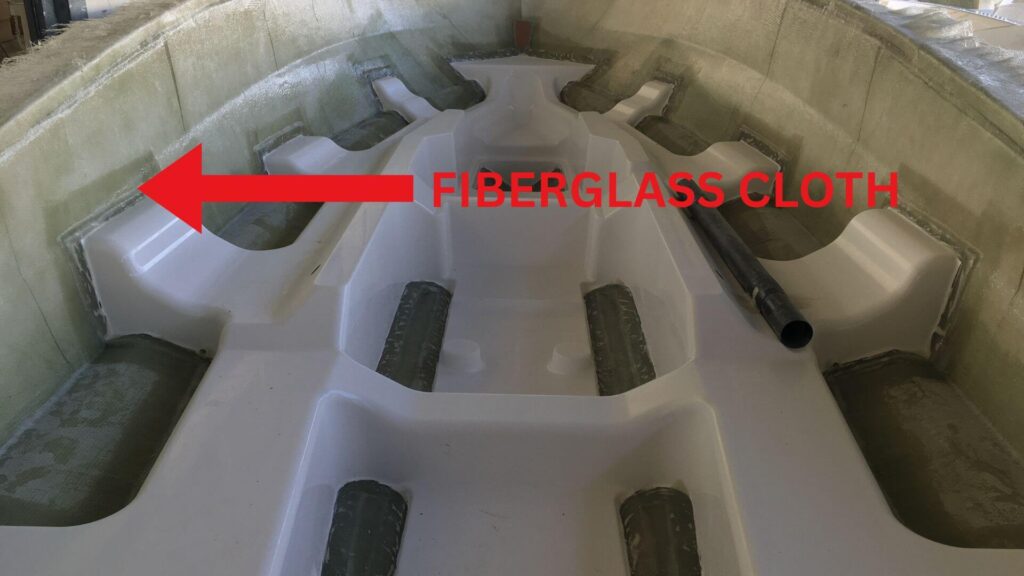
This step is what separates a proper repair from one that fails again in five years. Fully encase the stringer in fiberglass — top, sides, and the fillet at the base.
Lay up 4 to 6 alternating layers of fiberglass mat and woven cloth, saturating each layer thoroughly with epoxy before the next goes on. Work out any air bubbles with a roller. Pay particular attention to the edges and corners — voids or dry spots here are where water will re-enter.
For more detail on wet layup techniques and choosing the right fiberglass cloth weights, Fiberglass Supply’s technical resources are worth bookmarking.
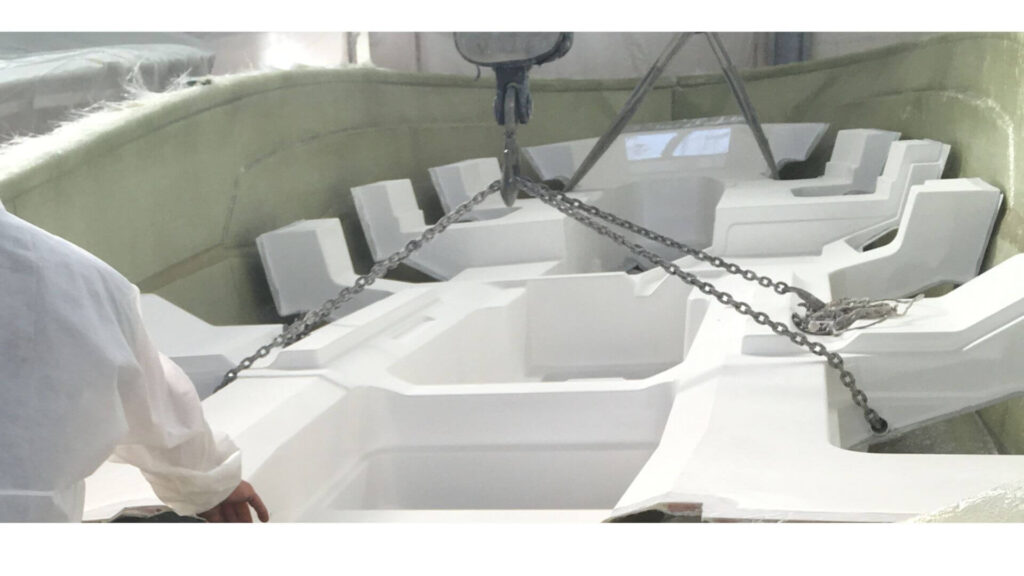
Step 7: Reinstall Decking and Hardware
Before anything goes back in, inspect the underside of the deck panels for any delamination or rot of their own. Address any issues now while everything is accessible.
Bed the deck panels back in using a flexible marine sealant. Bolt hardware down with anti-seize compound on every fastener — this prevents future galling and makes the next removal far less frustrating.
Step 8: Maximize Bilge Ventilation
Moisture is what killed your stringers in the first place. Don’t give it a second chance.
Install ventilation to port and starboard in the bilge space. Add limber holes along the new stringer run if none exist — these small drainage holes allow water to flow to the lowest point rather than pooling against the stringer.
Run bilge fans after reassembly to thoroughly dry the space before sealing it up.
DIY vs. Professional Repair: What Does It Actually Cost?
| Item | DIY Cost (Estimate) | Yard Cost (Estimate) |
|---|---|---|
| Marine-grade plywood (stringers) | $80 – $200 | Included in labor |
| Epoxy resin and fiberglass cloth | $150 – $400 | Included in labor |
| Safety gear (one-time purchase) | $60 – $120 | N/A |
| Power tools (if not already owned) | $200 – $500 | N/A |
| Miscellaneous (sealants, fasteners) | $50 – $150 | Included |
| Labor | $0 (your time) | $2,000 – $8,000+ |
| Total | $540 – $1,370 | $3,000 – $10,000+ |
The DIY route demands time and patience, but the savings are real. If you already own the tools, your material costs might be under $500.
Common Mistakes to Avoid
Many DIY stringer jobs fail not because of poor technique but because of shortcuts. Here are the most common ones:
- Skipping hull support: Removing a stringer without jack stands can permanently distort the hull shape.
- Rushing surface prep: A contaminated bonding surface means the new stringer won’t properly adhere. The grind-and-clean step is boring, but it determines everything.
- Using polyester resin instead of epoxy: Polyester doesn’t bond well to existing cured fiberglass. Use epoxy for all bonding and encapsulation.
- Inadequate fiberglass layup: Four to six layers is the minimum. Going thinner saves time but compromises the moisture barrier.
- Forgetting end grain sealing: End grain is the most vulnerable part of any plywood — seal it with neat epoxy before bonding.
- Poor ventilation after the repair: Sealing a damp bilge is asking for a repeat problem. Dry the space thoroughly before reassembly.
==>> If interested, you should also read my guide about repairing a soft fiberglass boat floor here.
Conclusion
Fiberglass boat stringer replacement is one of the more demanding DIY repairs you can take on as a boat owner — but it’s also one of the most rewarding. You’re not just patching a surface; you’re restoring the structural foundation that keeps your hull safe on the water.
The process requires patience: careful demolition, thorough surface preparation, precise fitting, solid bonding, and proper fibreglass encapsulation. Skip any of those stages and you risk repeating the whole job in a few years.
Done right, a replaced stringer is stronger than the original. Pair it with good bilge ventilation and regular moisture checks, and you’ll be keeping that boat solid for decades to come.
Frequently Asked Questions
1. How do I know if my stringers are rotten without tearing the boat apart?
Press a sharp awl or screwdriver firmly into any exposed stringer wood. If it sinks in more than a quarter inch with light pressure, you have rot. Also tap the deck above the stringer with a hammer — a hollow thud instead of a solid thwack indicates delamination or decay beneath.
2. Can I replace just one stringer, or do I need to do them all?
You can replace a single stringer if the others are still sound. Probe each one individually before deciding. That said, if one has rotted, the others in the same section have likely been exposed to the same moisture conditions and are worth inspecting carefully.
3. How long does fiberglass boat stringer replacement take?
For an experienced DIYer working on a typical runabout, budget two to three full weekends. Larger boats, heavily bonded stringers, or complications like rotten transom areas can push that to several weeks of part-time work.
4. Do I need fiberglass experience to do this job?
You should be comfortable with basic wet layup work — mixing and applying epoxy, wetting out fiberglass cloth, rolling out air bubbles. If you’ve never worked with fiberglass before, practice on a scrap panel first. The techniques aren’t complicated, but working in a cramped bilge is harder than a flat bench project.
5. What type of wood should I use for replacement stringers?
Marine-grade plywood rated to BS1088 specification is the standard. It’s voidless, uses waterproof adhesive, and is far more durable than standard construction plywood. Don’t cut costs here — the quality of the wood core determines how long the repair lasts.
6. Can I use polyester resin instead of epoxy?
No. Polyester resin has poor adhesion to existing cured fiberglass. For all bonding and encapsulation work on a repair like this, epoxy is the correct choice. It’s also more moisture-resistant and more flexible, which matters in a hull that flexes underway.
7. How do I prevent the stringers from rotting again?
Complete encapsulation in fiberglass is the primary defense — no exposed wood. Add to that: good bilge ventilation, regular limber hole cleaning so water drains rather than sits, and periodic inspections of hardware fittings to catch any new moisture entry points early.

Warren is the founder of BoatGenesis and brings practical experience in fiberglass boat repair, marine equipment testing, and powerboat building. He has worked on a range of repair and restoration projects and now focuses on creating clear, research-based guides to help boat owners avoid costly mistakes and make smarter maintenance decisions. Learn more about Warren.