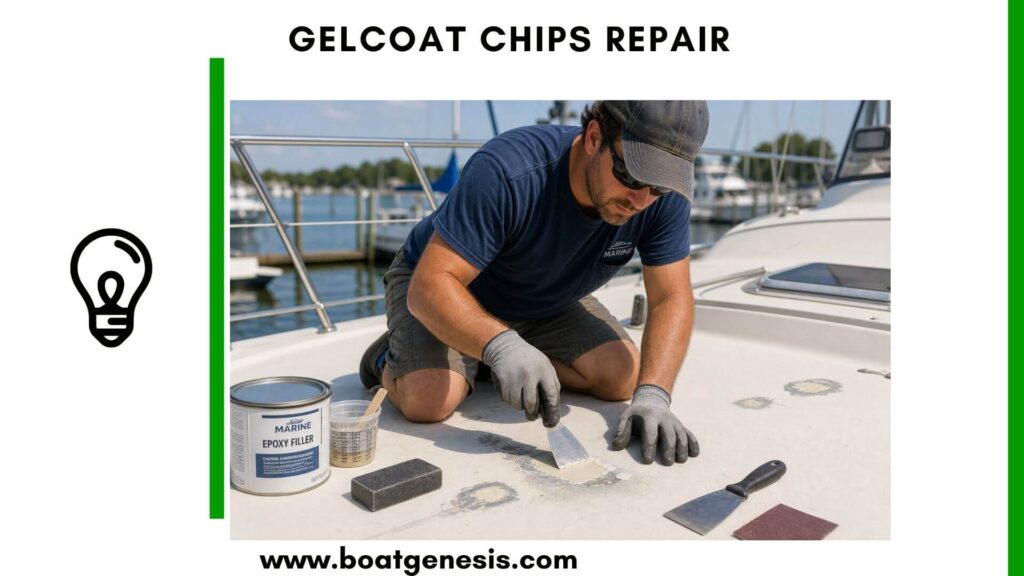
If you want to learn how to repair gelcoat chips without repainting the whole hull, the good news is that most small chips are easy to fix yourself.
What may look like a small cosmetic problem can actually let water reach the fiberglass underneath and cause much bigger damage over time.

You can repair gelcoat chips yourself using paste, catalyst, and basic tools to create an invisible fix that protects your boat and saves you money.
Professional gelcoat repair techniques focus on proper surface preparation, color matching, and careful application to blend the repair seamlessly with your existing finish.
Most boat owners can handle these repairs in an afternoon with the right approach.
Learning to fix gelcoat chips properly means you can tackle damage as soon as it happens.
This keeps your boat looking great and prevents small problems from becoming big ones.
The process involves cleaning the damaged area, shaping it correctly, applying color-matched gelcoat paste, and finishing it to match the surrounding surface.
Key Takeaways
- Clean and bevel the damaged area properly before applying gelcoat paste to ensure a strong, lasting bond
- Use color-matched gelcoat paste with the correct catalyst ratio and overfill the repair slightly for best results
- Sand and polish the cured repair in stages to blend it invisibly with the surrounding gelcoat
- Key Takeaways
- Protecting the Fiberglass Hull
- Preventing Water Intrusion and Damage
- Maintaining Appearance and Resale Value
- Identifying Types of Damage
- Causes of Chips and Spider Cracks
- Assessing Severity and Repairability
- Essential Tools and Materials
- Safety Gear and Best Practices
- Cleaning and Surface Preparation
- 1. Masking and Taping Off the Repair Area
- 2. Mixing Gelcoat and MEKP Catalyst
- 3. Applying Gelcoat Paste
- Using Release Film and Achieving a Smooth Cure
- Wet Sanding and Smoothing the Repaired Area
- Polishing for a Glossy Finish
- Final Waxing and Protection
- Preventing Future Chips and Damage
- Routine Maintenance and Inspection
- When to Seek Professional Help
- What steps are involved in repairing minor gelcoat chips on a boat?
- Can you fix deep scratches on a boat hull without a full repaint, and if so, how?
- What are the best gelcoat repair kits available for marine use?
- How can you effectively fix gelcoat cracks on a boat?
- Is it possible for new gelcoat to adhere well to an older gelcoat surface?
- What are the considerations when choosing between DIY gelcoat repair and professional services?
Why Timely Gelcoat Chip Repair Is Critical
Small chips in your boat’s gelcoat might look harmless, but they create openings that let water reach the fiberglass hull underneath.
This kind of damage spreads fast and leads to expensive structural problems if you don’t fix it quickly.
Protecting the Fiberglass Hull
Your gelcoat serves as the primary barrier between your fiberglass hull and the water.
When a chip breaks through this protective layer, it exposes the porous fiberglass material directly to moisture and UV rays.
The fiberglass laminate underneath can’t handle constant water contact.
Without the gelcoat shield, water seeps into the microscopic spaces between the glass fibers and weakens the resin bonds that hold the fiberglass together.
UV exposure causes even more damage to exposed fiberglass.
The sun’s rays break down the resin and make the fibers brittle over time.
What started as a small surface chip can turn into a soft, spongy area in your hull if you ignore it for too long.
Preventing Water Intrusion and Damage
Water intrusion through gelcoat chips creates a domino effect of problems in your boat.
Once moisture gets past the gelcoat and into the fiberglass, it becomes trapped between layers.
This trapped water causes osmotic blistering.
The water reacts with chemicals in the resin and creates acidic compounds that dissolve the resin bonds and create visible bubbles in the hull.
Fixing osmotic blisters requires grinding away large sections of gelcoat and fiberglass, then rebuilding those layers from scratch.
Common water damage progression:
- Week 1-2: Water penetrates the chip
- Month 1-3: Moisture spreads between laminate layers
- Month 3-6: Small blisters form under the surface
- Year 1+: Multiple blisters and potential delamination
Cold weather makes water intrusion worse.
When water freezes inside the fiberglass, it expands and creates cracks that spread outward from the original chip.
Maintaining Appearance and Resale Value
A boat covered in visible chips and scratches tells buyers you didn’t maintain the vessel properly.
Buyers see cosmetic damage as a warning sign of hidden structural issues.
They’ll either walk away or demand a steep price reduction.
Marine gelcoat repairs cost much less when you catch chips early.
A small chip repair takes an hour and costs under $50 in materials.
Fixing widespread gelcoat damage from neglect can cost thousands of dollars and require professional help.
Your boat’s finish also affects your enjoyment of ownership.
Chips that expose white fiberglass stand out against colored hulls and make your boat look older than it is.
Regular boat gelcoat repairs keep your vessel looking sharp and protect your investment for years of trouble-free use.
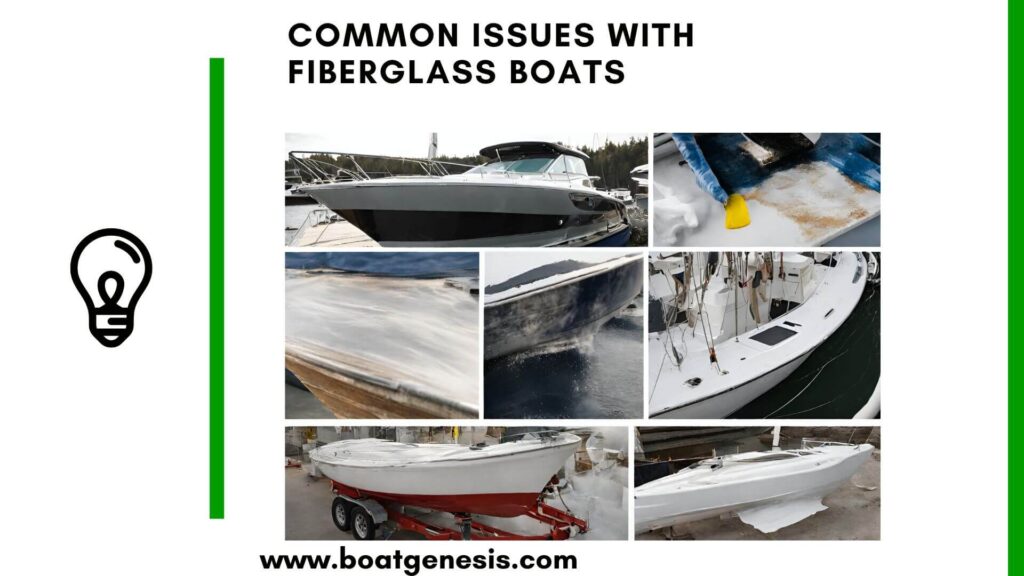
Understanding Gelcoat Chips and Related Damage
Gelcoat damage comes in different forms, from small chips to web-like cracks across the surface.
Learning to spot these issues and understand what caused them helps you choose the right repair method and prevent future problems.
Identifying Types of Damage
Chips appear as small divots where pieces of gelcoat have broken away from the hull.
These typically expose the underlying fiberglass layer and have defined edges.
Spider cracks form thin, web-like patterns on the surface without breaking through completely.
They branch out from a central point and look like tiny lightning bolts across the gelcoat.
Stress cracks run in straight or curved lines, usually appearing in high-stress areas.
These differ from spider cracks because they follow a more linear path rather than branching out.
Common damage types include:
- Surface scratches that only affect the top layer
- Deep gouges that penetrate through to the fiberglass
- Star-shaped impact damage from hard collisions
- Hairline fractures barely visible to the eye
Causes of Chips and Spider Cracks
Impact damage from docks, trailers, and debris creates most gelcoat chips.
Your boat’s gelcoat chips when hard objects strike the hull with enough force to break through the protective layer.
Spider cracks develop from stress and flexing in the fiberglass beneath the gelcoat.
Temperature changes cause expansion and contraction that weakens the bond between layers.
Want to avoid costly fiberglass boat repair mistakes?
Learn how to inspect damage properly, decide when to DIY, and prevent expensive fiberglass problems before they start.
Age plays a major role in gelcoat breakdown.
UV exposure from sunlight breaks down the protective coating over time, making it brittle and prone to cracking.
Improper hull support during storage puts excessive pressure on specific points.
This concentrated stress causes the gelcoat to crack even without direct impact.
Assessing Severity and Repairability
Small chips under a quarter-inch wide qualify as minor damage you can repair yourself.
These repairs don’t require professional help if you follow proper techniques.
Check the area around chips for soft spots or discoloration on the interior hull.
These signs indicate structural damage beyond simple gelcoat repair.
Cracks longer than a few inches or those that penetrate the fiberglass layer need professional evaluation.
You should also inspect surrounding areas for additional damage that might not be visible at first glance.
Damage assessment checklist:
- Measure chip depth and width
- Look for moisture or dark spots underneath
- Test flexibility of surrounding gelcoat
- Check if cracks continue to spread
Surface-level damage responds well to DIY repairs, while deep structural issues require expert attention.
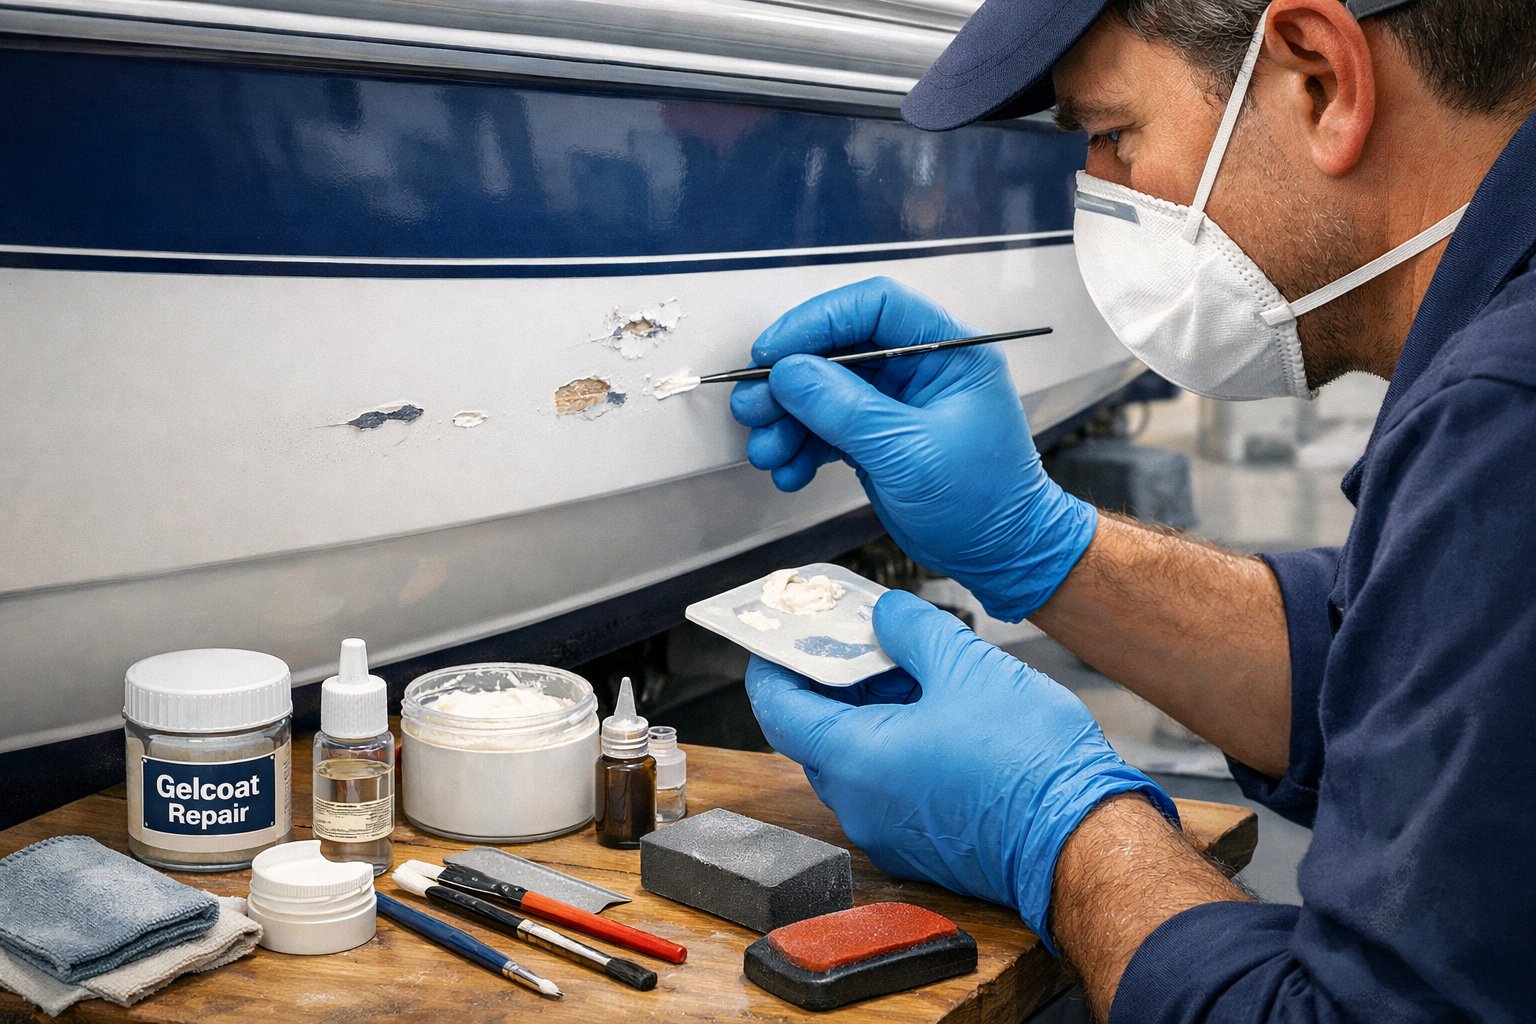
Preparing for Gelcoat Chip Repair
Success in gelcoat repair depends on having the right supplies and properly preparing the damaged area.
You need specific tools, protective equipment, and a clean work surface to achieve a professional finish.
Essential Tools and Materials
A gelcoat repair kit forms the foundation of your repair supplies.
These kits typically include gelcoat paste, hardener, mixing tools, and application brushes.
You’ll also need sandpaper in multiple grits, starting with 220-grit for initial preparation and progressing to 400, 600, 800, and 1500-grit for finishing work.
Beyond the basic kit, gather these items:
- Mixing containers (small plastic cups work well)
- Putty knife or plastic scraper for application
- Masking tape to protect surrounding areas
- Clean rags or microfiber cloths
- Rubbing compound for final polishing
- Marine wax for protection
A sanding block helps maintain an even surface during the smoothing process.
For larger repairs, consider a random-orbit sander with appropriate discs.
Keep a small grinder or can opener handy to widen narrow cracks before filling.
Safety Gear and Best Practices
Protect yourself with gloves and safety glasses during every step of the repair process.
Gelcoat chemicals can irritate skin and eyes, making personal protective equipment non-negotiable.
Work in a well-ventilated area, preferably outdoors or in a space with good air circulation.
Gelcoat and acetone fumes can be harmful when inhaled in enclosed spaces.
If working indoors, open windows and use fans to maintain airflow.
Keep your workspace at temperatures above 65°F (18°C) for proper gelcoat curing.
Cold temperatures prevent the hardener from activating correctly, leading to soft or tacky repairs that never fully set.
Avoid working in direct sunlight or excessive heat, which can cause the gelcoat to cure too quickly.
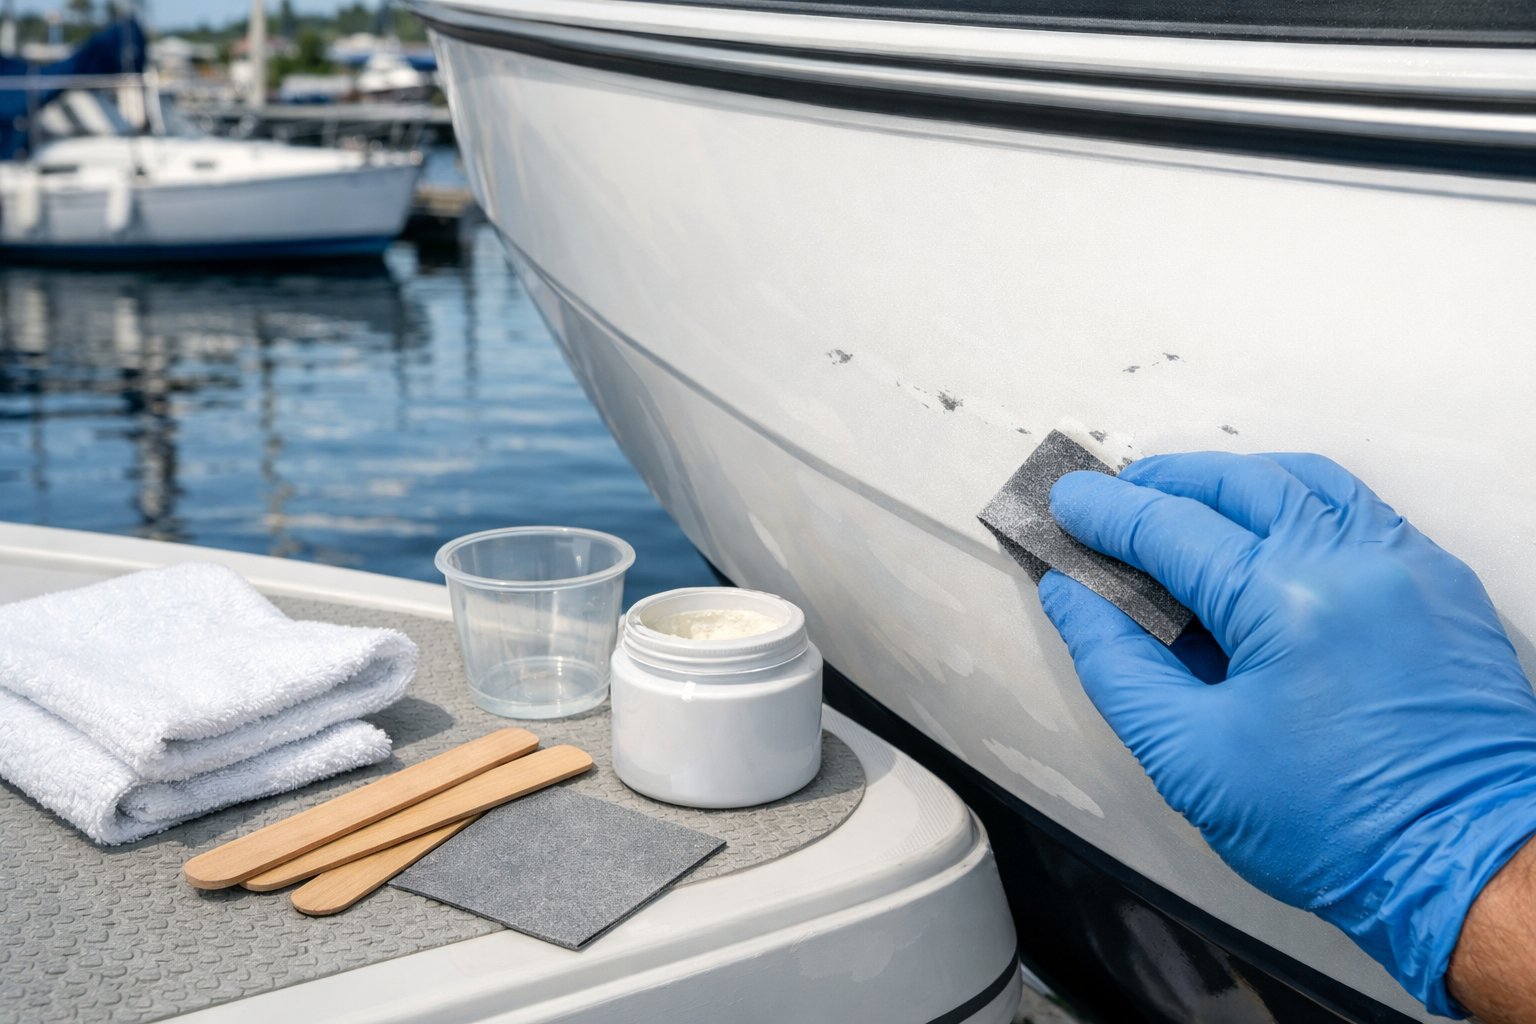
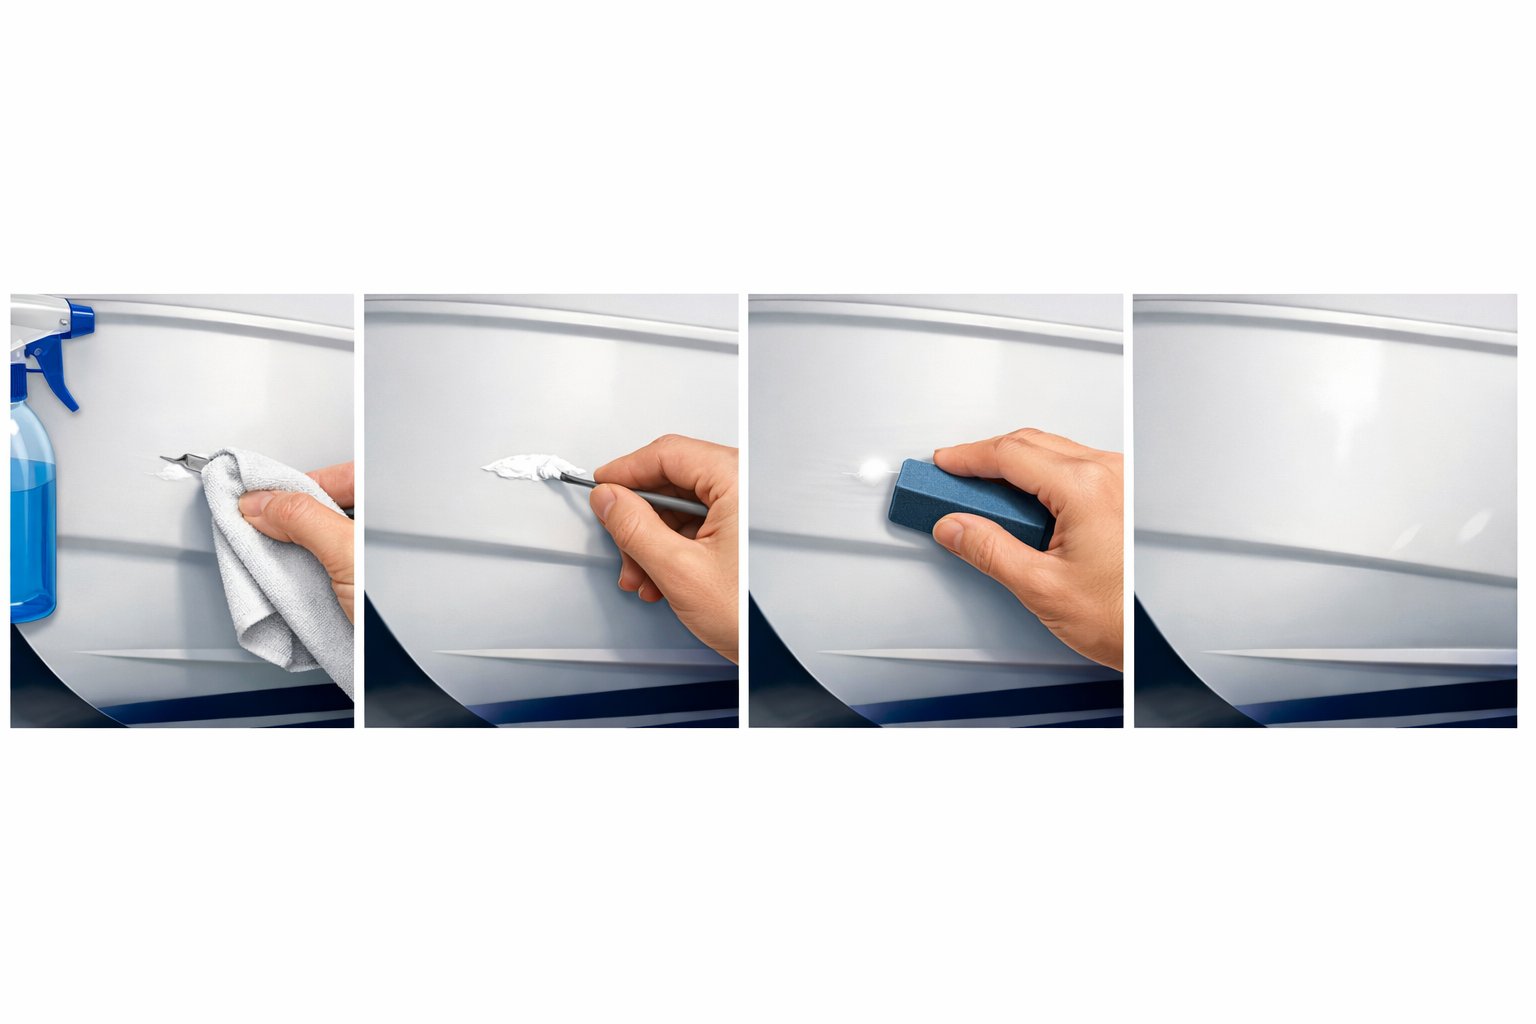
Cleaning and Surface Preparation
Clean the damaged area thoroughly before starting your repair.
Use boat wash or boat soap with water to remove salt, dirt, and grime from the surface.
Rinse completely and let dry.
After the initial cleaning, wipe the chipped area with acetone using a clean cloth.
This powerful solvent removes oils, wax, and contaminants that prevent proper gelcoat adhesion.
Apply the acetone in gentle circular motions, paying special attention to the edges of the chip.
Allow the surface to dry completely before proceeding.
Any moisture trapped under the gelcoat will cause adhesion problems and may lead to future blistering.
Test the surface by touching it with a dry finger—it should feel completely dry and slightly rough, not smooth or waxy.
Sand around the damaged area lightly with 220-grit sandpaper to create a rough surface for better bonding.
Wipe away all sanding dust with a tack cloth or acetone-dampened rag before applying gelcoat.
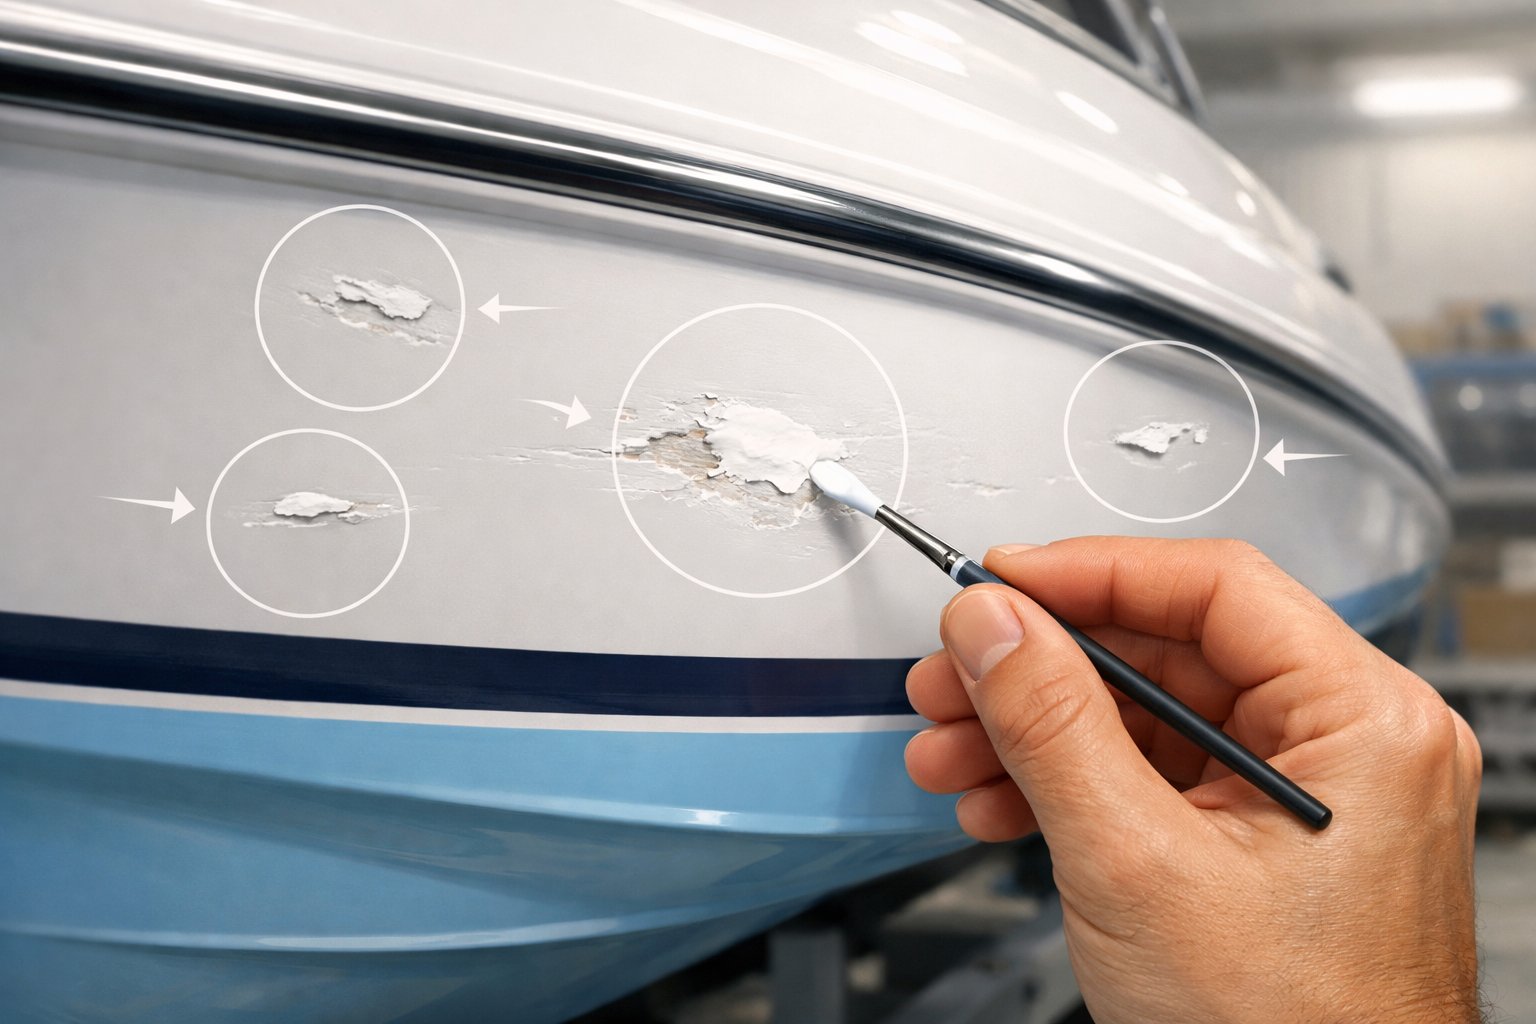
Step-By-Step Gelcoat Chip Repair Process
Repairing gelcoat chips requires proper preparation, careful mixing, and correct application techniques to blend the repair seamlessly with your hull.
The process involves protecting surrounding areas, preparing the right gelcoat mixture, filling the damaged spot, and creating a smooth finish that cures properly.
1. Masking and Taping Off the Repair Area
Before you start applying gelcoat, protect the undamaged areas around the chip.
Use masking tape to create a border around the repair zone, leaving about half an inch of space beyond the damaged area.
This prevents accidental spreading of the gelcoat mixture onto good surfaces.
Press the masking tape down firmly to ensure a tight seal.
Gaps allow the resin to seep underneath and create more work later.
Clean the taped area with a marine-grade cleaner to remove any wax, oil, or debris that might prevent proper adhesion.
Sand the damaged area with 220-grit sandpaper to create a rough surface for the new gelcoat to grip.
Feather the edges of the chip by sanding outward from the center.
Remove all sanding dust with a clean, dry cloth before moving to the next step.
2. Mixing Gelcoat and MEKP Catalyst
Get your mixing cups and mixing sticks ready before opening any materials.
Pour the gelcoat paste into a clean mixing cup, measuring the amount you’ll need for your repair.
Most small chips require only a small amount of material.
Add the MEKP (methyl ethyl ketone peroxide) catalyst according to the manufacturer’s instructions, typically around 1-2% of the total gelcoat volume.
Too much MEKP causes the gelcoat to cure too fast and potentially crack, while too little means it won’t harden properly.
Use measuring tools rather than guessing the ratio.
Stir the mixture thoroughly with a mixing stick for at least one minute.
Scrape the sides and bottom of the cup to ensure the catalyst is completely blended throughout the gelcoat paste.
The mixture will start to thicken within 10-15 minutes, so work quickly once you’ve added the MEKP.
3. Applying Gelcoat Paste
Apply gelcoat to the chip using a small putty knife or plastic spreader.
Press the paste firmly into the damaged area, slightly overfilling the chip to account for shrinkage during curing.
Work the material into all corners and edges of the damage.
Use a scraping motion to remove excess material and level the surface with the surrounding gelcoat.
Don’t worry about achieving a perfect finish at this stage because you’ll sand it smooth later.
Make sure the entire damaged area is filled with no air pockets or voids remaining.
Work steadily but don’t rush, as you have several minutes before the gelcoat begins to cure.
If you’re repairing multiple chips, mix small batches and complete one repair at a time.
Using Release Film and Achieving a Smooth Cure
Place a piece of release film (or wax paper) over the wet gelcoat immediately after application.

This guide helps boat owners understand fiberglass damage clearly — what matters, what doesn’t, and when repairs are truly necessary, so small issues don’t turn into expensive mistakes.
See What Every Boat Owner Should Know →The film prevents air from reaching the surface and creates a smooth finish.
Press the release film down gently to eliminate air bubbles and wrinkles.
Smooth the film outward from the center using a squeegee or credit card.
This pushes out excess material and creates an even surface that requires less sanding.
The film should lay flat against the repair without any trapped air underneath.
Leave the release film in place until the gelcoat has fully cured, which typically takes 2-4 hours depending on temperature and humidity.
You can tell it’s ready when the repair feels hard to the touch.
Remove the film carefully and inspect your work before moving on to sanding and polishing the repair.
Finishing Techniques for Professional Results
The repair is only as good as the finish you put on it.
Proper wet sanding removes excess gelcoat and creates a level surface, while polishing and waxing restore the shine and protect your work from the elements.
Wet Sanding and Smoothing the Repaired Area
Once your gelcoat has fully cured, sand down the proud surface you built up during application.
Start with 400-grit sandpaper and a bucket of clean water.
Keep the surface wet while you sand in a circular motion to prevent scratching.
Work your way through progressively finer grits: 600, 800, and finally 1000 or 1200-grit.
Each grit removes the scratches from the previous one.
The water acts as a lubricant and washes away debris that could create deep scratches.
Check your progress frequently by wiping the area dry.
The repaired spot should feel completely flush with the surrounding gelcoat.
If you can still feel a ridge with your fingertips, keep sanding with your current grit before moving finer.
Polishing for a Glossy Finish
After wet sanding, your repair will look dull and hazy.
You need rubbing compound first to remove the fine sanding marks.
Apply a small amount to a foam pad and work it into the repair using a buffer or polisher set to low speed.
Once the haziness disappears, switch to a finishing polish or polishing compound.
This finer product brings out the actual gloss.
Use a clean foam pad and work in overlapping circular passes.
Don’t press too hard or move too fast, as this creates heat that can damage the gelcoat.
The repair should now match the glossy finish of the surrounding hull.
If it still looks flat compared to the rest of your boat, repeat the polishing step with fresh compound.
Final Waxing and Protection
The last step seals your repair and blends it completely with the rest of your hull.
Apply a quality marine wax to the repaired area and several inches beyond it.
This creates a uniform protective layer that helps hide any slight color differences.
Use a foam applicator or soft cloth to spread a thin, even coat of wax.
Let it haze over according to the product instructions, then buff it off with a clean microfiber towel.
The waxed surface protects against UV rays and water intrusion while giving your repair a consistent shine that matches the factory gelcoat.
Tips for Long-Lasting Gelcoat Repairs and Ongoing Care
Proper care after completing your boat gelcoat repair extends the life of the fix and protects the surrounding polyester gelcoat from new damage.
Regular inspections and preventive measures reduce the need for future repairs.
Preventing Future Chips and Damage
The best repair is the one you never have to make.
Use dock bumpers and fenders at stress points where your hull contacts pilings or other boats.
Store equipment carefully and avoid dragging metal tools across gelcoat surfaces.
When trailering, secure gear so nothing shifts during transport.
Sharp corners on tackle boxes and coolers cause more damage than most owners realize.
Apply a quality marine wax every six months to create a protective barrier against UV rays and saltwater.
This layer also makes routine cleaning easier and prevents dirt from grinding into the surface.
Wax fills microscopic pores in gelcoat that would otherwise collect grime and moisture.
Inspect high-traffic areas monthly for early signs of wear.
The bow, stern corners, and areas near cleats take the most abuse.
Catching small scratches before they deepen into chips saves time and money.
Routine Maintenance and Inspection
Check your hull’s hull identification number area and high-stress zones every three months for cracks or discoloration.
Look for spider-web patterns that signal impact damage below the surface.
Wash your boat with pH-neutral soap after every saltwater outing.
Salt crystals left to dry act like sandpaper on gelcoat.
Rinse from top to bottom so dirty water flows away from clean areas.
Use a rotary tool with soft pads for light polishing between wax applications.
This removes oxidation before it dulls the finish.
Work in small sections and keep the pad moving to avoid heat buildup that can damage gelcoat.
Document repairs in your maintenance log with dates and locations.
Professional repair yards report that up to 60% of hull damages involve the gelcoat layer, making tracking patterns useful for identifying weak spots.
When to Seek Professional Help
Call a professional when damage extends through to the fiberglass cloth or spans structural corners.
These repairs require laminate work that goes beyond surface gelcoat market products.
Spider-web cracking over large areas suggests impact trauma that needs expert assessment.
Tap around damaged spots with your knuckle—a dull thud instead of a sharp sound means water has penetrated the laminate.
Repairs near through-hull fittings or below the waterline need professional attention to maintain watertight integrity.
Mistakes in these areas can lead to serious water intrusion.
If blisters appear in clusters or the gelcoat feels spongy when pressed, the core may be saturated and requires specialized drying and relamination before any cosmetic work begins.
Frequently Asked Questions
Boat owners often face similar challenges when dealing with gelcoat damage, from understanding the basic repair process to deciding whether to tackle the job themselves.
These common questions cover the practical aspects of fixing chips, scratches, and cracks in your boat’s protective coating.
What steps are involved in repairing minor gelcoat chips on a boat?
You need to start by cleaning the damaged area thoroughly with acetone or marine cleaner to remove dirt, wax, and grease.
This step ensures the new gelcoat will bond properly to the surface.
Next, sand around the chip using 320-grit sandpaper to smooth the edges and create a slightly roughened surface.
This process is called feathering and helps the repair blend into the surrounding area.
Apply masking tape around the repair area to protect the undamaged gelcoat.
Mix your gelcoat with hardener according to the manufacturer’s instructions, typically using a small amount of hardener per ounce of gelcoat.
Use a fine paintbrush or applicator stick to fill the chip, building up the gelcoat slightly higher than the surrounding surface.
The material will shrink as it cures, so you need this extra height for a flush finish.
Allow the gelcoat to cure completely, which can take several hours to overnight depending on temperature and humidity.
Once cured, sand the area with progressively finer grits from 320 up to 600 or 800 to create a smooth surface.
Finish by polishing the repaired area with a polishing compound using circular motions until it blends seamlessly with the surrounding gelcoat.
Can you fix deep scratches on a boat hull without a full repaint, and if so, how?
Deep scratches can be repaired without repainting if the damage hasn’t penetrated through the gelcoat into the underlying fiberglass.
You’ll follow a similar process to chip repair but may need to apply multiple layers of gelcoat.
Start by cleaning and sanding the scratch to remove any loose material and create a good bonding surface.
For deeper scratches, use a grinder to create a V-shaped groove that allows the new gelcoat to grip properly.
Apply the gelcoat in thin layers rather than one thick application.
Each layer should cure before you add the next one, building up the repair gradually until it’s slightly above the surrounding surface.
The key difference with deep scratches is that you need more patience during the filling process.
Rushing with a single thick application can lead to improper curing and a weak repair that may crack or fail later.
What are the best gelcoat repair kits available for marine use?
Quality gelcoat repair kits typically include pre-measured gelcoat, hardener, mixing cups, application tools, and various grits of sandpaper.
Choose a kit that offers color-matching options or lets you tint the gelcoat to match your boat’s hull.
Look for kits that include everything you need instead of buying components separately.
An all-in-one gel coat repair kit saves you time and ensures all materials work well together.
Marine-specific brands designed for saltwater exposure perform better than general-purpose fiberglass repair products.
These formulations resist UV damage and water intrusion more effectively.
The best kit for you depends on the size and number of repairs you need to make.
Small touch-up kits work well for minor chips, while larger projects may require buying gelcoat by the pint or quart.
How can you effectively fix gelcoat cracks on a boat?
Repairing gelcoat cracks starts with determining whether the crack extends into the fiberglass or stays within the gelcoat layer.
Surface cracks are easier to fix than structural damage.
Grind out the crack using a Dremel tool or small grinder to create a V-shaped groove.
This gives the new gelcoat something to grip and helps prevent the crack from reappearing.
Clean the area thoroughly with acetone and let it dry completely before filling.
Apply the gelcoat mixture into the groove, making sure to eliminate any air bubbles.
If cracks keep returning, a structural issue in the fiberglass may need attention before the gelcoat repair will hold.
Reinforce the area from behind if necessary before applying new gelcoat.
Allow extra curing time for crack repairs since they often involve more material than simple chips.
Sand and polish the area once fully cured to restore a smooth finish.
Is it possible for new gelcoat to adhere well to an older gelcoat surface?
New gelcoat bonds well to older gelcoat when you prepare the surface properly through cleaning and sanding.
Create a clean, slightly roughened surface to give the new material something to grip.
Older gelcoat often contains wax, oils, and oxidation that prevent proper adhesion.
Remove these contaminants completely using acetone or a marine cleaner before starting your repair.
Sanding the area around the damage creates microscopic scratches that help the new gelcoat lock onto the old surface.
Without this mechanical bond, the repair may peel or pop out over time.
The age of your gelcoat matters less than its condition and your preparation work.
A well-maintained 20-year-old gelcoat surface can accept new material just as well as a five-year-old surface if you prepare it correctly.
What are the considerations when choosing between DIY gelcoat repair and professional services?
Your skill level and the size of the damage should guide your decision between DIY and professional repair. Small chips and scratches suit DIY work, while large areas or structural damage need professional expertise.
DIY repairs cost significantly less than professional services. However, you must invest your time and patience to achieve good results.
You’ll need to buy materials and tools. Basic gelcoat repair requires only common supplies.
Consider the location of the damage when making your decision. Repairs on highly visible areas like the topsides need to blend perfectly.

Warren is the founder of BoatGenesis and brings practical experience in fiberglass boat repair, marine equipment testing, and powerboat building. He has worked on a range of repair and restoration projects and now focuses on creating clear, research-based guides to help boat owners avoid costly mistakes and make smarter maintenance decisions. Learn more about Warren.