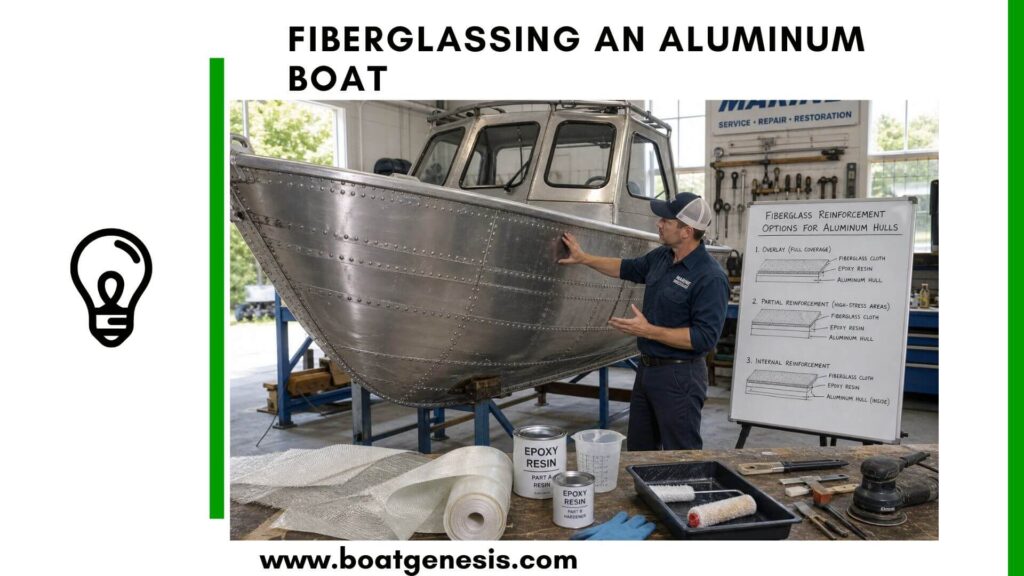
So you’ve got an aluminum boat and you’re wondering: can you fiberglass an aluminum boat? The answer is yes — but there’s a catch. Aluminum and fiberglass don’t naturally like each other.
Aluminum has a slick, oxidized surface that repels adhesion, which means if you skip the prep work, your fiberglass will peel right off. Do it properly, though, and you’ll end up with a tough, corrosion-resistant finish that can last for years.
Whether you want to repair a damaged hull, protect against saltwater corrosion, or just give your old boat a cleaner look, this guide walks you through everything you need to know — step by step, no guesswork.
Key Takeaways
- You can apply fiberglass to an aluminum boat, but surface preparation is everything.
- Aluminum needs to be sanded, cleaned, and primed with epoxy before any fiberglass goes on.
- Use marine-grade epoxy resin — not polyester resin, which doesn’t bond well to metal.
- Rush the curing process and the whole thing fails. Patience is non-negotiable.
- The result is worth it: better corrosion resistance, a smoother hull, and improved aesthetics.
- Regular inspections will keep your fiberglass coating in good shape long-term.
- Key Takeaways
- Why Would You Fiberglass an Aluminum Boat?
- What You'll Need Before You Start
- Step-by-Step: How to Fiberglass an Aluminum Boat
- Pros and Cons at a Glance
- Galvanic Corrosion: The Hidden Risk You Need to Know About
- How to Maintain a Fiberglass-Coated Aluminum Boat
- Common Mistakes to Avoid
- FAQ: Fiberglassing an Aluminum Boat
- Can I use polyester resin instead of epoxy on aluminum?
- How long does the whole process take?
- Will fiberglassing make my boat heavier?
- Can I fiberglass just part of the boat — like the hull bottom?
- How do I know if my existing fiberglass coating is failing?
- Does fiberglassing an aluminum boat affect resale value?
- What's the best fiberglass cloth for this job?
- Final Thoughts
Why Would You Fiberglass an Aluminum Boat?
Aluminum is a great boat-building material — lightweight, strong, and naturally resistant to rust. But it’s not perfect. Over time, it can pit, corrode (especially in saltwater), develop stress cracks, or just look beat up.
Fiberglassing your aluminum boat solves several problems at once:
- Corrosion protection: Fiberglass creates a physical barrier between aluminum and water, particularly valuable in marine or saltwater environments.
- Hull smoothness: A glassed hull has less drag, which can improve fuel efficiency and speed.
- Damage repair: Got dents or stress fractures? Fiberglass fills and reinforces them.
- Appearance: Let’s be honest — a clean glassed hull looks a lot sharper than raw, oxidized aluminum.
What You’ll Need Before You Start
Don’t head to the hardware store without this list. Using the wrong materials is one of the most common mistakes people make.
| Material | Why It Matters |
|---|---|
| 80-grit sandpaper | Roughens the surface for adhesion |
| Marine degreaser | Removes oil, salt, and oxidation |
| Epoxy primer (aluminum-rated) | Creates a chemical bridge between metal and resin |
| Marine-grade epoxy resin | Bonds to metal; polyester resin will NOT work here |
| Fiberglass cloth (woven or biaxial) | The structural layer |
| Foam rollers + brushes | For even resin application |
| Fine-grit sandpaper (220+) | For finishing between layers |
| Marine topcoat or gelcoat | Final UV and water protection |
| Gloves, respirator, safety glasses | Epoxy fumes and fiberglass particles are no joke |
Step-by-Step: How to Fiberglass an Aluminum Boat
Step 1 — Clean the Surface Thoroughly

Start with a completely clean hull. Any grease, oil, or salt residue will kill your bond before you even start.
Use a marine degreaser and scrub the entire surface. Follow up with a rinse of water and white vinegar to neutralize any remaining oxidation. Let it dry completely.
Step 2 — Sand the Aluminum
This is the most important step. Aluminum naturally forms an oxide layer that resists bonding — sanding breaks through it and creates a rough texture that epoxy can grip.
Want to avoid costly fiberglass boat repair mistakes?
Learn how to inspect damage properly, decide when to DIY, and prevent expensive fiberglass problems before they start.
Use 80-grit sandpaper and sand in multiple directions. You want the surface to look uniformly scuffed, not shiny. After sanding, wipe the surface down again with a clean, dry cloth to remove all dust.
Pro tip: Don’t let too much time pass between sanding and priming. Aluminum re-oxidizes quickly, especially in humid air. Try to apply primer within a few hours of sanding.
Step 3 — Apply Epoxy Primer
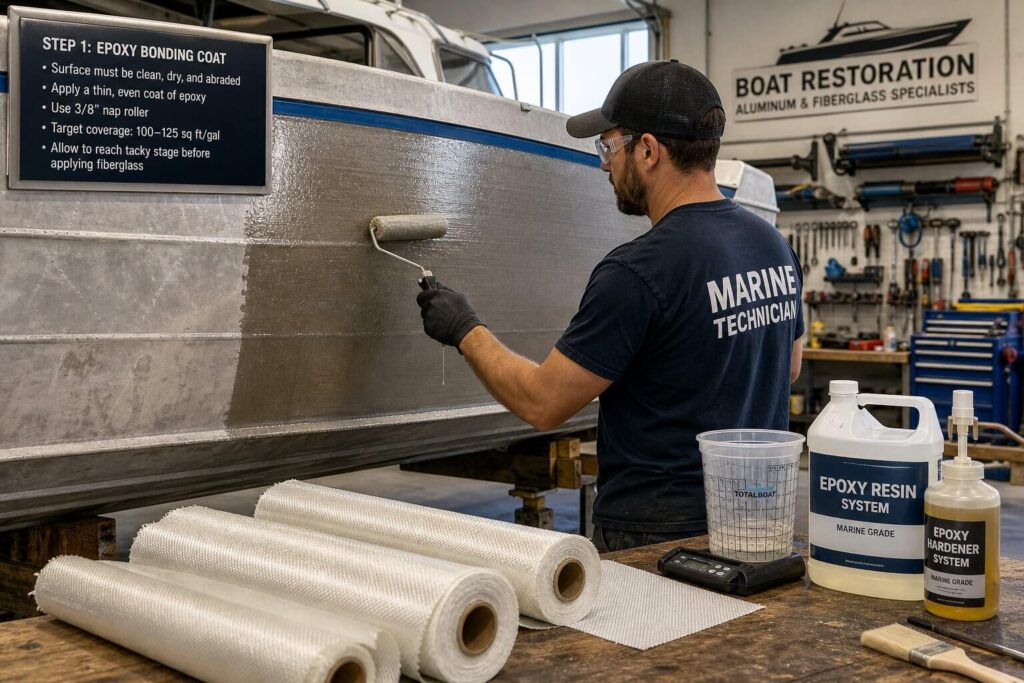
An epoxy primer designed for aluminum is the chemical handshake between your boat and the fiberglass. Skipping it almost guarantees delamination down the road.
Mix the primer according to the manufacturer’s instructions and apply a thin, even coat with a foam roller. Cover the entire area you plan to glass. Let it cure fully — typically 18 to 24 hours depending on temperature and humidity.
Step 4 — Apply Epoxy Resin and Lay the Fiberglass Cloth
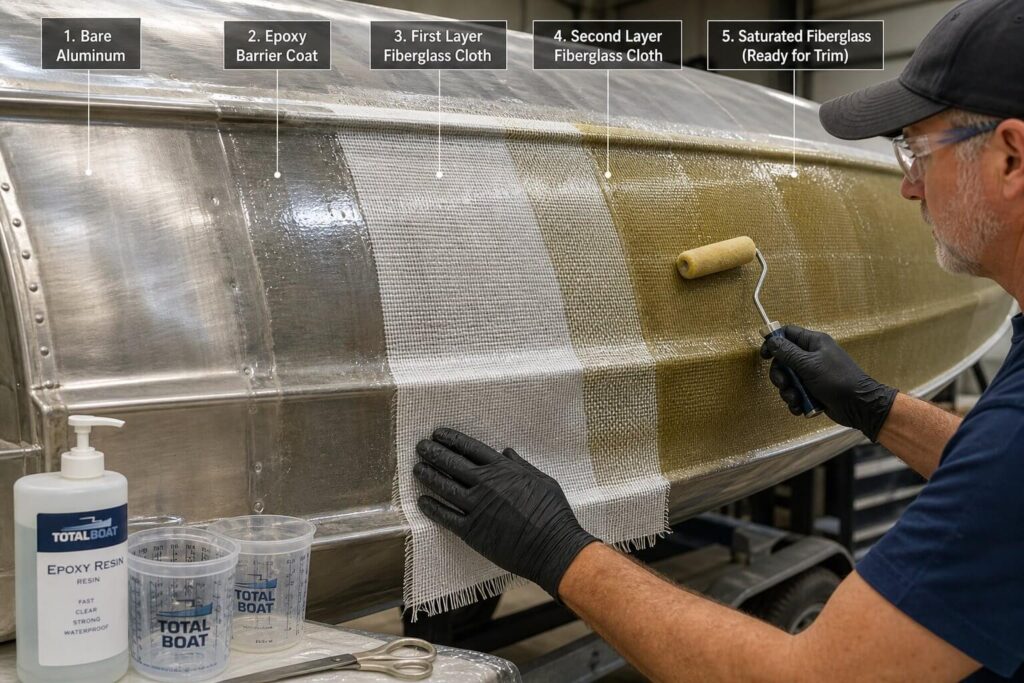
Once the primer has cured, it’s time to laminate.
- Mix your epoxy resin (follow exact ratios — epoxy doesn’t forgive eyeballing).
- Apply a wet layer of resin to the primed surface with a roller.
- Lay your pre-cut fiberglass cloth over the wet resin, starting from one end and smoothing toward the other.
- Use a roller to work out all air bubbles and ensure full saturation. The cloth should turn translucent when properly wetted out.
- Apply a second coat of resin over the top to fully encapsulate the fabric.
For high-stress areas like the keel or bow, add a second layer of cloth for extra reinforcement. Let each layer cure before adding the next.
Step 5 — Sand Between Layers (If Adding Multiple)
Once a layer has cured to a firm but slightly tacky state (not fully hardened), lightly sand with 120–180 grit to improve inter-coat adhesion. Clean off the dust and apply the next layer.
If the resin has fully hardened before you add another layer, sand with 80-grit to re-roughen the surface.
Step 6 — Final Sanding and Topcoat
After your final layer has fully cured (allow at least 24–48 hours), sand the entire surface with 220-grit sandpaper until smooth. Work up to 320 or 400 grit for a fine finish.
Apply a marine-grade topcoat or gelcoat to protect the fiberglass from UV degradation and water intrusion. This is also where you can add paint or antifouling coating if needed.
Pros and Cons at a Glance
| Pros | Cons | |
|---|---|---|
| Protection | Excellent corrosion and impact resistance | Adds weight to the hull |
| Appearance | Clean, polished finish | Requires repainting over time |
| Performance | Smoother hull = less drag | Not reversible without significant work |
| Cost | One-time investment in longevity | Materials and time are not cheap |
| Repairability | Fiberglass is easy to patch | Delamination is hard to fix if prep was poor |
Galvanic Corrosion: The Hidden Risk You Need to Know About
Here’s something the quick-fix guides often leave out: galvanic corrosion.
When you put fiberglass (or more specifically, the metal fasteners and fittings often associated with it) in contact with aluminum in a marine environment, you can create a galvanic cell — essentially a slow-acting battery that corrodes your aluminum from the inside out.
To reduce this risk:
- Use aluminum or stainless steel fasteners only — never bronze or copper near aluminum.
- Apply a barrier coat of epoxy between dissimilar metals.
- Consider fitting zinc sacrificial anodes to your hull. These corrode instead of your boat.
- Inspect your anodes every season and replace them when they’ve worn down by about 50%.
For a deep dive on galvanic corrosion in marine environments, ABYC (American Boat and Yacht Council) publishes detailed standards and guides that are worth reading before you start any hull work.

This guide helps boat owners understand fiberglass damage clearly — what matters, what doesn’t, and when repairs are truly necessary, so small issues don’t turn into expensive mistakes.
See What Every Boat Owner Should Know →How to Maintain a Fiberglass-Coated Aluminum Boat
Getting the fiberglass on is only half the job. Neglect the maintenance and you’ll be peeling it off in a few years.
Every season:
- Inspect the entire hull for cracks, chips, or areas where the fiberglass has lifted from the aluminum.
- Check all edges and seams — these are where water infiltration typically starts.
- Touch up minor chips with epoxy filler before they spread.
Every 2–3 seasons:
- Sand and re-apply topcoat or antifouling paint as needed.
- Check zinc anodes and replace if depleted.
Watch for these warning signs:
- Bubbling or blistering under the fiberglass surface (osmotic blistering — caused by water getting under the glass)
- Soft spots when you press on the hull
- Visible cracking along stress points like the keel or transom
Catching problems early is far cheaper than dealing with full delamination. For guidance on diagnosing and fixing fiberglass issues, West System Epoxy’s technical resources are some of the most trusted in the industry.
Common Mistakes to Avoid
Skipping or rushing the surface prep. You cannot compensate for poor prep with better materials. The bond lives or dies in steps 1–3.
Using polyester resin instead of epoxy. Polyester resin doesn’t bond well to metal and will delaminate. Always use marine-grade epoxy when working on aluminum.
Applying fiberglass in cold or humid conditions. Epoxy cures poorly below 50°F (10°C) and high humidity slows the process and can cause surface defects. Aim for 65–80°F with low humidity.
Not overlapping your cloth edges. Each piece of fiberglass cloth should overlap the next by at least 2–3 inches to avoid weak seams.
Leaving air bubbles trapped under the cloth. Work your roller carefully from the center outward. Trapped air is a delamination waiting to happen.
FAQ: Fiberglassing an Aluminum Boat
Can I use polyester resin instead of epoxy on aluminum?
No. Polyester resin doesn’t bond reliably to metal surfaces. Always use marine-grade epoxy resin when fiberglassing aluminum.
How long does the whole process take?
Plan for a minimum of 3–5 days for a small to mid-size boat, accounting for curing time between each step. Trying to rush it is the fastest way to ruin the job.
Will fiberglassing make my boat heavier?
Yes, slightly. A full fiberglass lamination adds weight, which can affect performance in lightweight aluminum tenders or jonboats. For larger vessels, the difference is usually negligible.
Can I fiberglass just part of the boat — like the hull bottom?
Absolutely. Many boat owners glass only high-wear or corrosion-prone areas. Just make sure the edges of the fiberglass are sealed and feathered smoothly to prevent water from getting underneath.
How do I know if my existing fiberglass coating is failing?
Look for bubbling, soft spots, delamination at edges, or visible moisture under the surface. A tap test (tap the hull with a knuckle — a dull thud instead of a sharp knock suggests delamination) is a useful quick check.
Does fiberglassing an aluminum boat affect resale value?
It can go either way. A clean, well-done fiberglass job can increase appeal and value. A poor job — visible bubbles, peeling edges, uneven surface — can actually hurt resale value and raise questions about the hull’s condition underneath.
What’s the best fiberglass cloth for this job?
For most applications, 6 oz woven fiberglass cloth works well. For heavy-duty areas like the keel, consider 1708 biaxial cloth for extra strength.
Final Thoughts
Fiberglassing an aluminum boat isn’t a weekend impulse project — it takes preparation, patience, and the right materials. But when it’s done properly, the results speak for themselves: a hull that’s tougher, cleaner, and better protected against everything the water throws at it.
The key is to respect the process. Clean thoroughly, sand aggressively, prime before you laminate, and never rush the cure. Follow those rules and your aluminum boat will wear its fiberglass coating for many seasons to come.

Warren is the founder of BoatGenesis and brings practical experience in fiberglass boat repair, marine equipment testing, and powerboat building. He has worked on a range of repair and restoration projects and now focuses on creating clear, research-based guides to help boat owners avoid costly mistakes and make smarter maintenance decisions. Learn more about Warren.