Repairing a large hole in a fiberglass boat is something anyone can do, as long as you have the right tools, preparation, and method.
So, if you’ve discovered a large hole in your fiberglass boat, don’t panic. While it’s certainly more complex than fixing minor gelcoat cracks, you don’t always need a professional to take on the job.
In this comprehensive DIY repair guide, you’ll learn how to identify, prepare, patch, and finish large holes in fiberglass boats — especially those located on the outside hull where water intrusion is a serious concern.
KEY TAKEAWAYS
- Large holes under 8 inches wide in non-structural areas can be repaired at home.
- Always create a backing when working on holes in the outer hull.
- Use thickened epoxy to prevent sagging and ensure strong adhesion.
- Layer multiple fiberglass patches from smallest to largest.
- Seal everything with unthickened epoxy top coats.
- Fair, sand, and apply a protective finish for a professional look.
What Counts as a “Large” Hole You Can Fix Yourself?
In fiberglass boat repair, a “large hole” typically refers to damage wider than 2 inches but smaller than a basketball, usually around 2 to 6 inches in diameter. These holes may fully penetrate the hull, but they don’t compromise the overall structure of the boat.
If:
- The damage is isolated (not involving stringers or bulkheads),
- The area around the hole is solid (no spongy or rotted core),
- And you feel confident using fiberglass cloth and epoxy resin,
Then it’s a DIY project most boaters can handle with the right steps.
However, it’s safer to consult a marine professional if the hole is larger than a dinner plate, affects the hull’s integrity, or has surrounding delamination.
Repairing a Large Hole in a Fiberglass Boat
Here are my recommended steps for repairing a large hole in a fiberglass boat.
1. What You’ll Need
- 80–100 grit sandpaper or sanding pads
- Acetone (cleaning agent)
- Fiberglass cloth (10 oz recommended)
- Epoxy resin (or polyester/vinyl ester)
- Disposable brushes and rollers
- Plastic spreaders
- Scissors or utility knife
- Painter’s tape
- Mixing cups and sticks
- Gloves, mask, and goggles for safety
2. Prep the Damaged Fiberglass Area
Start by carefully examining the extent of the damage. Use acetone and a clean rag to wipe the area surrounding the hole thoroughly.
This removes grease, dirt, wax, or any residue that could interfere with adhesion.
Once clean, sand the area using 80-100 grit sandpaper, extending at least 3 to 4 inches beyond the hole’s edge.
This sanding process, called “keying” the surface, is critical. It gives the resin something to grip onto when applied.
After sanding, use a vacuum or compressed air to blow away dust. Wipe again with acetone or a wax and grease remover, then allow the area to dry completely.
Want to avoid costly fiberglass boat repair mistakes?
Learn how to inspect damage properly, decide when to DIY, and prevent expensive fiberglass problems before they start.
3. Create a Backing for the Patch (Optional)
Apply this step only if the hole goes through the entire structural material and can be seen from the other side.
Because the hole is on the outside of the hull, you can’t simply pour epoxy and expect it to hold — gravity and water pressure work against you.
So before applying any resin, you must create a backing support behind the hole.
Cut a flexible sheet of plastic, cardboard, or fiberglass panel slightly larger than the hole. Tape or screw this panel from the inside of the hull, so it forms a temporary backing that keeps the epoxy in place while curing.
If accessing the inside is impossible, you can temporarily tape wax paper over a flexible mold and press it against the hole from outside to hold the shape.
Some DIYers also use a balloon, tape mold, or foam pad covered in release film for smaller holes.
4. Cut Fiberglass Cloth for Patching
Now that the surface is clean and your backing is in place, it’s time to cut fiberglass cloth patches.
Measure the hole and cut 3 to 5 layers of fiberglass cloth, each slightly larger than the last, forming a graduated stack. For example, if the hole is 4 inches wide, cut your first patch at 4 inches, the next at 5 inches, and so on.
This layering approach ensures a strong, tapered patch that bonds well to the surrounding fiberglass.
Use 10-ounce fiberglass cloth for maximum strength, and ensure your cuts are clean. Set these aside in order.
5. Mix the Epoxy Resin
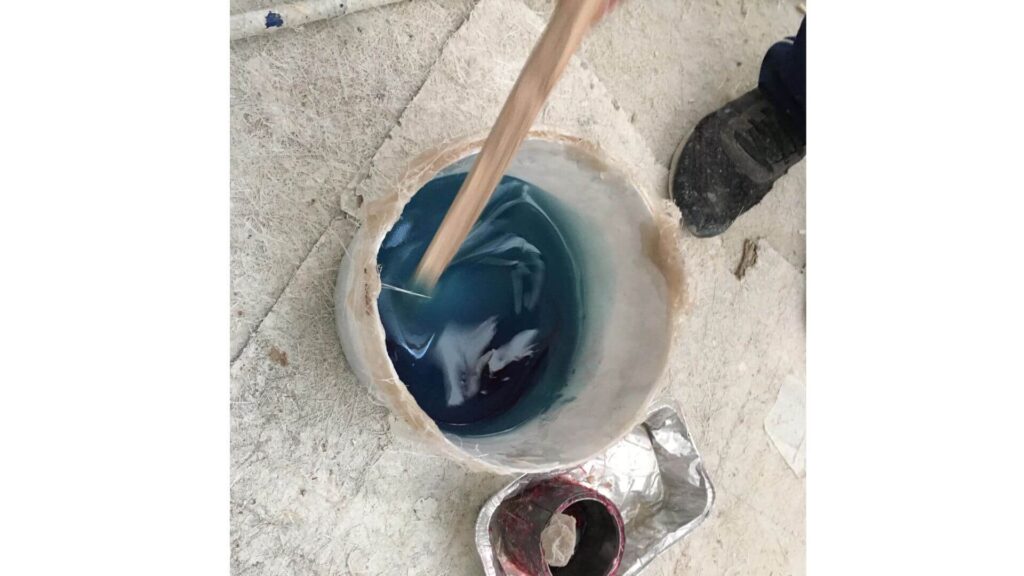
Next, mix your epoxy resin and hardener according to the manufacturer’s directions.
For this kind of structural repair, slow-curing epoxy is ideal because it gives you more working time.
Combine the components in a mixing cup and stir thoroughly for 2–3 minutes using a stir stick. The final mix should be consistent with no streaks.
If you’re applying the epoxy from outside the hull, this is where thickening becomes critical.
Add a thickening filler like colloidal silica (Cabosil) or chopped fiberglass strands to the resin until it reaches a peanut butter-like consistency.
This helps it stay in place and bond properly when applied vertically or overhead on the outer hull.
6. Apply Thickened Epoxy from the Outside
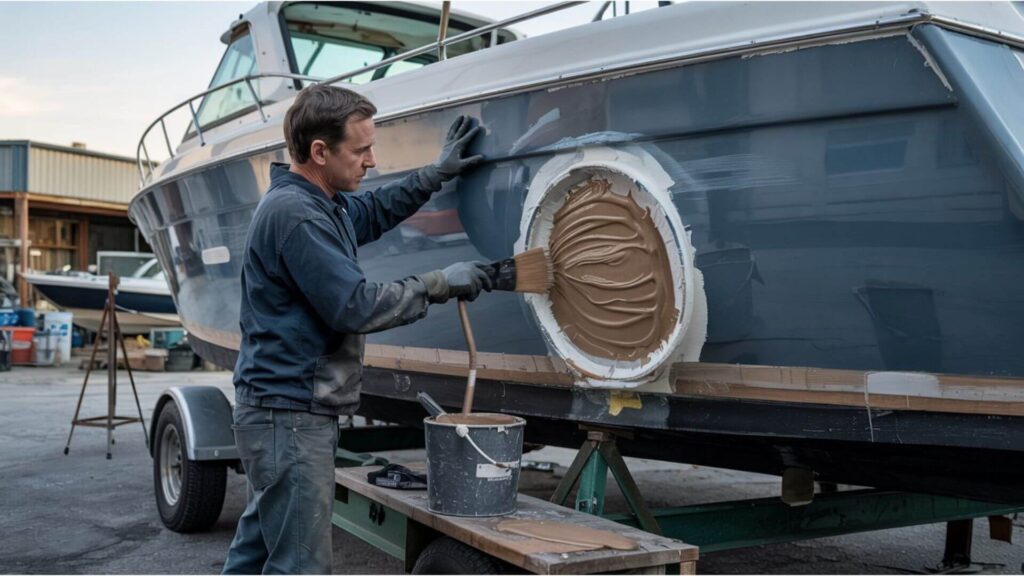
Wearing gloves, press the thickened epoxy into the hole from the outside of the hull.
Use a putty knife or spreader to pack it tightly into the damaged area, pressing firmly so the epoxy adheres to the fiberglass edges and backing panel.

This guide helps boat owners understand fiberglass damage clearly — what matters, what doesn’t, and when repairs are truly necessary, so small issues don’t turn into expensive mistakes.
See What Every Boat Owner Should Know →This initial layer helps seal the hole, create a bonding surface, and fill internal voids.
You want the epoxy to completely fill the gap without sagging. If it begins to run or drip, you may need to wait a few minutes for it to begin curing or add more thickener.
Let the epoxy partially cure (gel stage) until it’s firm but still tacky. This is your window to begin laying the fiberglass patches.
7. Saturate and Layer the Fiberglass Patches
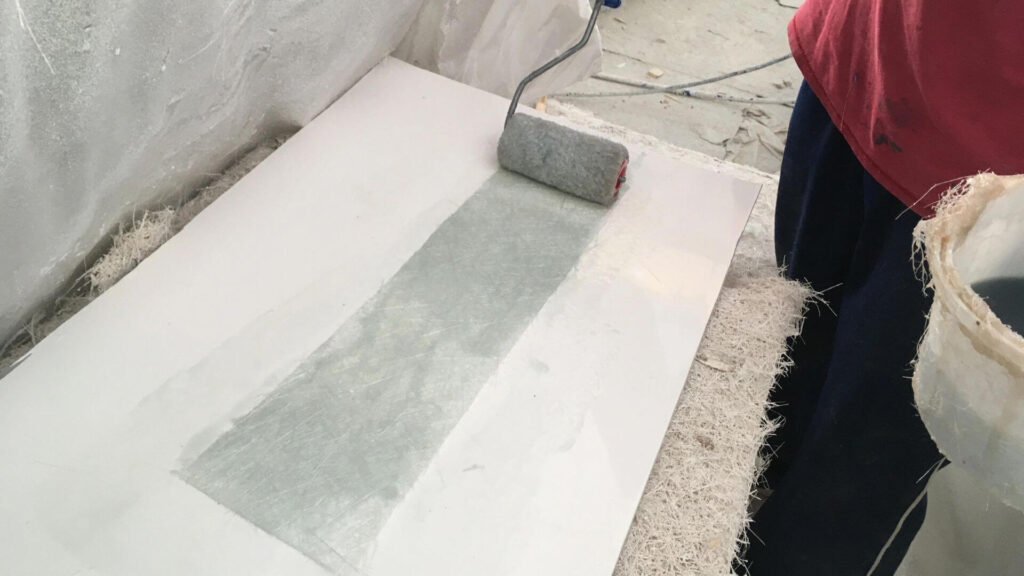
Next, using a disposable brush or roll mohair, completely saturate the fiberglass cloth with epoxy resin. Ensure full penetration—any dry spots will air pocket later, compromising structural strength.
Begin with the smallest patch and press it over the hole, aligning it carefully.
Saturate the patch with unthickened epoxy resin using a disposable brush or roller. Then, apply the next largest patch on top, saturate it, and repeat until all layers are in place.
As you work, use a plastic spreader to remove any trapped air bubbles or wrinkles in the cloth.
Make sure each layer is soaked completely and the epoxy penetrates all fibers — dry spots can lead to future failure.
Let the layered patch fully cure based on the resin manufacturer’s cure time (often 12–24 hours).
8. Add Protective Epoxy Coats
Once the fiberglass patches have cured, sand the surface gently with 80–100 grit sandpaper to smooth any uneven layers.
Then mix a fresh batch of unthickened epoxy and brush on 2–3 thin protective coats. These seal the patch from moisture and UV damage and prepare the surface for painting or gelcoat.
Let each coat cure before applying the next. Lightly sand between coats for best results.
9. Fair, Finish, and Paint
After the final epoxy coat has cured for 48 hours or more, sand the surface again until smooth and flush with the original hull. This may involve using a fairing compound to fill in low spots and blend the edges.
Wipe away all dust, then apply a marine primer if painting or gelcoat if restoring the original finish.
Follow with color matching and polishing if desired.
Finally, reapply any antifouling paint on the repaired area if it’s below the waterline.
Repairing Smaller Fiberglass Holes and Fractures
For smaller cracks or fractures less than 6 inches, you can streamline these fiberglass repair steps even further.
Start by thoroughly cleaning and sanding the area just as before. Then use thickened epoxy alone to fill any minor fiberglass holes or cracks. Apply several coats allowing each batch to fully harden between layers until achieving a slight thickness above flush.
Once cured, sand any bumps smooth. Then brush on resin without fillers to seal the surface before applying primers, paints or gelcoat as desired.
==>> Read my full guide on repairing small holes in a fiberglass boat here.
Tips for Structurally Sound Fiberglass Hole Repairs
To guarantee restored integrity, keep these fiberglass repair tips in mind:
- Always roughen the surrounding area larger than the hole itself
- Use fiberglass cloth thicker and stronger than the original skin
- Fully saturate cloth layers before applying
- Remove any trapped air pockets
- Fill voids with epoxy
- Apply a minimum of 3 layers of unthickened epoxy
- Allow ample cure time between steps
Preparing Your Boat for Launch
After a high-quality fiberglass repair, your boat is ready to get going once again! Just make sure to:
- Thoroughly inspect the repair
- Check for any pinholes, gaps, or soft spots
- Sand down uneven areas with 80-100 grit paper
- Prime and finish-coat the entire patched zone
- Reapply anti-fouling bottom paints
Complete these final steps, and your boat should provide reliable performance for more seasons.
You should also read my in-depth article about fixing any type of boat fiberglass holes here!
Need more tips on repairing a large hole in a fiberglass boat? watch this video by Sailing Vagabond Epicurean.
Final Thoughts
While this guide covers a step-by-step guide on repairing a large hole in a Fiberglass boat, each boat damage situation is unique.
Make sure to carefully apply thickened epoxy from the outside, use proper cloth layering, and allow sufficient cure time. If done correctly, the repaired area will be as strong — or stronger — than the original fiberglass skin.
If you have specific questions about your repair or run into any issues along the way, don’t hesitate to ask for advice in the comments section below!
I’m happy to provide extra tips to ensure watertight repairs anyone can accomplish at home.
You can use the contact form in the menu above, or email me at contact@boatgenesis.com.

Warren is the founder of BoatGenesis and brings practical experience in fiberglass boat repair, marine equipment testing, and powerboat building. He has worked on a range of repair and restoration projects and now focuses on creating clear, research-based guides to help boat owners avoid costly mistakes and make smarter maintenance decisions. Learn more about Warren.