

Learning how to replace a transom on a fiberglass boat can seem intimidating, but with the right guidance, you can restore your boat’s strength for years of adventures on the water.
In this guide, I’ll break down every step of the process, share insider tips, and even cover what most professionals overlook—like how to avoid hidden pitfalls and ensure your repair lasts.
Whether you’re a weekend DIYer or a seasoned boater, you’ll find practical advice, clear instructions, and a few hard-earned lessons to help you succeed.
Key Takeaways
- Replacing a transom on a fiberglass boat is a big job, but it’s absolutely doable with patience and the right tools.
- The main steps are: assessment, removal, fabrication, installation, and finishing.
- Using modern materials and techniques can make your repair stronger than the original.
- Don’t rush the prep or the curing—quality work here means years of worry-free boating.
- Avoid shortcuts that can lead to hidden moisture or future rot.
- Key Takeaways
- Why Transoms Fail—and Why You Should Care
- Signs Your Fiberglass Boat Transom Needs Replacing
- Tools and Materials You’ll Need
- How to Replace a Transom on a Fiberglass Boat?
- What Most Pros Don’t Tell You
- Common Mistakes to Avoid
- Advanced Tips: Going Beyond the Basics
- Final Steps: Reassembly and Sea Trial
- Maintenance Tips to Keep Your New Transom Strong
- FAQ
- Final Thoughts
Why Transoms Fail—and Why You Should Care
The transom is the backbone of your boat’s stern. It supports the engine, absorbs water impact, and holds everything together.
Over time, water intrusion—often from poorly sealed bolts or cracks—rots the wood core inside the fiberglass, leading to flexing, stress cracks, and eventually, structural failure.
Ignoring a failing transom isn’t just a safety risk; it can lead to expensive repairs and even the loss of your boat.
Replacing it is a big job, but it’s far more affordable than buying a new one.
Signs Your Fiberglass Boat Transom Needs Replacing
Before you start, make sure you actually need a transom replacement. Here’s what to look for:
- Soft spots or flexing: Press on the transom near the engine mount. If it feels spongy or moves, the wood is likely rotted.
- Cracks or separation: Stress cracks around the engine bracket or corners.
- Water stains or leaks: Water draining from screw holes or seams.
- Unusual engine movement: Excessive vibration or shifting while underway.
A simple test: Tap the transom with a screwdriver handle. Solid wood sounds sharp; rotten wood sounds dull.
Tools and Materials You’ll Need
Here’s your essential toolkit:
- Safety gear: gloves, goggles, respirator
- Power tools: drill, circular saw, oscillating multi-tool, grinder
- Hand tools: chisels, putty knives, screwdrivers, clamps
- Fiberglass repair kit: resin, hardener, fiberglass cloth/mat
- Marine plywood or composite core material
- Epoxy adhesive and fillers
- Acetone, rags, mixing cups
- Measuring tape, straight edge, marker
- Cardboard (for templates)
- Sandpaper (various grits)
- Paintbrushes, rollers
Pro tip: If you’re replacing with composite instead of wood, you’ll need fewer worries about future rot, but you’ll need to follow the manufacturer’s instructions for bonding.
Want to avoid costly fiberglass boat repair mistakes?
Learn how to inspect damage properly, decide when to DIY, and prevent expensive fiberglass problems before they start.
How to Replace a Transom on a Fiberglass Boat?
Here are a few steps to follow for replacing the transom on a fiberglass boat.
Note: This transom repair is performed from the inside of the boat, which is the preferred method for most fiberglass boats. By leaving the outer skin intact, you preserve the boat’s structural integrity and original appearance while minimizing the risk of water intrusion. This approach ensures a cleaner finish and a more durable, long-lasting repair.
You would only repair from outside the boat when the inside access is too difficult or space is limited.
1. Assess the Transom Damage
The first step is to inspect the damage and determine how extensive the repairs need to be.
Look for cracks, soft spots, or areas where the transom is pulling away from the hull. Minor damage may only require an epoxy injection to re-bond it.
==>> Read my full guide on fiberglass boat transom repair here.
More significant damage, like rotting or splintering, means a full transom replacement.
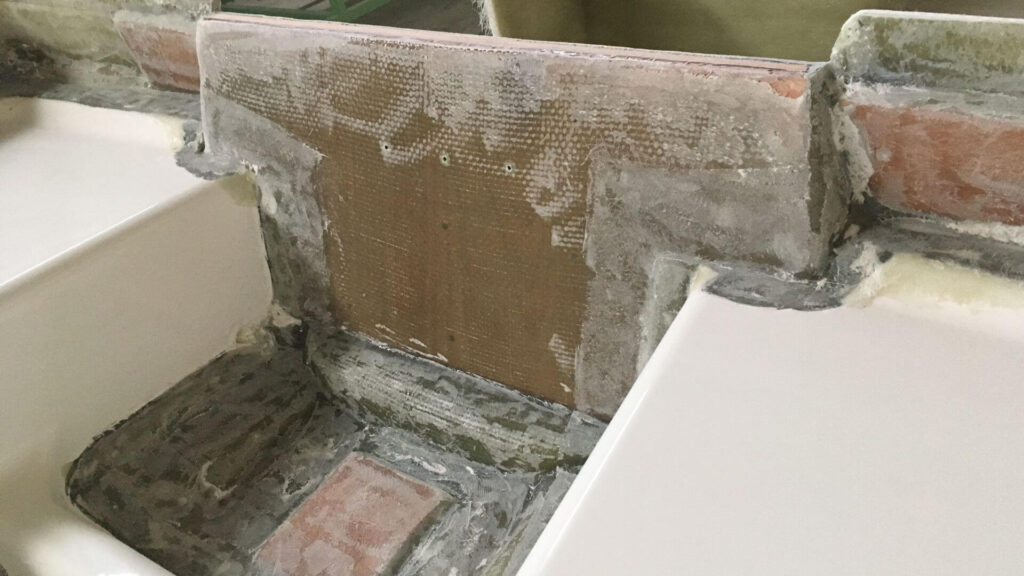
2. Remove the Old Transom
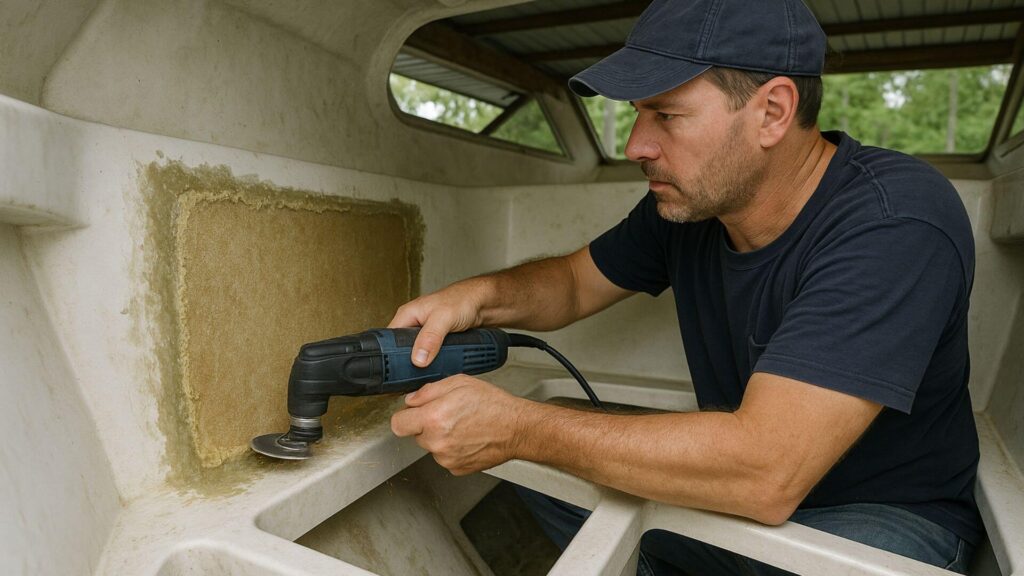
- From inside the boat, use a circular saw or oscillating tool to carefully cut away the inner fiberglass skin, leaving a 1-2 inch border.
- Remove all the old wood or core material. Scrape, chisel, or grind out every bit of rot. Moisture left behind will doom your repair.
- Inspect the outer fiberglass skin for damage. If it’s cracked or thin, reinforce it with new fiberglass layers.
Insider tip: Many guides gloss over this, but take your time here. Even a small bit of rotten wood left behind can start the rot cycle all over again.
3. Dry and Clean the Area
- Let the area dry completely—use fans or even a heat gun if needed.
- Wipe all surfaces with acetone to remove oils and dust.
4. Make a Template and Cut the New Core
- Use cardboard to make a precise template of the transom cavity.
- Trace the template onto marine plywood or composite core. Cut to fit snugly.
- If your transom is thicker than your material, laminate two or more layers with epoxy.
Tip: For extra strength, stagger the seams if using multiple layers, and pre-coat the wood with epoxy before installation to seal out moisture.
5. Install the New Transom
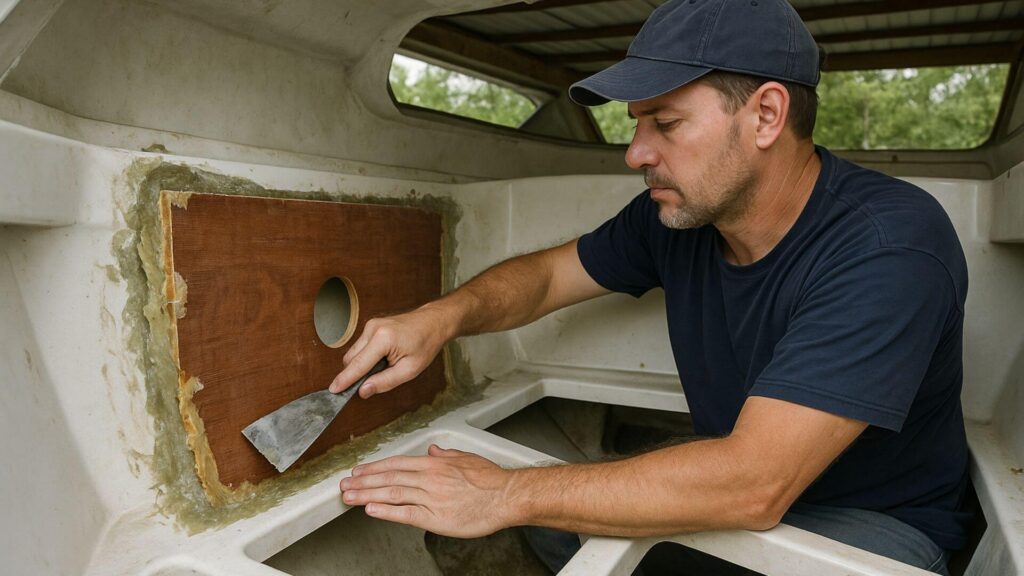
Measure precisely and cut your marine plywood to size.
Test fit it into the transom opening you’ve created. Pre-drill any holes for hardware mounts or wiring.
Apply thickened epoxy to all contact surfaces and bolt the plywood in place securely. Allow the epoxy to fully cure as directed.
6. Waterproof and Reinforce the Transom
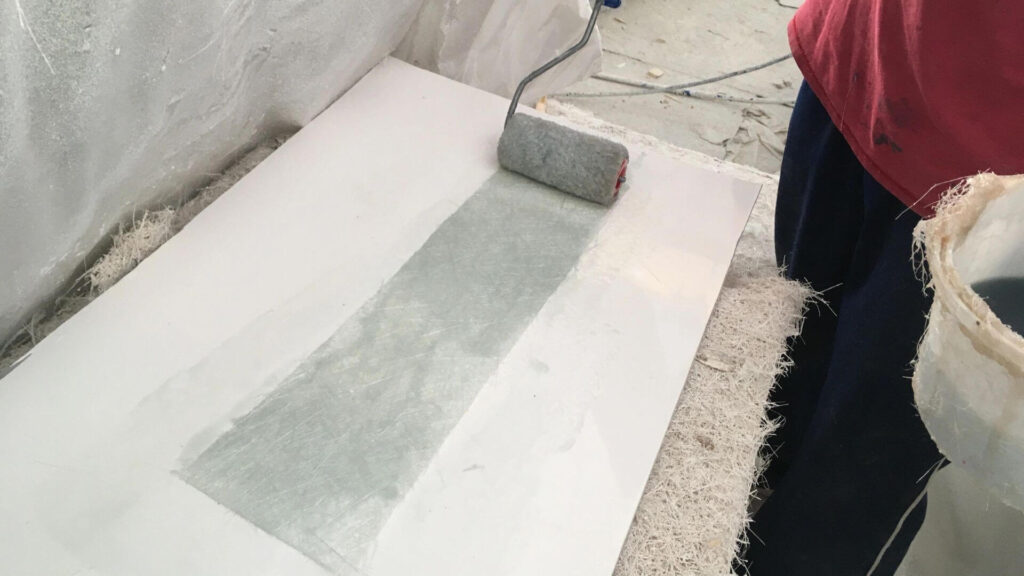
- Once the core is bonded and cured, sand the edges of the existing inner skin to a smooth taper.
- Cut fiberglass cloth or mat to size, starting with the largest piece and working to smaller ones.
- Wet out each layer with resin and lay them in place, overlapping each edge for strength.
- Roll out air bubbles and ensure full saturation.
- Build up layers until the repair is flush with surrounding areas.
Install stainless steel backing plates with through bolts for added reinforcement once the fiberglass has cured fully.
==>>Also read: Does a jack plate put more stress on a transom?
7. Finish and Reinstall Hardware
- Once cured, sand smooth and clean the area.
- Drill holes for hardware, but overdrill each hole, fill with epoxy, and then re-drill to prevent future water intrusion—a step many skip, but this is crucial for a long-lasting repair.
- Reinstall your engine, trim, and fittings, sealing every bolt and screw with marine sealant.
With that, the fiberglass boat transom replacement is complete!

This guide helps boat owners understand fiberglass damage clearly — what matters, what doesn’t, and when repairs are truly necessary, so small issues don’t turn into expensive mistakes.
See What Every Boat Owner Should Know →What Most Pros Don’t Tell You
1. Moisture Testing and Prevention
Before you even start, check for hidden moisture in the boat’s structure around the transom using a moisture meter. If you skip this, you could trap water inside, leading to rot even after your hard work.
2. Upgrading Materials for Longevity
Consider using composite core materials instead of marine plywood. They’re lighter, won’t rot, and can be just as strong if installed correctly. Yes, they cost more up front, but you’ll thank yourself down the line.
3. Reinforcing the Outer Skin
If your outboard is larger than what the boat was originally designed for, or if you noticed extensive cracking in the outer fiberglass skin, now’s your chance to reinforce it.
Add extra layers of fiberglass cloth and resin to the outer skin before installing the new core. This not only boosts strength but also helps prevent future cracking and flexing under heavy loads.
Don’t skimp on this step if you want your transom to outlast the rest of your boat.
You could also read this Epoxyworks article that does a good job at emphasizing the importance of applying the largest fiberglass layers first and working inward for a flush finish.
4. Ventilation and Curing Time
Many boat owners get impatient during the curing process. But if you rush reassembly, you risk trapping solvents or moisture, weakening the bond.
Always allow each layer of epoxy and fiberglass to cure fully—sometimes up to 48 hours, depending on temperature and humidity. Good ventilation is key, both for your safety and for the best results.
5. Seal Every Penetration
Every bolt, screw, or fitting that passes through your new transom is a potential leak point. Use a high-quality marine sealant (like 3M 4200 or 5200) on every hole—even if the hardware claims to be “self-sealing.”
Overdrill, fill with epoxy, and then re-drill for a perfect, watertight fit. This step is often overlooked but is the most effective way to prevent future water intrusion.
Common Mistakes to Avoid
- Rushing the Demolition: Removing the old transom core can be tedious, but leaving even a small patch of rotten material can ruin your repair.
- Improper Core Fit: Your new core should fit snugly with no gaps. Loose fits mean weak spots and potential voids.
- Skipping Surface Prep: Epoxy and fiberglass only bond well to clean, sanded, dust-free surfaces. Wipe everything with acetone and sand thoroughly.
- Ignoring Curing Times: Cutting corners here leads to delamination and weak bonds. Patience pays off.
- Not Reinforcing High-Stress Areas: Transom corners and engine mount zones take the most abuse. Add extra fiberglass here for peace of mind.
Advanced Tips: Going Beyond the Basics
1. Adding Drainage
Install a drain tube at the bottom of the transom if your boat doesn’t already have one. This lets any trapped water escape and makes future inspections easier.
2. Upgrading to Composite Cores
Materials like Coosa Board or Nidacore are gaining popularity for good reason—they’re lighter, stronger, and immune to rot. While they cost more, they can extend the life of your repair and improve boat performance.
3. Documenting the Process
Take photos and notes as you go. Not only does this help if you ever sell the boat, but it also makes future maintenance easier.
4. Customizing for Your Needs
If you fish or use your boat for watersports, now’s your chance to add backing plates or extra mounting points for accessories. Reinforce these areas with additional fiberglass and epoxy for worry-free upgrades.
Final Steps: Reassembly and Sea Trial
Once the repair is fully cured and sanded smooth:
- Reinstall all hardware, using plenty of marine sealant.
- Mount your engine, double-checking alignment and torque specs.
- Test everything on land before hitting the water.
- Perform a careful sea trial, watching for leaks, vibrations, or unusual noises.
Maintenance Tips to Keep Your New Transom Strong
- Inspect hardware and sealant annually for cracks or leaks.
- Keep all holes sealed—never screw directly into the fiberglass without sealing.
- Store your boat covered to minimize water exposure.
- Dry out the bilge and transom area after every use.
FAQ
Marine-grade plywood is the best choice for a new transom. Use a plywood with a high-grade and thick veneer, like Okoume. This minimises voids in the inner plywood layers. Coating it properly with epoxy protects it from future rotting.
For most average-sized fiberglass boats under 25 feet, use 3/4 inch thick plywood. Scale up to 1 inch thick for larger boats. Remember, the transom must be strong enough to support the weight of the outboard motor.
Expect the job to take 3–7 days, depending on drying and curing times. The bulk of the work is in prep and waiting for materials to cure.
Most experts recommend 3-4 layers consisting of alternating sheets of woven roving and lighter fiberglass cloth. This provides both strength and water protection. Don’t forget to also seal around the transom with silicone.
Yes, with patience, basic tools, and attention to detail. If you’re not comfortable with power tools or fiberglass work, consider hiring a pro for the most critical steps.
Final Thoughts
Learning how to replace a transom on a fiberglass boat is a serious project, but it’s one of the most rewarding upgrades you can make.
With careful planning, quality materials, and a little sweat, you’ll restore your boat’s backbone and enjoy years of safe, solid boating.
Don’t rush, don’t skip steps, and remember—every hour you spend doing it right is an hour you’ll save on future repairs.
If you have questions or want to share your own transom replacement story, drop a comment below!

Warren is the founder of BoatGenesis and brings practical experience in fiberglass boat repair, marine equipment testing, and powerboat building. He has worked on a range of repair and restoration projects and now focuses on creating clear, research-based guides to help boat owners avoid costly mistakes and make smarter maintenance decisions. Learn more about Warren.


In the instructions, it is stated to remove the in-boat fiberglass from the transom. The pictures show the work being done from the outside of the boat.
Am I missing something?
Great observation—thanks for pointing that out! You’re absolutely right; the original image showed the work being done from the outside, which didn’t match the article’s focus on interior transom replacement. I’ve since updated the post with a more accurate image to better reflect the instructions. Appreciate the catch!