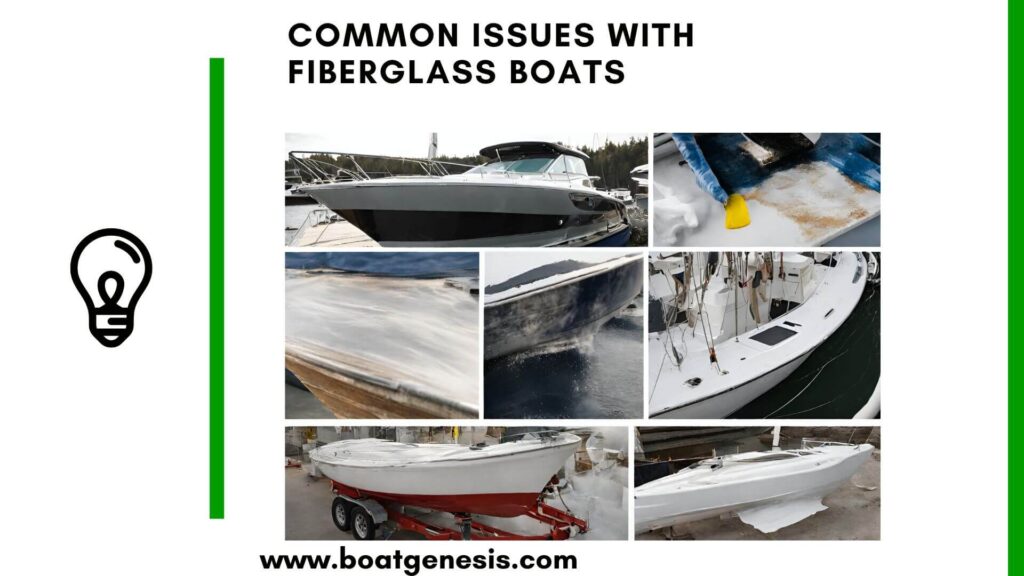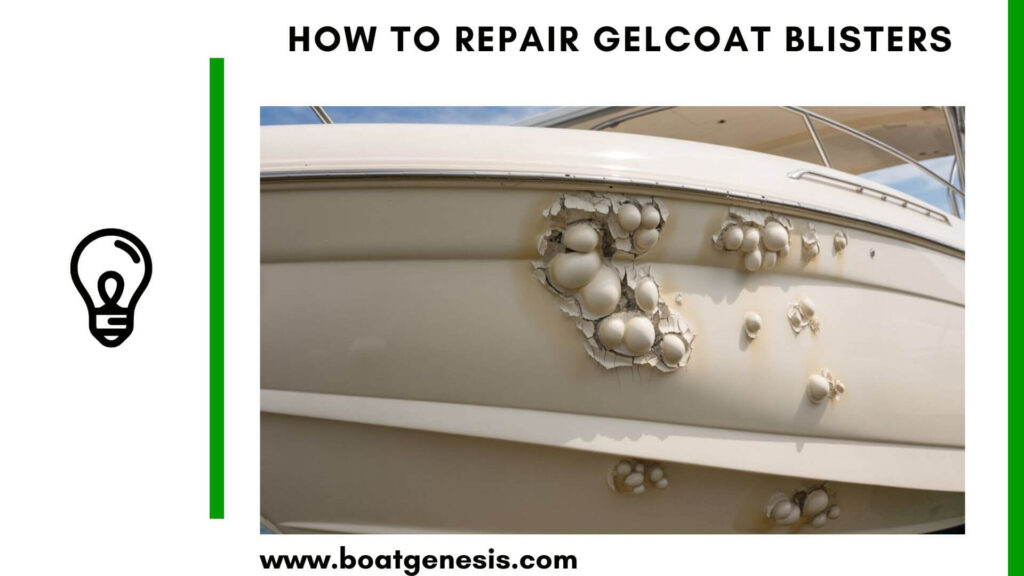
If you’ve spotted small, raised bubbles on your boat’s hull, you’re looking at gelcoat blisters — one of the most common fiberglass boat problems out there. The good news? Fixing gelcoat blisters is a job most boat owners can do themselves with the right materials and a bit of patience.
Left untreated, though, those small bumps can quietly grow into a much bigger (and more expensive) headache.
This guide walks you through everything: what causes blisters, how to assess the damage, and exactly how to repair and protect your hull so the problem doesn’t come back.
Key Takeaways
- Gelcoat blisters are caused by water being absorbed into the fiberglass, creating pressure beneath the surface.
- Small blisters confined to the gelcoat layer can be a DIY repair — deeper damage may need professional help.
- Proper drying before any repair is non-negotiable. Skipping this step is the #1 reason repairs fail.
- Using a barrier coat after repair dramatically reduces the chance of blisters returning.
- Regular inspection every 6 months catches new blisters before they become structural problems.
- Key Takeaways
- What Are Gelcoat Blisters, and Why Do They Form?
- Assessing the Damage First
- What You'll Need
- Step-by-Step: How to Repair Gelcoat Blisters
- How Long Does a Gelcoat Blister Repair Take?
- How to Stop Gelcoat Blisters from Coming Back
- When to Call a Professional
- FAQ: How to Repair Blisters in Gelcoat
- Wrapping Up
What Are Gelcoat Blisters, and Why Do They Form?
Gelcoat is the smooth, glossy outer layer of a fiberglass boat. It looks tough, but it’s actually slightly porous — and over time, water molecules work their way through. Once water gets trapped between the gelcoat and the fiberglass laminate beneath it, a chemical reaction occurs.
The trapped moisture builds up osmotic pressure, and the gelcoat starts to push outward. That’s the blister you see.
Think of it like a slow-growing water balloon stuck to the hull.
Common culprits include:
- Prolonged storage in the water (especially in warm climates)
- Low-quality or thinly applied gelcoat from the factory
- Poor hull preparation before the gelcoat was originally applied
- No barrier coat to act as a moisture shield
- Chemical exposure or extreme temperature swings
Watch out: Saltwater and warm water accelerate blister formation. If your boat lives in a marina year-round, inspect the hull more frequently than seasonal sailors.
Assessing the Damage First
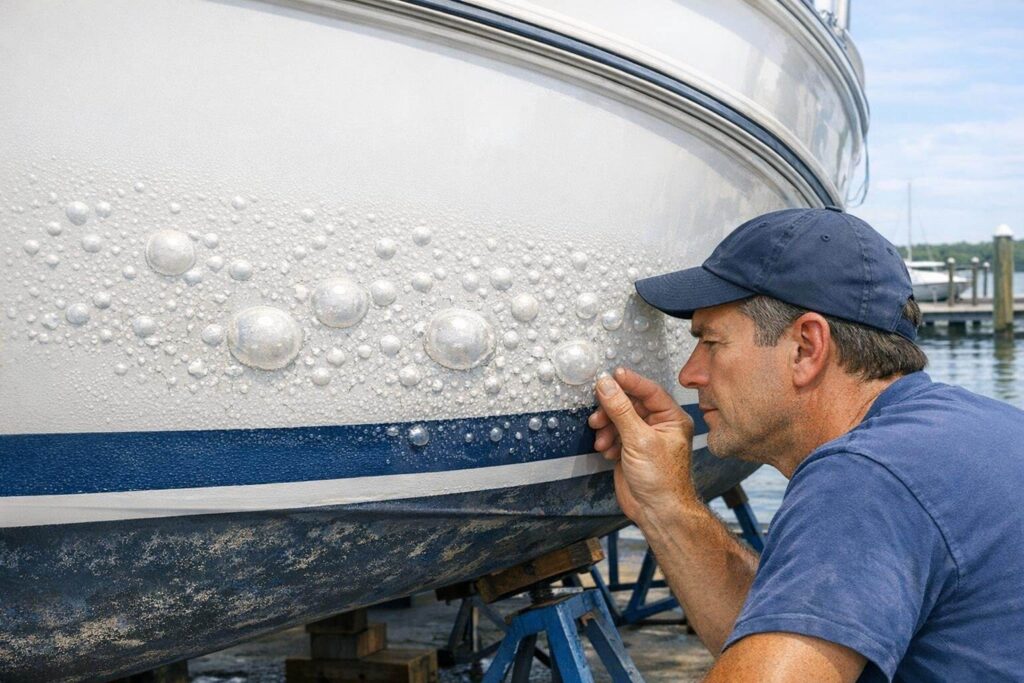
Before you grab any sandpaper, take the time to evaluate what you’re dealing with properly. Not all blisters are equal.
Surface blisters vs. structural blisters
Use a sharp tool — a pick, awl, or stiff scraper — to carefully open one or two blisters. If the fluid inside is clear or slightly milky and the fiberglass beneath feels firm, you’re dealing with surface blisters. That’s the best-case scenario and a straightforward repair.
Want to avoid costly fiberglass boat repair mistakes?
Learn how to inspect damage properly, decide when to DIY, and prevent expensive fiberglass problems before they start.
If the liquid smells strongly of chemicals, or if the fiberglass under the blister feels soft, spongy, or delaminated, you’ve got structural damage. At that point, a professional assessment is a smart call before you go further.
| Blister Type | Signs | Repair Approach | DIY Friendly? |
|---|---|---|---|
| Surface blister (gelcoat only) | Firm fiberglass, clear/milky fluid | Sand, fill, re-gelcoat | ✅ Yes |
| Moderate (shallow delamination) | Slightly soft area, discolored fluid | Grind out, epoxy fill, re-gelcoat | ⚠️ With experience |
| Structural (deep delamination) | Spongy hull, strong chemical smell | Laminate repair + gelcoat | ❌ Seek a pro |
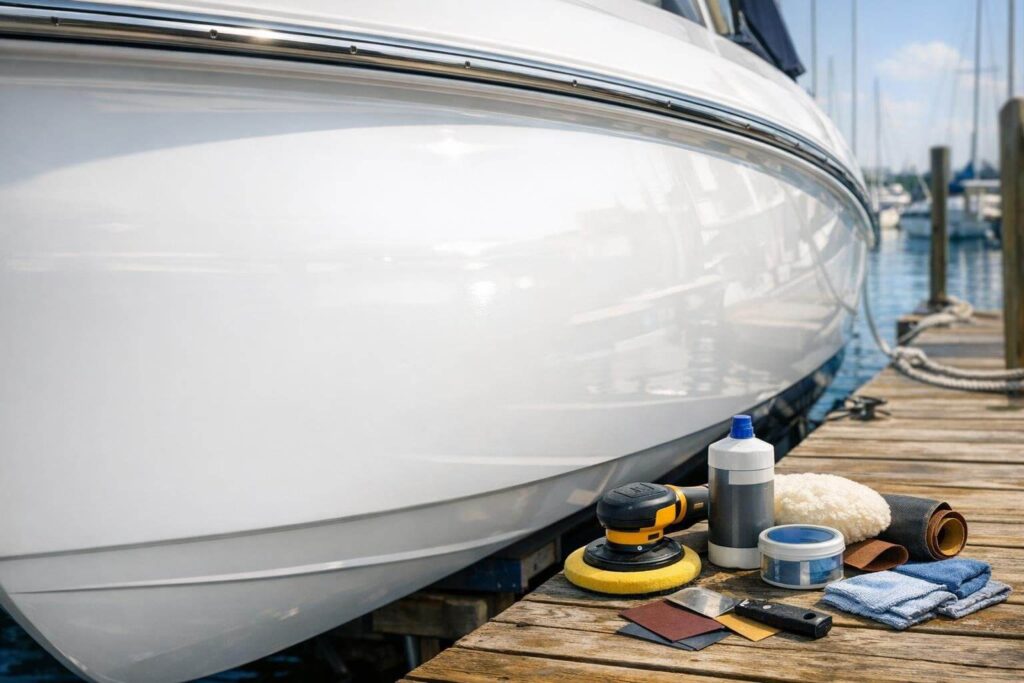
What You’ll Need
Get everything together before you start. Running to the hardware store mid-repair is the kind of thing that leads to shortcuts.
Tools
- Heat gun or hair dryer
- Scraper or awl
- Putty knife
- Orbital sander or sanding block
- Mixing cups and stir sticks
- Paintbrushes or foam rollers
- Rotary buffer with foam pad
Materials
- Gelcoat repair kit (color-matched)
- Two-part polyester filler or epoxy fairing compound
- Sandpaper: 80, 120, 220, 400, 600 grit
- Acetone
- Clean rags
- Masking tape
- Marine polishing compound
- Marine wax
On color-matching: don’t skip this. Gelcoat yellows and fades over time, so what looks like “bright white” on the shelf often won’t match your hull. If you can, bring a photo or a small sample to your marine supply store.
Step-by-Step: How to Repair Gelcoat Blisters
Step 1: Dry the Affected Area
This is the most important step and the one most people rush. A wet or damp hull will cause your repair to fail — the new gelcoat won’t bond properly, and the blisters will come back fast.
Open each blister with a scraper or pick, squeeze out any fluid, and let the hull air dry. For a thorough job, use a heat gun on low, keeping it moving to avoid scorching the fiberglass. Ideally, let the hull dry for several weeks if your boat was in the water.
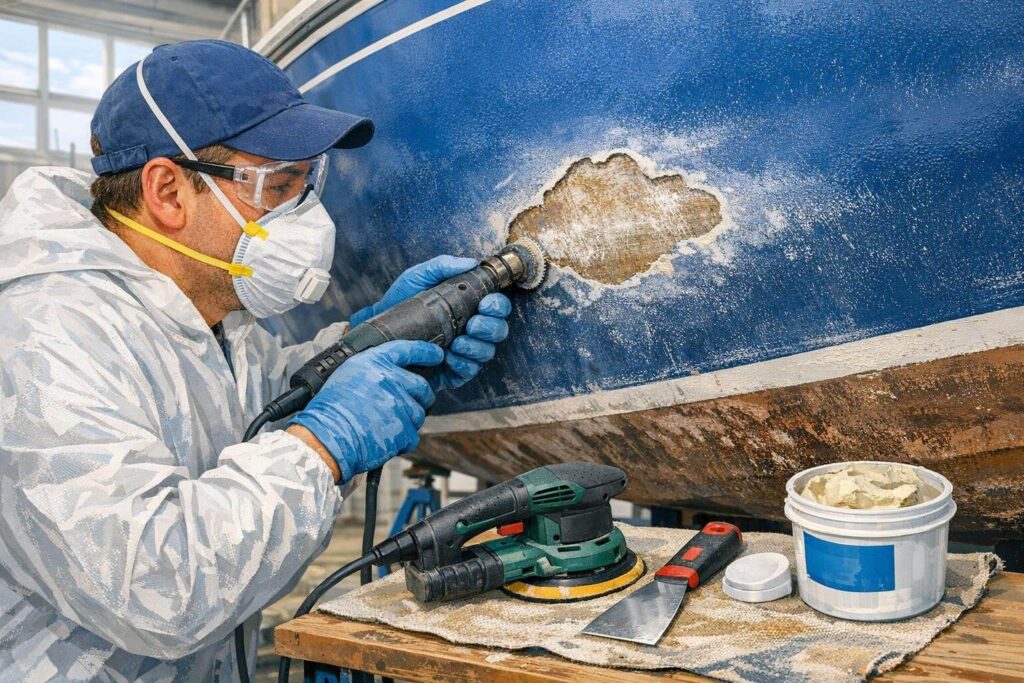
Step 2: Remove Damaged Gelcoat
Sand or grind out all the damaged gelcoat around each blister. You want to reach clean, solid material — no soft spots, no residue.
Start with 80-grit sandpaper and work in a slightly larger area than the blister itself. Clean the surface with acetone and a fresh rag.
Step 3: Apply Filler
Mix your two-part polyester filler according to the manufacturer’s instructions — most have a short working time, so mix small batches.
Use a putty knife to press the filler firmly into each void, slightly overfilling it. Let it cure fully before moving on.
Step 4: Sand the Repair Smooth
Once the filler is hard, sand it flush with the surrounding hull. Work through the grits: start with 120, move to 220, then finish with 400.
Wipe away all dust with a clean rag dampened with acetone. The surface should feel smooth and even under your fingertips.
Note that this step is one of the most important if you want to repair blisters in gelcoat the right way. So, take your time.

This guide helps boat owners understand fiberglass damage clearly — what matters, what doesn’t, and when repairs are truly necessary, so small issues don’t turn into expensive mistakes.
See What Every Boat Owner Should Know →Step 5: Apply New Gelcoat
Mix your gelcoat with hardener as directed — again, work in small batches since it starts to gel quickly. Apply thin, even coats with a brush or foam roller, allowing each layer to cure before adding the next. Two to three coats are typical.
Let the final layer cure fully (up to 24 hours per coat, sometimes longer in cool or humid conditions).
Step 6: Wet-Sand, Polish, and Wax
Wet-sand the cured gelcoat with 400-grit, then 600-grit, to knock down any high spots. Follow with a marine polishing compound on a rotary buffer to restore the shine.
Finish with a quality marine wax to protect the repair and blend it visually with the surrounding hull.
How Long Does a Gelcoat Blister Repair Take?
Here’s an honest breakdown of the time involved — drying time is the real wildcard.
| Stage | Estimated Time |
|---|---|
| Hull drying (after haul-out) | 2 – 8 weeks (varies with weather) |
| Opening and grinding blisters | 2 – 6 hours |
| Applying filler and sanding | 3 – 5 hours |
| Gelcoat application (multiple coats) | 1 – 3 days |
| Final sanding, polishing, waxing | 2 – 4 hours |
How to Stop Gelcoat Blisters from Coming Back
Fixing the current damage is only half the job. Here’s what actually works for prevention:
Apply a barrier coat
This is the single most effective thing you can do. An epoxy barrier coat (like Interlux Interprotect) seals the hull against moisture absorption. Apply it after your gelcoat repair before putting the boat back in the water.
Haul out annually
Boats that stay in the water year-round blister faster. Hauling out gives the hull a chance to dry, and gives you the chance to spot new blisters early.
Wax regularly
Marine wax adds a thin layer of moisture resistance above the gelcoat. It’s not a substitute for a barrier coat, but it helps — and it keeps the hull looking good.
Inspect every six months
Mark any small or suspicious areas with tape during each inspection. Catching a blister when it’s the size of a pea is far easier than dealing with it when it’s the size of a golf ball.
When to Call a Professional
Not every blister repair is a weekend DIY project. Here are the signs it’s time to bring in a professional:
- The fiberglass beneath the blisters feels soft, springy, or shows signs of delamination
- Blisters cover a large portion of the hull (widespread osmosis)
- You find structural damage around the keel, waterline, or through-hull fittings
- The hull has been previously repaired and the damage has returned
For advanced osmosis treatment, professional boatyards can strip the entire gelcoat, allow the hull to dry for months, and apply a full epoxy laminate system — a process that goes well beyond a DIY repair but can add years to a boat’s life. This BoatUS guide on osmotic blistering explains the process in detail.
FAQ: How to Repair Blisters in Gelcoat
Are gelcoat blisters serious?
They range from cosmetic to structural. Small surface blisters are a manageable DIY repair. If left untreated for years, water intrusion can cause delamination — which weakens the hull and becomes a much more expensive fix.
Can I repair blisters myself?
Yes, for surface blisters. You need basic tools, a color-matched gelcoat kit, and patience. The biggest mistake DIYers make is not waiting long enough for the hull to dry before applying filler or gelcoat.
Do freshwater boats get gelcoat blisters?
Yes. The osmotic process happens in freshwater too — it’s just generally slower than in saltwater. If your freshwater boat stays in the water all season, inspect it regularly.
How do I know if my boat has osmosis?
Signs include multiple blisters across the hull, a vinegar-like smell when you open a blister, and soft or discolored fiberglass beneath the gelcoat. A moisture meter (available at most marine stores) can help confirm how wet the hull is.
What’s the difference between gelcoat and epoxy repair?
Gelcoat is the cosmetic outer finish — it’s what you see and touch. Epoxy is used for structural fills and as a barrier coat because it bonds more strongly and is more waterproof. For blister repairs, you’ll often use both: epoxy filler to fill the void, gelcoat on top to restore the appearance.
How much does professional gelcoat blister repair cost?
It varies widely depending on the extent of the damage and your location. Minor repairs can cost $500–$1,500. A full osmosis treatment on a 30-foot boat can run $3,000–$8,000 or more. Doing it yourself saves most of that cost.
Will blisters affect my boat’s resale value?
Untreated blisters — especially widespread osmosis — can significantly reduce resale value and are a red flag during a pre-purchase survey. A properly documented repair actually demonstrates good boat maintenance, which buyers appreciate.
Wrapping Up
Gelcoat blisters aren’t the end of the world — but they do demand attention. The repair process is straightforward if you take your time, let the hull dry properly, and follow each step without rushing.
To repair blisters in gelcoat, you have to be patient.
The most common mistake is impatience: jumping to the filler and gelcoat before the fiberglass is truly dry is a fast track to repeating the whole job.
Fix it right once, apply a barrier coat, and stay on top of your regular inspections. Your hull will thank you — and so will your wallet at resale time.

Warren is the founder of BoatGenesis and brings practical experience in fiberglass boat repair, marine equipment testing, and powerboat building. He has worked on a range of repair and restoration projects and now focuses on creating clear, research-based guides to help boat owners avoid costly mistakes and make smarter maintenance decisions. Learn more about Warren.