Filling screw holes in a fiberglass boat may seem like a small task, but leaving them unaddressed can lead to bigger problems like water intrusion, weakening of the hull, and unsightly cosmetic damage.
Whether you’re repairing old mounting holes from hardware installations or fixing accidental drilling mistakes, knowing how to fill screw holes properly is crucial for maintaining your boat’s strength and appearance.
In this step-by-step guide, we’ll show you exactly how to restore your fiberglass boat’s surface like a pro — with simple materials, clear methods, and smart DIY tips.
KEY TAKEAWAYS
Always fill screw holes promptly to prevent water intrusion, core rot, and weakening of structural areas.
Prep the area properly by cleaning, drying, and beveling hole edges for better adhesion.
Use thickened epoxy filler to completely seal holes — no fiberglass cloth needed for standard screw hole repairs.
Finish with gelcoat and polish for a seamless, long-lasting finish.
Protect your work by applying a marine wax layer after polishing.
Let’s get started.
Want to avoid costly fiberglass boat repair mistakes?
Learn how to inspect damage properly, decide when to DIY, and prevent expensive fiberglass problems before they start.
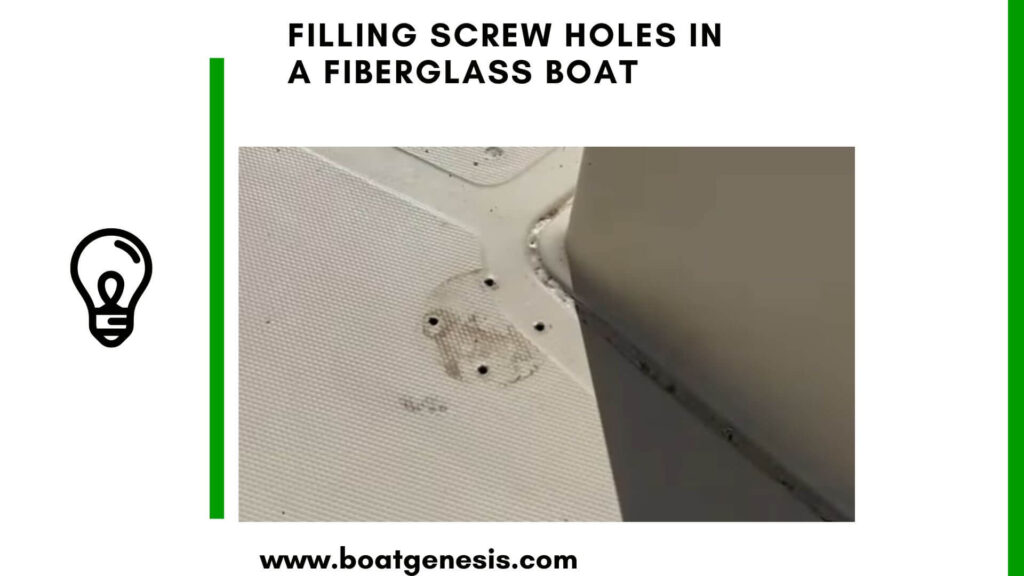
Why It’s Important to Fill Screw Holes in a Fiberglass Boat
Open screw holes are more than just a cosmetic flaw — they can cause serious hidden damage over time:
- Water Intrusion: Moisture easily seeps into open holes, leading to waterlogged cores, delamination, and internal rot.
- Structural Weakening: Openings compromise the strength of decks, transoms, and hull sections, especially in cored fiberglass.
- Corrosion: Metal fasteners left in open holes can corrode, stain, and even crack surrounding laminate.
- Aesthetics: Multiple screw holes create an unprofessional, weathered appearance that hurts resale value.
Properly filling and sealing these holes protects your boat’s integrity, keeps it looking its best, and extends its lifespan.
Filling Screw Holes In A Fiberglass Boat: Step-By-Step Instructions
1. Preparing the Area
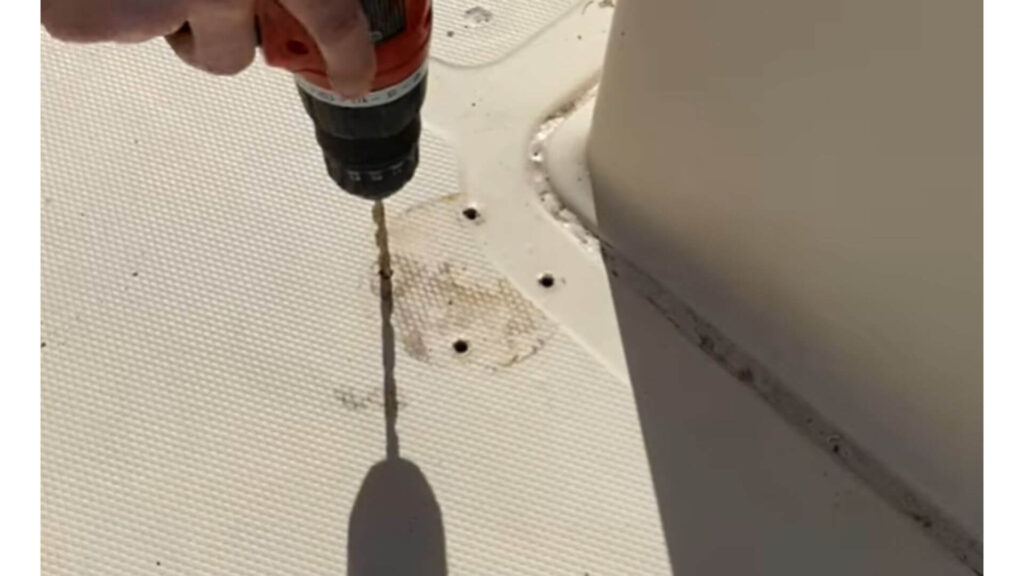
Before filling anything, prep is crucial:
Use a Dremel tool to slightly bevel (V-out) the hole edges if needed. This creates more surface area for the filler to grip, ensuring a stronger repair.
Clean the area thoroughly with soap and water to remove dirt and salt.
Dry completely.
Wipe the area around each hole with acetone to eliminate oils or waxes that could interfere with bonding.
Careful inspection will dictate the supplies needed for repairs.
2. Filling the Screw Holes
Now it’s time to fill the holes securely:
- Mix marine-grade epoxy resin and a thickening filler (like colloidal silica) to create a peanut butter consistency.
- Using a putty knife or spreader, force the thickened epoxy into each hole, pressing firmly to eliminate air pockets.
- Slightly overfill the hole to allow room for sanding later.
Important:
For very small holes, thickened epoxy alone is sufficient. There is no need for fiberglass cloth reinforcement unless surrounding laminate is damaged.
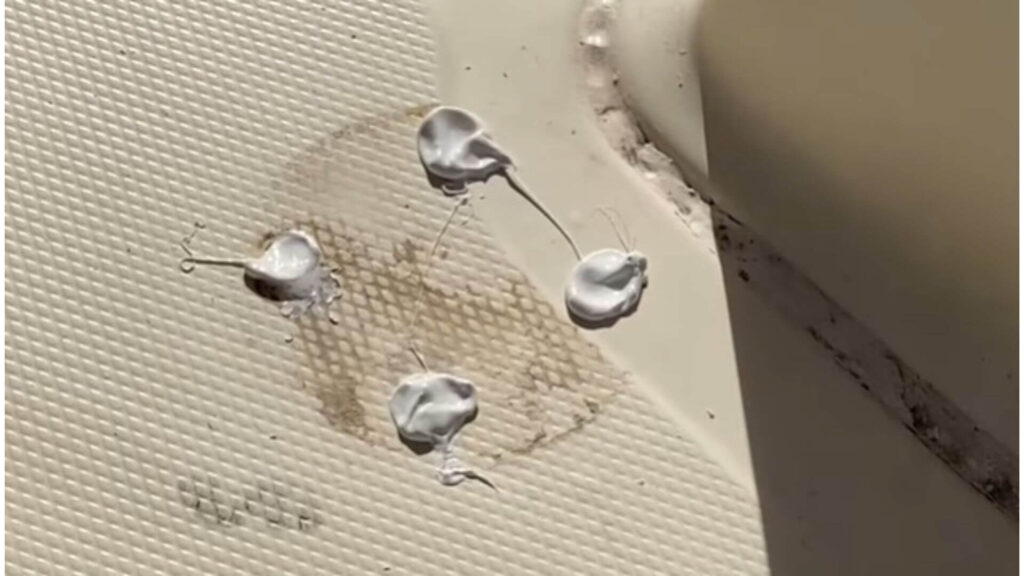
Reshape as needed once applied. Allow this filler layer to fully cure before moving to the next steps.
3. Sanding Smooth
Once the epoxy cures fully (following the manufacturer’s cure times):
- Sand the repaired areas flush with the surrounding surface using 80–120 grit sandpaper.
- Step up to finer grits (220–320) to smooth it even more if you’re planning to refinish the surface.
Thoroughly clean sanded areas afterwards.

This guide helps boat owners understand fiberglass damage clearly — what matters, what doesn’t, and when repairs are truly necessary, so small issues don’t turn into expensive mistakes.
See What Every Boat Owner Should Know →A smooth, seamless finish will help the final gelcoat layer blend naturally.
4. Applying Gelcoat (Optional for Cosmetic Repairs)
If you want to restore the glossy appearance:
- Match the original gelcoat color as closely as possible.
- Apply gelcoat over the sanded patches with a small brush or roller.
- Allow to cure, then sand and polish to blend perfectly.
For working boats or hidden repairs, you can skip this step if appearance isn’t critical.
Sand again after full cure, then buff and polish for a seamless look.
5. Final Polishing and Waxing
After completing all repairs:
- Buff the area with a polishing compound to restore gloss.
- Apply a protective layer of marine wax to guard against UV rays and saltwater damage.
Your fiberglass boat will look as good as new — and better protected than ever.
Filling Screw Holes in a Fiberglass Boat: Your FAQs Answered
I get lots of common questions on the best methods for patching screw holes in fiberglass boat hulls and decks. So let’s review answers to some of the most frequent inquiries:
For small screw holes, I recommend marine-grade polyester filler made for fiberglass repair. Brands like Evercoat or 3M Marine-Tex work well. It sands easily to contour with surrounding areas.
Yes, sealing the interior hole first creates a water barrier to prevent delamination or rotting later on. Use a fiberglass backing resin or thickened epoxy for best results.
For typical small screw holes, applying thickened epoxy resin alone is usually strong enough. Fiberglass cloth is only necessary if the surrounding area is weakened or if the hole has expanded significantly and requires added reinforcement.
While regular Bondo works in theory, it doesn’t adhere as well long-term in the marine environment. Stick to marine epoxy products for permanent reliable repairs.
Matching the existing gelcoat finish will give the most seamless, durable finish. But you can use quality marine enamel paints if unable to match factory colors.
Start very coarse around 80 grit to level filler with the surrounding area. Then work up to 220-400 grit for smoothing and prepping gelcoat application.
Check the manufacturer’s recommended cure times, but usually 24 hours minimum for skim coats and small fill areas. Give 72 hours for thicker rebuilt sections.
Unfilled screw holes allow water to seep into the fiberglass and underlying core material, which can cause rot, delamination, and serious structural damage over time. Properly filling and sealing holes preserves the boat’s strength and prevents costly future repairs.
Let me know in the comment section below if you have any other fiberglass boat repair questions! I’m always happy to help.
You should also read my full guide on fixing any type of hole in a fiberglass boat here.
Final Thoughts
Filling screw holes in a fiberglass boat isn’t just about looks — it’s about preventing serious water damage and preserving your boat’s structural strength.
By cleaning, filling, and sealing screw holes properly, you ensure your boat stays solid, dry, and beautiful for years to come.
Even if you’re new to fiberglass repair, these simple steps let you resolve small imperfections with professional-looking results and long-term confidence.
If you do have any questions, consider leaving them in the comment section below.

Warren is the founder of BoatGenesis and brings practical experience in fiberglass boat repair, marine equipment testing, and powerboat building. He has worked on a range of repair and restoration projects and now focuses on creating clear, research-based guides to help boat owners avoid costly mistakes and make smarter maintenance decisions. Learn more about Warren.