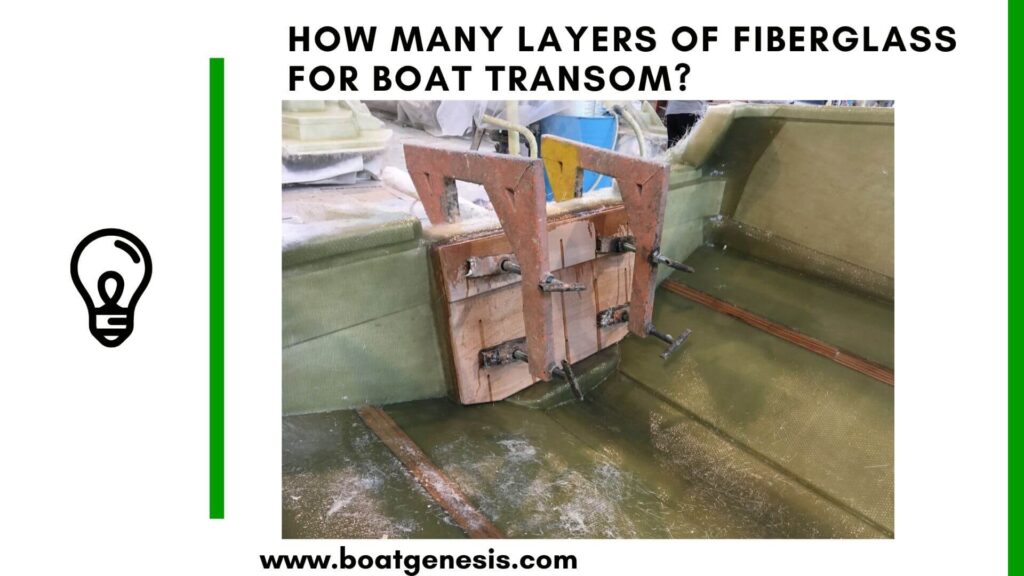
When you’re repairing or replacing a boat transom, one of the most important decisions you’ll make is figuring out how much fiberglass to apply.
Most experts recommend using 3 to 4 layers of fiberglass on a boat transom, alternating between woven roving and lighter fiberglass cloth to build proper strength and waterproofing.
The exact number depends on your boat’s size, the engine weight it needs to support, and whether you’re working on the inner or outer skin.
Your transom supports your entire outboard motor and absorbs constant stress from water impact.
Too few layers leave you with a weak transom that flexes and cracks, while too many layers add unnecessary weight and cost without improving strength.
This guide breaks down how many layers you need for different situations and what materials work best.
You’ll learn the factors that determine layer count and get practical steps you can follow whether you’re doing the work yourself or overseeing a professional repair.
Key Takeaways
- Use 3 to 4 alternating layers of woven roving and fiberglass cloth for most boat transom repairs
- Layer quantity depends on boat size, engine weight, and whether you’re reinforcing inner or outer surfaces
- Proper resin application and curing time between layers prevents delamination and ensures long-term strength
- Key Takeaways
- Typical Layer Counts Based on Boat Type
- Effect of Engine Power on Layer Requirements
- Matching or Improving Original Construction
- Transom Thickness and Beveling
- Choice of Fiberglass Cloth and Weight
- Role of Core Materials in Layering
- Epoxy Resin vs Polyester Resin
- Mixing and Application Techniques
- Assessing and Removing Damaged Materials
- Preparing and Fitting the New Core
- Laminating the Transom with Fiberglass
- Finishing, Fairing, and Reassembly
- Surface Preparation and Cleanliness
- Layering Schedules and Overlaps
- Tabbing and Bonding Techniques
- Common Problems After Transom Repairs
- Waterproofing and Sealing Penetrations
Determining the Number of Fiberglass Layers for a Boat Transom
The number of fiberglass layers you need depends on your boat size, engine weight, and the original construction methods used.
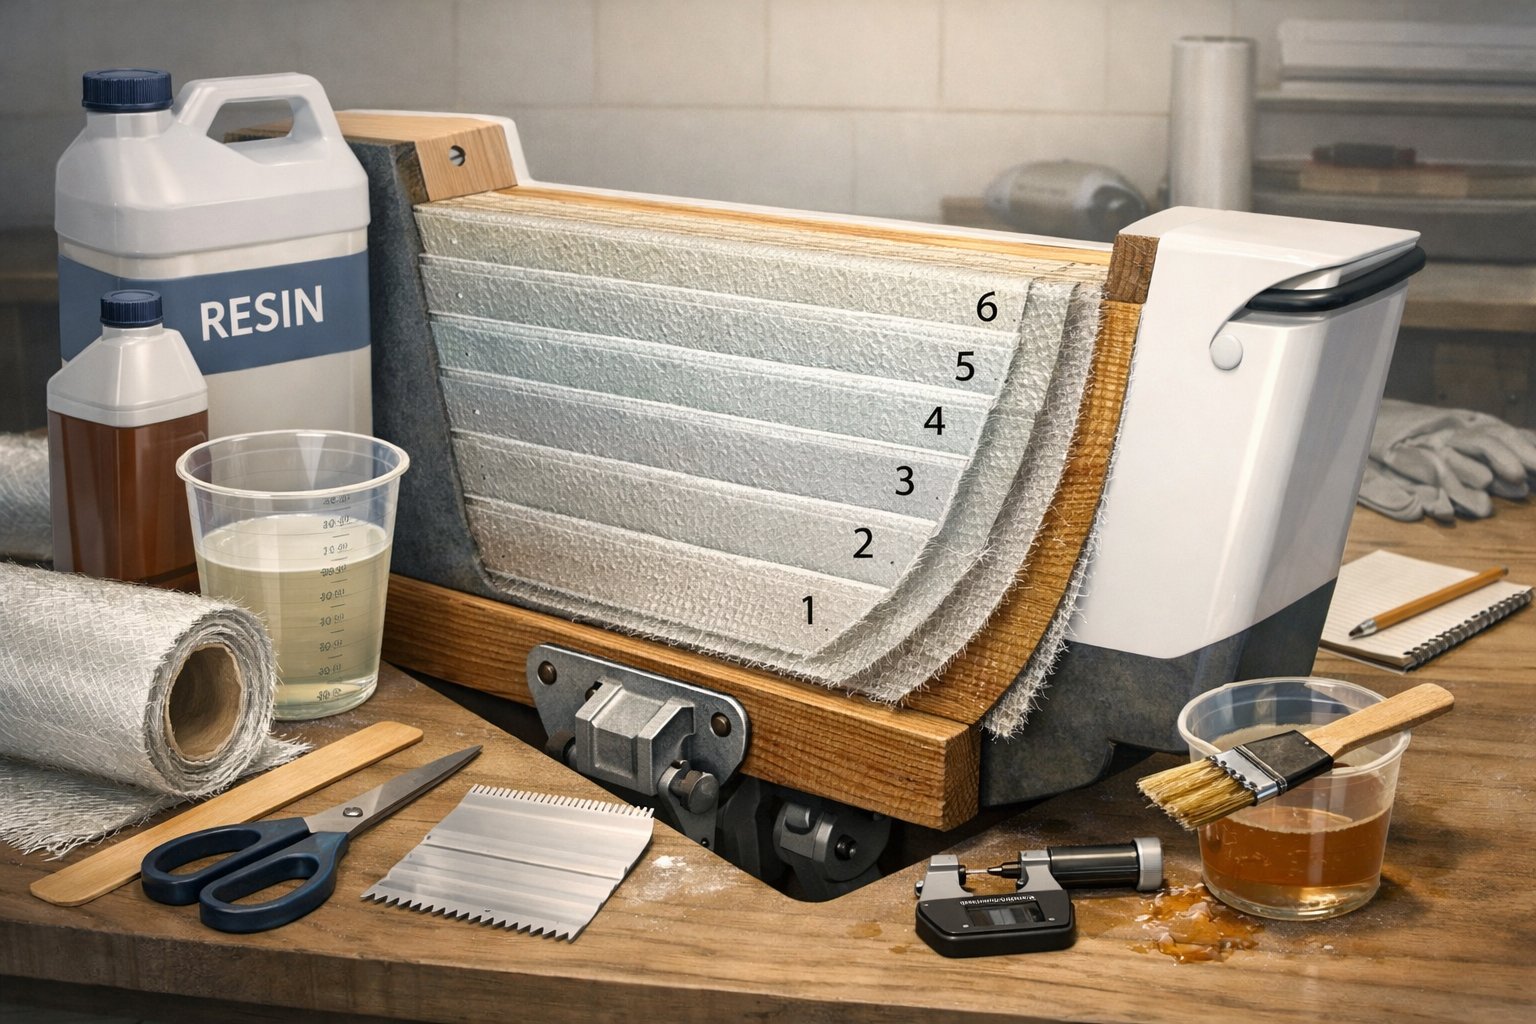
Most boat transoms require between 3 to 6 layers of fiberglass cloth to provide adequate strength and water resistance.
Typical Layer Counts Based on Boat Type
Small boats under 16 feet with portable motors typically need 3-4 layers of fiberglass consisting of alternating sheets of woven roving and lighter fiberglass cloth.
Mid-sized boats from 17 to 24 feet usually require 4-5 layers to handle the increased stress from larger outboard motors.
Larger boats over 25 feet often need 5-6 layers or more.
You should alternate between different types of fiberglass materials for maximum strength.
A common approach uses 1708 biaxial cloth, which combines chopped strand mat with woven fibers in one layer.
Effect of Engine Power on Layer Requirements
Your engine’s weight and horsepower directly impact how many fiberglass layers your transom needs.
Engines under 50 horsepower put less stress on the transom structure and can work with fewer layers.
Motors between 50-150 horsepower require additional reinforcement.
You need to add extra layers around the motor mounting area where the loads concentrate.
Engines over 150 horsepower demand the strongest construction with maximum layer counts and potentially thicker fiberglass materials.
High-performance boats experience even greater forces during acceleration and rough water conditions.
These applications may need specialized layup schedules with additional reinforcement beyond standard recommendations.
Matching or Improving Original Construction
The safest approach is to match whatever you removed during repair.
Measure the original fiberglass thickness before you start your transom replacement work.
You can improve on the original construction if you know it was inadequate.
Add one or two extra layers beyond what came from the factory if your boat showed signs of weakness or flexing.
However, don’t add excessive layers that create unnecessary weight.
Properly wet out each layer with resin before adding the next.
Let each layer gel before applying additional layers to ensure proper bonding between them.
Want to avoid costly fiberglass boat repair mistakes?
Learn how to inspect damage properly, decide when to DIY, and prevent expensive fiberglass problems before they start.
Key Factors Influencing Layer Quantity and Strength
The number of fiberglass layers you apply to your boat transom depends on the thickness of your core material, the weight of cloth you select, and how you prepare the beveled edges.
Understanding the relationship between mechanical stress and layer count helps you build a transom that withstands the forces from your outboard motor.
Transom Thickness and Beveling
Your transom’s thickness directly determines how many fiberglass layers you need to apply.
A typical boat transom uses marine plywood ranging from 3/4 inch to 1.5 inches thick as the core material.
When you cut or repair damaged sections, you must create a proper bevel to restore full strength.
A 12-to-1 bevel ratio provides adequate room for multiple fiberglass layers across the repair area.
This means a 1/8 inch thick fiberglass skin requires a bevel width of at least 1.5 inches.
The bevel creates a gradual transition that allows fiberglass cloth to bond properly without air pockets or weak spots.
You should sand the bevel smooth and clean before applying any layers.
This preparation ensures each layer adheres correctly to build up the necessary strength.
Choice of Fiberglass Cloth and Weight
The type of fiberglass cloth you select affects how many layers your transom needs.
Cloth weights typically range from 6 ounces to 10 ounces per square yard for transom work.
Common cloth types for transoms:
- Woven roving (high tensile strength)
- Biaxial cloth (superior strength-to-weight ratio)
- Chopped strand mat (fills gaps between cloth layers)
Heavier 10-ounce cloth requires fewer layers to achieve the same thickness compared to lighter 6-ounce material.
Turning each fiberglass layer in different directions increases overall strength compared to laying all layers in the same orientation.
You should plan your total layer count before starting so you can alternate the direction of woven cloth properly.
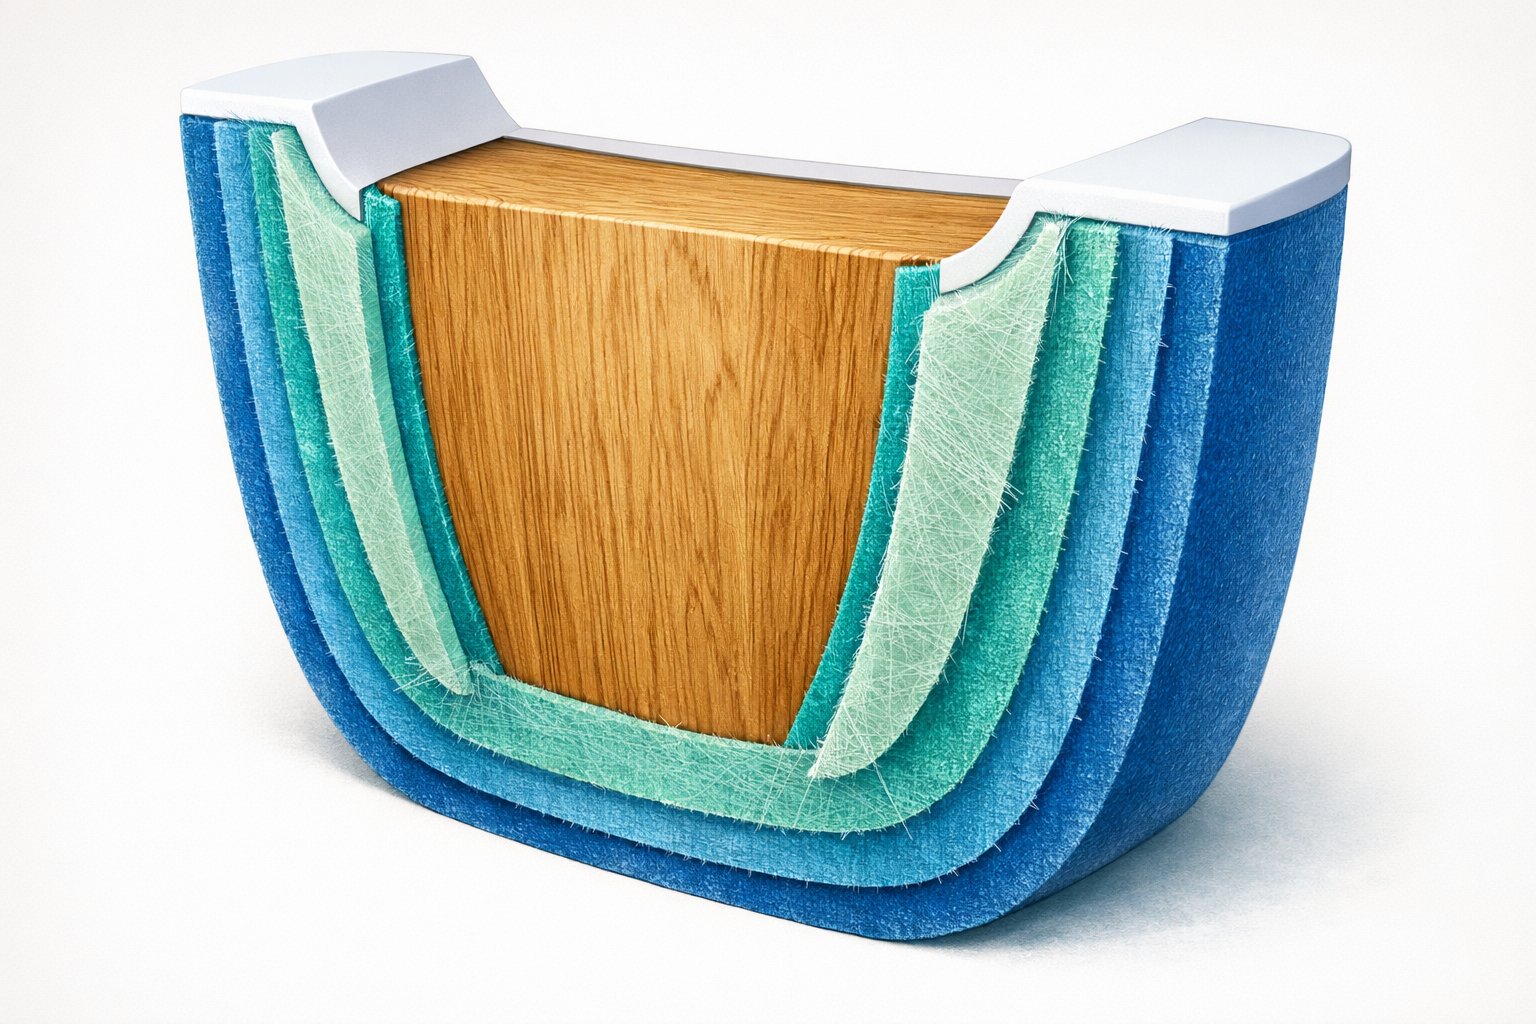
Role of Core Materials in Layering
Marine plywood serves as the standard core material for boat transoms.
The quality and condition of your core directly impacts how many fiberglass layers you must apply to achieve proper strength.
New marine plywood in good condition typically needs a minimum of two to three layers of fiberglass cloth on each side.
Even one thin layer of fiberglass increases strength significantly and eliminates flex in the material.
You should add chopped strand mat between cloth layers to increase surface contact and help hold the cloth in place.
Damaged or rotted core material requires complete replacement before you apply any fiberglass layers.
Modern alternatives like Coosa board offer rot-proof options that still need proper fiberglass encapsulation.
Your core material’s density and thickness determine the minimum number of protective layers needed to seal and strengthen the transom assembly.
Resin Selection for Transom Lamination
The resin you choose affects both the strength of your transom and how long it lasts.
Epoxy offers superior bonding and moisture resistance, while polyester provides a more budget-friendly option with faster cure times.
Epoxy Resin vs Polyester Resin
Epoxy resin creates stronger bonds with wood and fiberglass compared to polyester.
It resists water penetration better, which protects your transom from rot and delamination over time.
Many boat builders prefer epoxy because it doesn’t shrink as much when it cures.
Polyester resin costs less and cures faster than epoxy.
It works fine for basic repairs and boats that stay in freshwater.
However, polyester bonds weaker to wood and allows more moisture through.
This can cause problems in transoms that support heavy outboard motors.
Vinylester resins provide better water resistance than polyester while remaining affordable.
They offer a middle ground between polyester and epoxy for marine applications.
Thickened epoxy works well for filling gaps and creating fillets around transom edges.
You add filler materials to regular epoxy to make it thicker and easier to apply on vertical surfaces.
Mixing and Application Techniques
Mix your resin and hardener in exact ratios according to the manufacturer’s instructions.
Wrong ratios prevent proper curing and weaken your lamination.

This guide helps boat owners understand fiberglass damage clearly — what matters, what doesn’t, and when repairs are truly necessary, so small issues don’t turn into expensive mistakes.
See What Every Boat Owner Should Know →Use separate measuring containers for resin and hardener to avoid contamination.
Apply resin at temperatures between 60°F and 80°F for best results.
Cold temperatures slow curing while heat speeds it up too fast.
Work in sections small enough to saturate the fiberglass before the resin starts to gel.
Use a brush or roller to work out air bubbles from each layer.
Trapped air creates weak spots in your laminate.
Wet layup methods typically achieve a 50:50 fiber-to-resin ratio by weight, which provides good strength without excess weight.
Step-by-Step Process for Transom Replacement
Transom replacement requires careful removal of damaged materials, precise fitting of a new core, proper fiberglass lamination, and thorough finishing.
Each phase builds on the previous one to restore your boat’s structural integrity and ensure long-term performance.
Assessing and Removing Damaged Materials
Before starting any transom replacement, you need to check for signs of damage like soft spots, stress cracks around mounting bolts, or hollow sounds when tapping the surface.
Remove your outboard motor and all hardware attached to the transom first.
This includes trim tabs, ladders, and drain fittings.
Use a grinder or jigsaw to cut through the fiberglass skin and expose the damaged core.
Work carefully to avoid cutting into surrounding boat structure that you’ll need intact.
Wear proper safety gear since fiberglass dust irritates skin and lungs.
Remove all the old core material with a chisel, hammer, or saw.
This step takes patience, especially if strong adhesive was used originally.
Clean out every bit of rotted or damaged material from the cavity.
Sand the raw edges smooth and remove any debris with a shop vacuum before moving forward.
Preparing and Fitting the New Core
Measure the transom cavity carefully and use the old core as a template if it’s still intact.
Marine plywood works well for most transom repair projects, though composite materials offer better water resistance.
Cut your new core slightly smaller than the opening so it fits without forcing.
Many builders use multiple layers of half-inch marine plywood rather than a single thick piece.
This approach lets you add fiberglass between each layer for extra strength.
Check your fit multiple times before bonding anything in place.
Apply resin to the cavity surfaces and position the new core.
Use stainless steel screws or bolts with clamps to hold everything tight while the adhesive cures.
Follow the manufacturer’s curing time recommendations.
Clean all surfaces with acetone before the next step to ensure proper bonding.
Laminating the Transom with Fiberglass
Cut all your fiberglass cloth or mat to size before mixing any resin. Tape over bolt holes and other openings to keep resin from dripping through.
Coat the marine plywood or composite core with resin first. These materials absorb resin and can leave dry spots in your fiberglass layers.
Start with smaller pieces of fiberglass and work up to larger sheets. Most transoms need at least three to four layers of fiberglass cloth on each side for adequate strength.
Apply resin to each layer and let it gel before adding the next one.
Roll out air bubbles and ensure each layer bonds smoothly to the previous one. This process strengthens the transom and protects against future water intrusion.
Building up multiple layers creates the thickness and rigidity needed to support your engine’s weight and stress.
Finishing, Fairing, and Reassembly
Once your fiberglass fully cures, sand any rough spots or high areas to create a smooth surface. Apply unwaxed gelcoat for initial layers since it cures tacky and allows additional coats without sanding between applications.
Use waxed gelcoat only for your final layer to get a tack-free finish. Fair the transom to match the surrounding hull contours.
This might require additional filler or gelcoat in low spots. Sand progressively finer until you achieve the desired smoothness.
Drill new mounting holes for your hardware using the original locations as guides. Reinstall all trim tabs, ladders, and drain fittings with proper sealant.
Mount your outboard motor last, making sure all bolts are torqued to specifications. Inspect all fasteners and seals before launching your boat.
Best Practices for Applying Fiberglass Layers
Proper application techniques make the difference between a strong, lasting transom repair and one that fails prematurely. Clean surfaces, strategic layer placement, and correct bonding methods create the structural integrity your boat transom needs.
Surface Preparation and Cleanliness
You must start with a completely clean, dry surface before applying any fiberglass layers. Remove all paint, gelcoat, and old fiberglass down to bare wood or existing solid laminate using a grinder or sander.
Sand the surface with 80-grit sandpaper to create a rough texture that helps the resin bond properly. Remove all dust with a vacuum and wipe the area with acetone on a clean rag.
Critical preparation steps:
- Remove any moisture from wood cores by allowing them to dry completely
- Check for soft spots or rot that need removal
- Clean your hands and tools before touching fiberglass cloth
- Work in temperatures between 60-80°F for best resin curing
Any contamination from oils, dirt, or moisture will prevent proper adhesion between layers. Contamination creates weak points that can lead to delamination.
Layering Schedules and Overlaps
Stagger your fiberglass layers rather than cutting all pieces the same size and stacking them directly on top of each other.
Cut each successive layer 1-2 inches wider than the previous one to create gradual transitions. Start with your smallest piece and work up to larger pieces.
This approach covers the seams from previous layers and eliminates hard points where the laminate could crack.
Proper overlap technique:
- Overlap each layer by at least 2 inches at seams
- Avoid having seams line up between layers
- Roll out air bubbles with a grooved roller
- Apply resin evenly to saturate all fibers
Plan your timing between fiberglass layers based on the resin cure stage. Apply the next layer while the previous one is still tacky for the best chemical bond.
Tabbing and Bonding Techniques
Bond your transom to the hull using tabbing strips cut at 45-degree angles to the grain direction. Create a radius or fillet with thickened epoxy in all inside corners before applying fiberglass cloth.
Mix colloidal silica or milled fibers into your resin to create thickened epoxy for filleting. Apply this mixture to form a smooth curve about the size of your finger’s radius in each corner.
Press fiberglass strips into the wet fillet and saturate them completely with resin. Use multiple layers of heavy fabric like 1708 biaxial for maximum strength at these critical connection points.
Work from the center outward when applying resin to push air bubbles toward the edges. A grooved roller consolidates the layers and removes trapped air that weakens the laminate.
Long-Term Structural Integrity and Maintenance
Even well-executed transom repairs need ongoing attention to prevent water intrusion and structural degradation. The two biggest threats to your repaired transom are moisture penetration through hardware holes and delamination from improper sealing techniques.
Common Problems After Transom Repairs
Delamination happens when the fiberglass layers separate from the core material. This occurs when moisture gets trapped between layers or when the initial bond wasn’t strong enough.
You’ll notice soft spots or hollow sounds when tapping the transom. Flexing at mounting points signals that your fiberglass boat transom doesn’t have enough layers for the engine weight.
Most repairs need 4-6 layers of fiberglass cloth to match factory strength. Too few layers create stress points around bolt holes.
Core rot can return if water finds a way into the transom through unsealed hardware penetrations. Brown water leaking from bolt holes means moisture has reached the core.
Use a moisture meter annually to check readings around all hardware. Gelcoat crazing appears as spider-web cracks in the finish.
This happens when the surface layer flexes too much or wasn’t applied at the right thickness. These cracks let water reach the fiberglass layers underneath.
Waterproofing and Sealing Penetrations
Every bolt hole in your transom is a potential leak point. Remove old sealant completely before reinstalling hardware.
Apply marine sealant like 3M 5200 to both sides of each through-hole and on bolt threads. Tighten hardware slowly to allow sealant to squeeze out evenly.
Wipe excess immediately but leave a visible bead around each fitting. Inspect sealant annually for cracks or gaps.
UV exposure and engine vibration break down even the best marine sealants over time. Re-bed any hardware showing gaps or discoloration.
Check drain holes regularly to prevent water buildup inside the transom cavity.

Warren is the founder of BoatGenesis and brings practical experience in fiberglass boat repair, marine equipment testing, and powerboat building. He has worked on a range of repair and restoration projects and now focuses on creating clear, research-based guides to help boat owners avoid costly mistakes and make smarter maintenance decisions. Learn more about Warren.