A small crack in your fiberglass fuel tank might not look like a big deal at first. But out on the water, even a minor leak can ground your whole season — or worse, create a serious safety hazard. The good news? Fiberglass fuel tank repair is something most boat owners can tackle themselves, as long as they catch the problem early and use the right materials.
This guide walks you through everything: spotting trouble early, choosing the right repair method, knowing when to call in a pro, and keeping your tank in solid shape for years ahead. No fluff — just practical advice from someone who’s seen what a neglected tank can do to an otherwise great boat.
Quick note on safety: Always drain your fuel tank completely and work in a well-ventilated area before starting any repair. Fuel vapors are invisible and extremely flammable. When in doubt, let a certified marine technician handle it.
- How to Spot a Fuel Tank Problem Before It Gets Expensive
- Fiberglass Fuel Tank Repair: The Right Fix for the Right Problem
- DIY vs. Professional Repair: Which Route Should You Take?
- What You'll Actually Need: Tools and Materials for the Job
- The Ethanol Problem: Why Modern Fuel Damages Fiberglass Tanks Faster
- When Repair Isn't Enough: Signs Your Tank Needs Replacing
- Key Takeaways
- Frequently Asked Questions
- 1. Can I repair a fiberglass fuel tank myself?
- 2. How long does a fiberglass fuel tank repair last?
- 3. What's the best epoxy for fiberglass fuel tank repair?
- 4. How do I know if my fuel tank needs replacing instead of repairing?
- 5. Is it safe to use a repaired fiberglass fuel tank?
- 6. How often should I inspect my fiberglass fuel tank?
- 7. Does ethanol in fuel really damage fiberglass tanks?
- Final Thoughts
How to Spot a Fuel Tank Problem Before It Gets Expensive
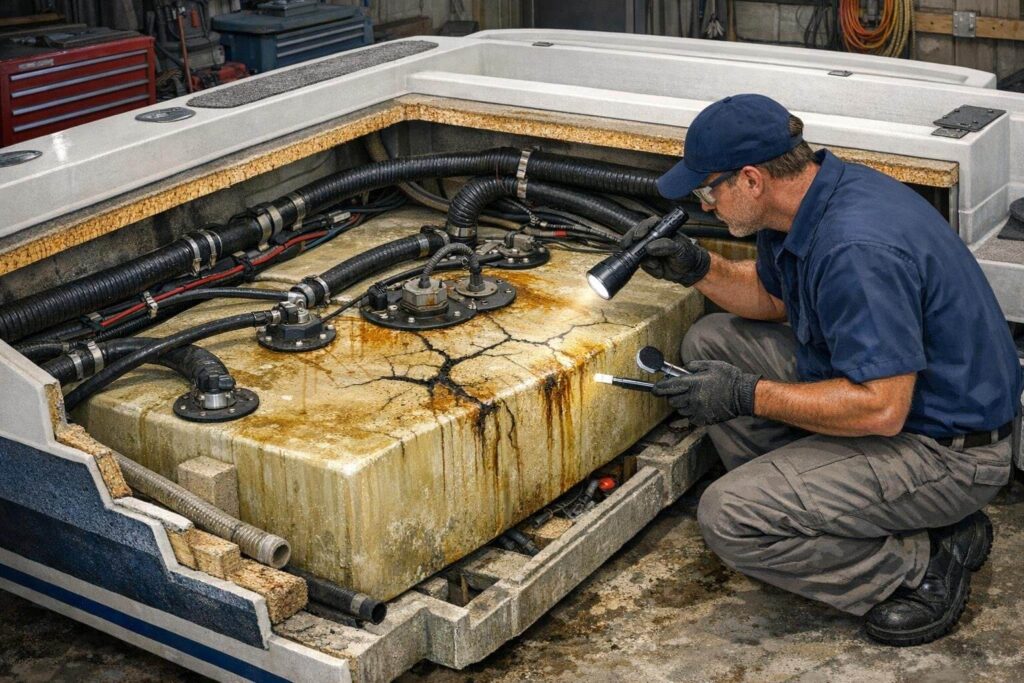
Most fiberglass fuel tanks don’t fail overnight. They degrade gradually — from years of fuel exposure, UV rays, saltwater, and the constant vibration of the engine. Catching the early signs makes all the difference between a simple patch job and a full replacement.
Here’s what to look for during your routine inspections:
Hairline cracks along seams: Corners and joints are stress points. Run your hand along seams and shine a flashlight at an angle to catch thin cracks you’d otherwise miss.
Fuel smell without a visible spill: If you smell fuel but can’t find the source, check around fittings, hose connections, and the underside of the tank. Vapors travel.
Blistering on the surface: Bubbles or raised spots in the gelcoat often mean moisture has gotten inside. Don’t ignore these — they grow over time.
Discoloration or staining: Dark spots or fuel staining around fittings and seams usually signals a slow leak that’s been going on longer than you think.
Want to avoid costly fiberglass boat repair mistakes?
Learn how to inspect damage properly, decide when to DIY, and prevent expensive fiberglass problems before they start.
Make a habit of inspecting your tank at the start and end of each season — and any time you notice unusual fuel consumption or a persistent fuel odor onboard.
Fiberglass Fuel Tank Repair: The Right Fix for the Right Problem
Not every issue calls for the same solution. Here’s a breakdown of the most common fiberglass fuel tank repairs, from simplest to most involved.
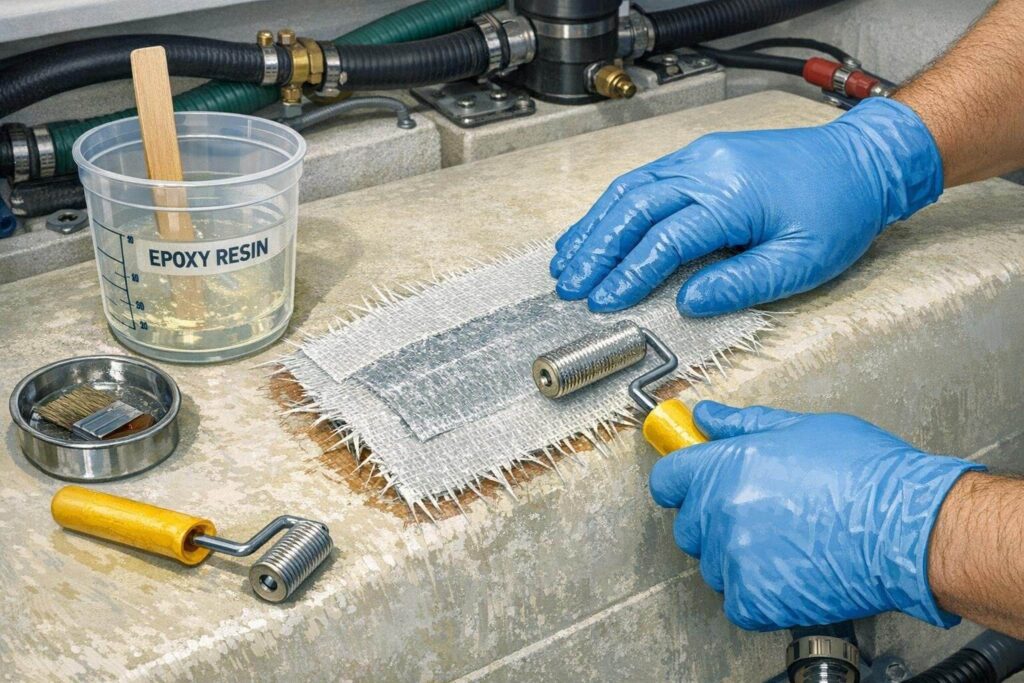
1. Sealing Cracks and Small Holes
Clean and sand the damaged area to give the epoxy something to grip. Apply thinned marine-grade epoxy resin in multiple thin coats, letting each cure fully.
Once the crack is filled, layer fiberglass cloth on top with more resin for reinforcement. Sand flush when fully cured.
2. Repairing Blisters and Delamination
Inject epoxy resin into the blister void to fill it, then sand the surface flat. Build the area back up with layers of fiberglass cloth and resin, matching the original thickness.
Finish by sanding smooth and flush with the surrounding surface.
3. Fixing Surface Scratches
For scratches that don’t go deep into the laminate, sand the area to create a clean taper into the gelcoat.
Apply color-matched marine paint in thin coats, allowing full cure between each. Wet sand and buff the final coat for a seamless finish.
4. Replacing Fittings and Fuel Lines
Drain the tank completely, then remove old corroded fittings and cracked hoses. Sand the fitting areas clean, install new marine-grade stainless fittings with epoxy seals, and replace fuel lines with marine-rated hose. This one’s worth doing proactively — don’t wait for a fitting to fail on the water.
Pro tip: Always use marine-grade epoxy products formulated for fuel contact — standard automotive or construction epoxies won’t hold up against gasoline or ethanol blends over time.
DIY vs. Professional Repair: Which Route Should You Take?

Knowing your limits saves money and prevents a small fix from turning into a bigger problem. Use this table to figure out the right approach for your situation.
| Issue Type | Severity | Best Approach | Estimated Difficulty |
|---|---|---|---|
| Surface scratch or gelcoat chip | Minor | DIY | Easy |
| Small hairline crack (<2 inches) | Minor | DIY | Easy–Moderate |
| Single blister or small delamination | Moderate | DIY | Moderate |
| Leaky fitting or cracked fuel line | Moderate | DIY | Moderate |
| Crack longer than 3–4 inches | Significant | Professional | Complex |
| Widespread blistering (>30% of surface) | Severe | Replace | Beyond repair |
| Major structural damage or warping | Severe | Replace | Beyond repair |
| Severe corrosion across large sections | Severe | Replace | Beyond repair |
What You’ll Actually Need: Tools and Materials for the Job
Walking into a marine supply store without a shopping list is a recipe for overspending or buying the wrong thing. Here’s exactly what you need for a solid fiberglass fuel tank repair job.

This guide helps boat owners understand fiberglass damage clearly — what matters, what doesn’t, and when repairs are truly necessary, so small issues don’t turn into expensive mistakes.
See What Every Boat Owner Should Know →| Item | Why You Need It | Notes |
|---|---|---|
| Marine-grade epoxy resin | Core repair material | Must be rated for fuel contact. West System and TotalBoat are reliable brands. |
| Fiberglass cloth or mat | Structural reinforcement | 6 oz. woven cloth for most tank repairs. Use mat for building thickness. |
| Epoxy thinner/reducer | Helps resin penetrate cracks | Use sparingly — too much weakens the cure. |
| 80, 120, 220-grit sandpaper | Surface prep and finishing | Work up through grits for a smooth final surface. |
| Acetone or degreaser | Cleaning before repair | Clean surface must be completely dry before applying resin. |
| Mixing cups and stir sticks | Proper epoxy mixing | Wrong ratios ruin the cure. Use graduated cups. |
| Gloves, goggles, respirator | Personal protection | Non-negotiable. Epoxy fumes are harmful in enclosed spaces. |
| Color-matched gelcoat paint | Surface finish | Only needed for cosmetic repairs above the waterline. |
The Ethanol Problem: Why Modern Fuel Damages Fiberglass Tanks Faster
Here’s something many boat owners don’t realize until it’s too late: the fuel at most gas stations today contains ethanol — usually E10 (10% ethanol). And ethanol is not kind to older fiberglass fuel tanks.
Unlike pure gasoline, ethanol absorbs water. Over time, this water-contaminated fuel attacks the resin in fiberglass tanks from the inside out — a process called osmotic degradation. It softens the laminate, causes blistering from within, and breaks down the gelcoat barrier that keeps everything sealed.
If your tank was built before the mid-2000s, it may not have been designed with ethanol resistance in mind. Signs of ethanol damage include interior blistering, a milky or cloudy fuel appearance, and a spongy feeling when you press on the tank wall.
What to do: When replacing or repairing your tank, ask for ethanol-resistant marine epoxy and fuel-rated gelcoat. If you’re replacing the whole tank, choose one specifically rated for ethanol blends (E10 or higher). Using ethanol-free marine fuel — available at many marinas — is also a smart preventative step.
When Repair Isn’t Enough: Signs Your Tank Needs Replacing
As much as we’d all like to patch and carry on, some fiberglass fuel tank damage is beyond saving. Here’s when a full replacement is the smarter — and safer — move.
A replacement makes sense when you’re dealing with cracks or holes too large to seal properly, severe corrosion across a significant portion of the tank, warping or deformation that affects fuel system function, or blistering covering more than 30% of the tank surface.
Tank replacement is a job for experienced marine technicians. It involves inerting the old tank before removal to eliminate explosive vapors, safely extracting the tank without damaging surrounding structures, and installing a new tank that matches the exact capacity and dimensions of the original.
The new tank also needs to align with existing fill, vent, and hose connections — and it must be specifically rated for marine use and ethanol gasoline.
Don’t cut corners here. An improperly removed or installed fuel tank is a genuine fire risk. The cost of professional installation is worth every penny compared to the alternative.
Useful External Resources
- BoatUS: Marine Fuel Tank Basics Comprehensive guidance on marine fuel systems, tank materials, and maintenance from one of the most trusted names in recreational boating.
- Epoxy Works (WEST SYSTEM): Fiberglass Boat Repair In-depth technical articles on fiberglass repair techniques, epoxy application, and marine-grade product selection from the makers of industry-standard marine epoxy.
Key Takeaways
- Catch problems early — small cracks and blisters are easy to fix; widespread damage often isn’t.
- Always use marine-grade epoxy formulated for fuel contact. Regular epoxy won’t hold up.
- Small cracks, surface blisters, and leaky fittings are realistic DIY repairs for most boat owners.
- Structural damage, large cracks, or severe corrosion require professional assessment — don’t guess.
- Ethanol fuel damages older fiberglass tanks from the inside. Use ethanol-resistant materials when repairing or replacing.
- If blistering covers more than 30% of the tank, replacement is usually more cost-effective than repair.
- Inspect your tank at the start and end of every season — not just when something seems wrong.
- Tank replacement should always be handled by a certified marine technician for safety reasons.
Frequently Asked Questions
These are the questions that come up most often — answered straight, no jargon.
1. Can I repair a fiberglass fuel tank myself?
Yes, for minor issues. Small cracks, single blisters, and leaky fittings are all reasonable DIY repairs if you use the right materials and follow the steps carefully. Anything involving significant structural damage or severe deterioration should be handled by a professional.
2. How long does a fiberglass fuel tank repair last?
A well-done repair using marine-grade epoxy can last many years — sometimes the life of the tank. The key is proper surface prep, allowing full curing between layers, and using products rated for marine fuel environments. Rushing the job is the main reason repairs fail early.
3. What’s the best epoxy for fiberglass fuel tank repair?
Look for marine-grade epoxy specifically rated for fuel contact. WEST SYSTEM and TotalBoat both make reliable products. Avoid general-purpose hardware-store epoxies — they’re not designed to withstand prolonged exposure to gasoline and will break down over time.
4. How do I know if my fuel tank needs replacing instead of repairing?
If the damage covers more than 30% of the tank surface, if there’s major structural deformation, or if you’re dealing with cracks too large to properly seal, replacement is the right call. A marine technician can assess the tank and give you an honest answer — sometimes a second opinion is worth it before spending money on repairs that won’t hold.
5. Is it safe to use a repaired fiberglass fuel tank?
Yes, when the repair is done correctly. The repair needs to be fully cured, structurally sound, and pressure-tested before you put fuel back in. If you have any doubt about the quality of the repair — especially on a larger crack — have a professional inspect it before heading out on the water.
6. How often should I inspect my fiberglass fuel tank?
At a minimum, inspect at the start and end of each season. Also, do a quick check any time you notice a fuel smell, unexpected fuel consumption, or after any impact to the hull. The earlier you spot an issue, the simpler and cheaper the fix.
7. Does ethanol in fuel really damage fiberglass tanks?
It can, especially in older tanks not built to resist ethanol. E10 fuel (10% ethanol) absorbs water, and that moisture attacks the fiberglass laminate over time. This is why you’ll often see more blistering on boats that sit with fuel in the tank for extended periods. Using ethanol-free marine fuel or ethanol treatment additives helps slow this process.
Final Thoughts
A fiberglass fuel tank repair doesn’t have to be a stressful event. Most problems start small and give you plenty of warning — if you’re paying attention. Build a habit of inspecting your tank each season, use the right marine-grade materials when issues arise, and know your limits.
The boats that stay on the water longest aren’t always the newest ones. They’re the ones with owners who catch small problems before they become big ones. Stay on top of your fuel system, and it’ll take care of you out on the water.
Got questions about your specific situation? Drop a comment below — happy to help you work through it.

Warren is the founder of BoatGenesis and brings practical experience in fiberglass boat repair, marine equipment testing, and powerboat building. He has worked on a range of repair and restoration projects and now focuses on creating clear, research-based guides to help boat owners avoid costly mistakes and make smarter maintenance decisions. Learn more about Warren.